Deze tutorial biedt alle stappen die nodig zijn om MySQL 8 op Ubuntu 18.04 LTS te installeren. Dezelfde stappen kunnen worden gevolgd voor andere versies van Ubuntu.
Opmerkingen :Om dit bericht te volgen, moet u de vorige installatie van de MySQL-server die is geïnstalleerd met behulp van het installatieprogramma volledig verwijderen als deze al op het systeem is geïnstalleerd. U kunt MySQL volledig verwijderen van Ubuntu volgen om de vorige installatie volledig te verwijderen die met het installatieprogramma is gedaan.
Mogelijk bent u ook geïnteresseerd in andere MySQL-specifieke tutorials, waaronder MySQL 8 installeren op
Stap 1 - MySQL APT-repository downloaden
Sinds MySQL 8 is niet opgenomen in de officiële repositories van Ubuntu 18.04 , we moeten downloaden zijn Debian-pakket . De huidige officieel beschikbare versie van MySQL op Ubuntu 18.04 is 5.7.26 . Gebruik de onderstaande opdracht om de meest recente APT-repository te downloaden.
# Download MySQL APT Repository
wget –c https://dev.mysql.com/get/mysql-apt-config_0.8.13-1_all.deb
Het zal het officiële Debian-pakket downloaden om MySQL 8 te installeren.
Stap 2 - MySQL-repository installeren
Gebruik de onderstaande opdracht om de MySQL-repository te installeren met behulp van de repository die we in de vorige stap hebben gedownload.
sudo dpkg -i mysql-apt-config_0.8.13-1_all.deb
Het zal vragen om een keuze te maken uit de beschikbare opties zoals getoond in Fig. 1. Houd de standaardoptie geselecteerd en druk op de Enter-toets om de installatie te starten.

Afb. 1
Op het volgende scherm zal het installatieprogramma vragen om de MySQL-versie te kiezen die moet worden geïnstalleerd, zoals weergegeven in Afb. 2. Bewaar mysql-8 geselecteerd en druk op de Enter-toets.
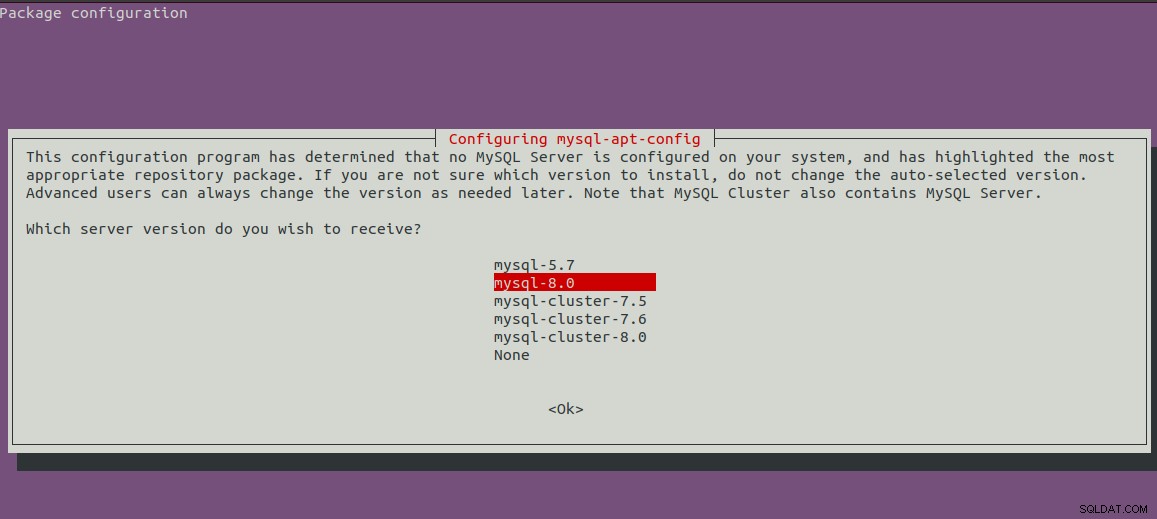
Afb. 2
Het toont het eerste scherm met de geselecteerde versie van MySQL. Druk nu op de pijl-omlaag en de volgende pijl-toets om naar de OK-opties te gaan, zoals weergegeven in Afb. 3.
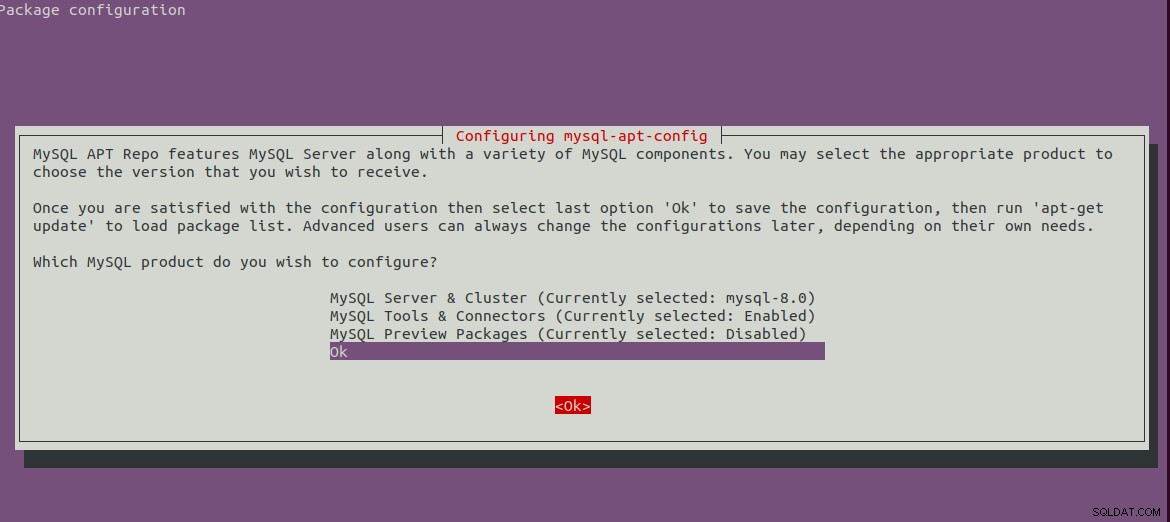
Afb. 3
Druk op de Enter-toets om de installatie te starten. Het zal onderstaande berichten tonen na het voltooien van de installatie.
bravo@pc1:/setups/database$ sudo dpkg -i mysql-apt-config_0.8.13-1_all.deb
Selecting previously unselected package mysql-apt-config.
(Reading database ... 200223 files and directories currently installed.)
Preparing to unpack mysql-apt-config_0.8.13-1_all.deb ...
Unpacking mysql-apt-config (0.8.13-1) ...
Setting up mysql-apt-config (0.8.13-1) ...
Warning: apt-key should not be used in scripts (called from postinst maintainerscript of the package mysql-apt-config)
Stap 3 - Systeembronnen vernieuwen
Ververs nu de systeemrepository's met behulp van de onderstaande opdracht.
sudo apt-get update

# It must show MySQL 8 repos
bravo@pc1:/setups/database$ sudo apt-get update
Hit:1 http://repo.mysql.com/apt/ubuntu bionic InRelease
Hit:2 http://in.archive.ubuntu.com/ubuntu bionic InRelease
Hit:3 http://in.archive.ubuntu.com/ubuntu bionic-updates InRelease
Hit:4 http://in.archive.ubuntu.com/ubuntu bionic-backports InRelease
Hit:5 http://security.ubuntu.com/ubuntu bionic-security InRelease
Get:6 http://repo.mysql.com/apt/ubuntu bionic/mysql-8.0 Sources [962 B]
Get:7 http://repo.mysql.com/apt/ubuntu bionic/mysql-8.0 i386 Packages [7,472 B]
Get:8 http://repo.mysql.com/apt/ubuntu bionic/mysql-8.0 amd64 Packages [7,463 B]
Fetched 15.9 kB in 3s (5,556 B/s)
Reading package lists... Done
Het zal de systeemcache verversen om updates te krijgen over de meest recente versies van de beschikbare pakketten.
Stap 4 - MySQL-server installeren
Na het bijwerken van de systeemcache kunnen we beginnen met het installeren van de MySQL-server en -client met behulp van de onderstaande opdracht.
# Install MySQL Server 8
sudo apt-get install mysql-server mysql-client
Druk op Y om te bevestigen en verder te gaan met de installatie. Hiermee wordt MySQL geïnstalleerd zoals we doen met het standaardpakket dat beschikbaar is op Ubuntu-repositories. De installatie zal ook vragen om
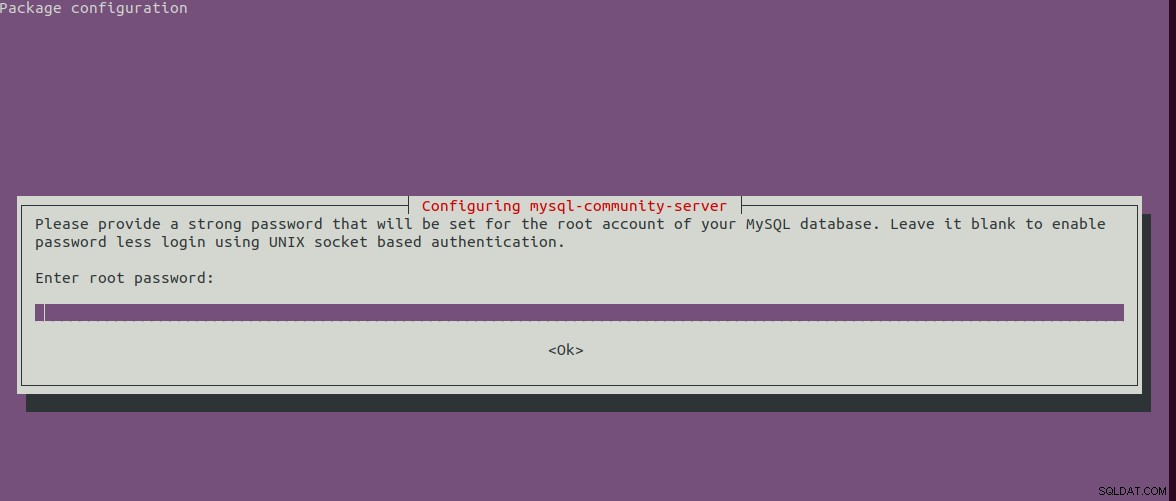
Afb. 4
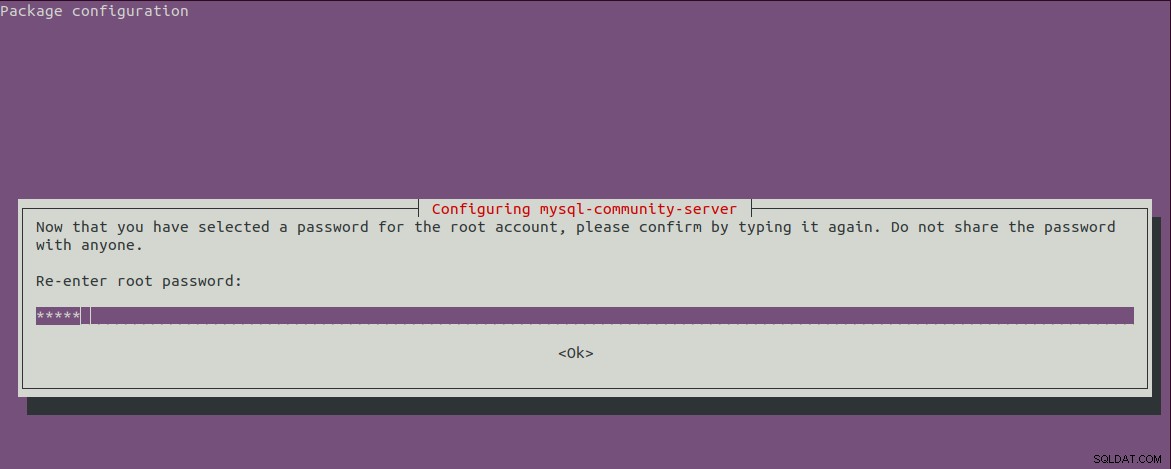
Afb. 5
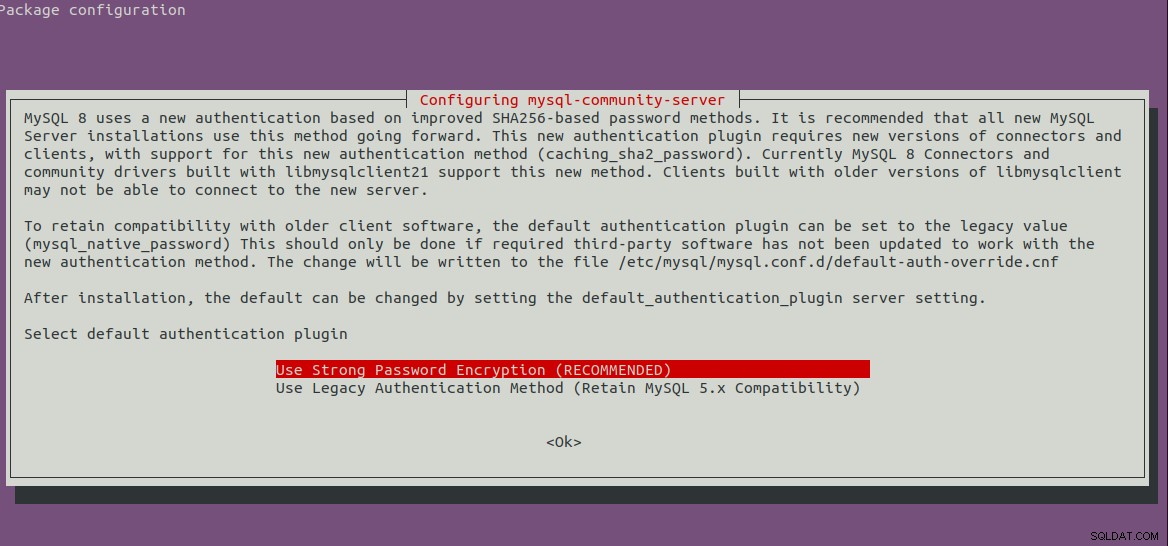
Afb. 6
Stap 5 - Veilige MySQL-installatie
We moeten de installatie ook beveiligen met het commando zoals hieronder vermeld.
sudo mysql_secure_installation
Het zal vragen om het root-wachtwoord in te stellen en een paar beveiligingsvragen. De volledige stappen die door mij worden gevolgd, zijn zoals hieronder weergegeven.
bravo@pc1:/setups/database$ sudo mysql_secure_installation

Securing the MySQL server deployment.

Enter password for user root:

VALIDATE PASSWORD COMPONENT can be used to test passwords
and improve security. It checks the strength of password
and allows the users to set only those passwords which are
secure enough. Would you like to setup VALIDATE PASSWORD component?

Press y|Y for Yes, any other key for No: y

There are three levels of password validation policy:

LOW    Length >= 8
MEDIUM Length >= 8, numeric, mixed case, and special characters
STRONG Length >= 8, numeric, mixed case, special characters and dictionary                  file

Please enter 0 = LOW, 1 = MEDIUM and 2 = STRONG: 1
Using existing password for root.

Estimated strength of the password: 25
Change the password for root ? ((Press y|Y for Yes, any other key for No) : n

 ... skipping.
By default, a MySQL installation has an anonymous user,
allowing anyone to log into MySQL without having to have
a user account created for them. This is intended only for
testing, and to make the installation go a bit smoother.
You should remove them before moving into a production
environment.

Remove anonymous users? (Press y|Y for Yes, any other key for No) : y
Success.


Normally, root should only be allowed to connect from
'localhost'. This ensures that someone cannot guess at
the root password from the network.

Disallow root login remotely? (Press y|Y for Yes, any other key for No) : y
Success.

By default, MySQL comes with a database named 'test' that
anyone can access. This is also intended only for testing,
and should be removed before moving into a production
environment.


Remove test database and access to it? (Press y|Y for Yes, any other key for No) : y
 - Dropping test database...
Success.

 - Removing privileges on test database...
Success.

Reloading the privilege tables will ensure that all changes
made so far will take effect immediately.

Reload privilege tables now? (Press y|Y for Yes, any other key for No) : y
Success.

All done!
bravo@pc1:/setups/database$
De bovenstaande stappen verwijderen de testdatabase en anonieme gebruikers. Het verbiedt ook inloggen op afstand om ervoor te zorgen dat de server lokaal toegankelijk is, hetzij met behulp van 127.0.0.1 of lokale host .
Gebruik de onderstaande opdracht om te controleren of de MySQL-server actief is.
bravo@pc1:/setups/database$ systemctl status mysql
● mysql.service - MySQL Community Server
   Loaded: loaded (/lib/systemd/system/mysql.service; enabled; vendor preset: enabled)
   Active: active (running) since Thu 2019-08-15 10:40:47 IST; 4min 45s ago
     Docs: man:mysqld(8)
           http://dev.mysql.com/doc/refman/en/using-systemd.html
  Process: 28669 ExecStartPre=/usr/share/mysql-8.0/mysql-systemd-start pre (code=exited, status=0/SUCCESS)
 Main PID: 28708 (mysqld)
   Status: "Server is operational"
    Tasks: 38 (limit: 4915)
   CGroup: /system.slice/mysql.service
           └─28708 /usr/sbin/mysqld

Aug 15 10:40:45 bravo systemd[1]: Starting MySQL Community Server...
Aug 15 10:40:47 bravo systemd[1]: Started MySQL Community Server.
Stap 6 - Controleer versie en toegang
Controleer de versie van de door ons geïnstalleerde server en zorg er ook voor dat de server toegankelijk is met het door ons geconfigureerde root-wachtwoord.
# Check version
sudo mysql --version
mysql  Ver 8.0.17 for Linux on x86_64 (MySQL Community Server - GPL)

# Login
sudo mysql -u root -p
Stap 7 - Belangrijke opdrachten
Deze sectie toont enkele van de belangrijke commando's voor het starten, stoppen en herstarten van de server.
# Check server status
sudo service mysql status

# Stop server
sudo service mysql stop

# Start server
sudo service mysql start

# Restart server
sudo service mysql restart
Stap 8 - Wachtwoordplug-ins gebruiken
Als u ervoor hebt gekozen om de wachtwoordplug-in-optie te gebruiken voor backword-campatibiliteit met versie 5.7, kan het nodig zijn om verbinding te maken met de MySQL-server met behulp van het account met
# Login to MySQL

# Check password plugin of root user
SELECT user,authentication_string,plugin,host FROM mysql.user;

# Note the password plugin of root user
+------------------+-------------------------------------------+-----------------------+-----------+
| user             | authentication_string                     | plugin                | host      |
+------------------+-------------------------------------------+-----------------------+-----------+
| root             |                                           | auth_socket           | localhost |
+------------------+-------------------------------------------+-----------------------+-----------+

# Change password plugin of root user to native
ALTER USER 'root'@'localhost' IDENTIFIED WITH mysql_native_password BY '<pw>';

# Apply changes
flush privileges;

# Check password scheme of user
SELECT user,authentication_string,plugin,host FROM mysql.user;

# Note the password plugin of root user
+------------------+-------------------------------------------+-----------------------+-----------+
| user             | authentication_string                     | plugin                | host      |
+------------------+-------------------------------------------+-----------------------+-----------+
| root             | *E5C4F73D963132CEF9BB4PA79LA818C08BAQC300 | mysql_native_password | localhost |
+------------------+-------------------------------------------+-----------------------+-----------+

# Change to new and recommended password plugin
ALTER USER 'root'@'localhost' IDENTIFIED WITH caching_sha2_password BY '<pw>';

# Apply changes
flush privileges;

# Check password scheme of user
SELECT user,authentication_string,plugin,host FROM mysql.user;

+------------------+------------------------------------------------------------------------+-----------------------+-----------+
| user             | authentication_string                                                  | plugin                | host      |
+------------------+------------------------------------------------------------------------+-----------------------+-----------+
| root             | $A$005$THISISACOMBINATIONOFINVALIDSALTANDPASSWORDTHATMUSTNEVERBRBEUSED | caching_sha2_password | localhost |
+------------------+------------------------------------------------------------------------+-----------------------+-----------+
Dit is hoe we de meest recente versie van MySQL-server kunnen installeren, d.w.z. MySQL 8 op Ubuntu 18.04 LTS.
