1 Inleiding tot de MS Access 2010, 2013, 2016 en 2019 Tutorial
Welkom bij de MS Access-zelfstudie. Deze tutorial is ontworpen om de gebruiker snel aan de slag te krijgen met MS Access (voortaan gewoon "Access"). De vier basismodules van Access worden gedemonstreerd:Tabellen, Formulieren, Rapporten en Queries. Eerst wordt een bedrijfsvoorbeeld besproken dat een achtergrond biedt voor het ontwikkelen van een eenvoudige database.
Er wordt aangenomen dat gebruikers van deze tutorial vaardig zijn in het werken met Microsoft Windows XP/Vista/Win7/Win10, enz. en met MS Excel. Dit is inclusief het gebruik van het toetsenbord en de muis. De tutorial is gebaseerd op Microsoft Access, dat deel uitmaakt van de Microsoft Office Professional-suite die ook MS Excel, MS Word en MS Powerpoint bevat.
Deze tutorial behandelt MS Access 2007, 2010, 2013, 2016 en 2019 die een gemeenschappelijke interface hebben (de "lintbalk" bovenaan) die verschilt van eerdere versies. Als u geïnteresseerd bent in het werken met MS Access '97 of 2000, bezoek dan de Microsoft Access Tutorial – Covering MS Access '97 en 2000 webpagina.
De tutorial begint met een kort overzicht van Relationele Databases . De meeste databasebeheersystemen die tegenwoordig worden gebruikt, zijn gebaseerd op het zogenaamde relationele databasemodel. Access is een relationeel databasebeheersysteem. Vervolgens beschrijven we een bedrijfsvoorbeeld en schetsen we de database en applicaties die we willen ontwikkelen. In de volgende paragrafen geven we stapsgewijze instructies voor het maken van tabellen, formulieren voor gegevensinvoer, rapporten en query's voor de toepassing.
1.1 Beoogd publiek
Deze tutorial is bedoeld voor studenten die net zijn begonnen met het MS Access-databasebeheersysteem.
1.2 Vereiste kennis
Deze tutorial gaat ervan uit dat de student bekend is met de basisbediening van een personal computer en Windows 2000, Windows XP, Windows Vista of Windows 7. Specifieke vaardigheden die nodig zijn voor deze tutorial zijn:
- Gebruik van muis en toetsenbord
- Openen en opslaan van bestanden op bijvoorbeeld de harde schijf en op USB-geheugenstick (thumb drive)
- Beheer van bestanden in het algemeen, inclusief het verschil tussen stationsletters, harde schijf, enz.
- Programma's uitvoeren vanuit het Windows Start-menu
- Vensters minimaliseren, maximaliseren en vergroten/verkleinen
De leerling moet een USB-geheugenstick (thumbdrive) of een ander draagbaar geheugenapparaat bij de hand hebben om de bestanden op te slaan die tijdens deze tutorial zullen worden aangemaakt.
1.3 Microsoft Access uitvoeren op een Apple Mac
Een probleem waarmee sommige studenten te maken kunnen krijgen, is het feit dat MS Access alleen draait onder het Windows-besturingssysteem (zoals Windows XP, Vista of Windows 7). Als je een MacBook, iMac of ander Apple-systeem met MacOS hebt dat een Intel CPU gebruikt, zijn er een paar mogelijke alternatieven die je kunt proberen. Veel moderne Apple-computers die een Intel-CPU gebruiken, kunnen het Windows-besturingssysteem gebruiken. Houd er rekening mee dat u hiervoor een wettelijk gelicentieerd exemplaar van het Windows-besturingssysteem nodig hebt. Er zijn twee manieren om dit te bereiken:
- U kunt uw Mac instellen voor "Dual Boot" zowel MacOS X als Windows. Een product dat dit mogelijk maakt, is Apple BootCamp-software.
- U kunt Windows OS "naast elkaar" draaien met Mac OS X met behulp van een "virtuele" computer zoals VirtualBox
Inhoudsopgave
- 1 Inleiding tot de MS Access-zelfstudie
- 1.1 Beoogd publiek
- 1.2 Vereiste kennis
- 1.3 Microsoft Access uitvoeren op een Apple Mac
- 2 Kort overzicht van relationele databases en databasetoepassingen
- 3 Een zakelijk voorbeeld
- 4 Microsoft Access starten
- 4.1 Beoordeling van het starten van Microsoft Access
- 5 Tabellen maken en bekijken
- 5.1 Een tabel maken met de ontwerpweergave
- 5.2 Oefening:Een tabel maken
- 5.3 Gegevens bekijken en toevoegen aan een tabel
- 5.4 Oefening:Gegevens toevoegen aan een tabel
- 5.5 Relaties maken tussen tabellen
- 5.6 Herziening van het maken en bekijken van tabellen
- 6 Query's maken en uitvoeren
- 6.1 Enkele tabelquery's
- 6.2 Oefening:Enkele tabelquery's
- 6.3 Meerdere tabelquery's
- 6.4 Oefening:Meerdere tabelquery's
- 6.5 Beoordeling van het maken en uitvoeren van query's
- 7 Formulieren voor gegevensinvoer maken en uitvoeren
- 7.1 Een enkelvoudig tabelformulier maken met de wizard
- 7.2 Oefening:Een enkelvoudig tabelformulier maken
- 7.3 Beoordeling van het maken en uitvoeren van een gegevensinvoerformulier
- 8 Rapporten maken en uitvoeren
- 8.1 Een enkelvoudig tabelrapport maken met de wizard
- 8.2 Oefening:Een enkelvoudig tabelrapport maken
- 8.3 Beoordeling van het maken en uitvoeren van een rapport
- 9 Een hoofd-/detailformulier maken en uitvoeren (formulier met een subformulier)
- 10 Een schakelbord maken en gebruiken
- 11 Een navigatieformulier maken en uitvoeren
- 11.1 Oefening:Een navigatieformulier wijzigen
- 11.2 Het navigatieformulier als standaard instellen
- 12 zelfstudieoverzicht en geavanceerde onderwerpen
De volgende pagina geeft een korte introductie tot relationele databases.
2 Kort overzicht van relationele databases en databasetoepassingen
De eerste databases die in de jaren zestig en zeventig werden geïmplementeerd, waren gebaseerd op platte gegevensbestanden of op hiërarchische of genetwerkte gegevensmodellen. Deze methoden voor het opslaan van gegevens waren relatief inflexibel vanwege hun starre structuur en grote afhankelijkheid van applicatieprogramma's om zelfs de meest routinematige verwerking uit te voeren.
Aan het eind van de jaren zeventig werd het relationele databasemodel die zijn oorsprong vond in de academische onderzoeksgemeenschap, kwam beschikbaar in commerciële implementaties zoals IBM DB2 en Oracle. Het relationele gegevensmodel specificeert gegevens die zijn opgeslagen in relaties die enkele relaties hebben onder hen (vandaar de naam relationeel ).
In relationele databases zoals Sybase, MySQL, Oracle, IBM DB2, MS SQL Server en MS Access worden gegevens opgeslagen in tabellen bestaande uit een of meer kolommen (Access roept een kolom een veld aan ). De gegevens die in elke kolom zijn opgeslagen, moeten van één gegevenstype zijn zoals Teken (soms een "tekenreeks" genoemd), Nummer of Datum. Een verzameling waarden uit elke kolom van een tabel wordt een record genoemd of een rij in de tabel.
Verschillende tabellen kunnen dezelfde kolom gemeen hebben. Deze functie wordt gebruikt om expliciet een relatie tussen twee tabellen op te geven. Waarden die in kolom A in de ene tabel voorkomen, worden gedeeld met een andere tabel.
Hieronder staan twee voorbeelden van tabellen in een relationele database voor een lokale bank:
Klantentabel
| Klant-ID | Voornaam | Achternaam | Straatadres | Stad | Staat | Zip |
|---|---|---|---|---|---|---|
| Nummer | Karakter | Karakter | Karakter | Karakter | Karakter | Karakter |
| 1001 | Joseph | Smith | 123 Lexington | Smithville | KY | 91232 |
| 1002 | Alberta | Jones | Davis Ave. | Smithville | KY | 91232 |
| 1003 | Nathanial | Bijl | 443 Grinder Ln. | Broadville | GA | 81992 |
| 1004 | Paulina | Bouwer | 661 Parker Rd. | Streetville | GA | 81990 |
Accounttabel
| Klant-ID | Accountnummer | Accounttype | Datum geopend | Saldo |
|---|---|---|---|---|
| Nummer | Nummer | Karakter | Datum | Nummer |
| 1001 | 9987 | Controleren | 10/12/1989 | 4000,00 |
| 1001 | 9980 | Besparingen | 10/12/1989 | 2000,00 |
| 1002 | 8811 | Besparingen | 05/01/1992 | 1000,00 |
| 1003 | 4422 | Controleren | 01/12/1994 | 6000.00 |
| 1003 | 4433 | Besparingen | 01/12/1994 | 9000,00 |
| 1004 | 3322 | Besparingen | 22-08-1994 | 500,00 |
| 1004 | 1122 | Controleren | 13-11-1988 | 800,00 |
De tabel Klant heeft 7 kolommen (klant-ID, voornaam, achternaam, straatadres, plaats, staat en postcode) en 4 rijen (of records) met gegevens. De rekeningentabel heeft 5 kolommen (CustomerID, AccountNumber, AccountType, DateOpened en Balance) met 7 gegevensrijen.
Elk van de kolommen voldoet aan een van de drie basis gegevenstypen :Karakter, Nummer of Datum. Het gegevenstype voor een kolom geeft het type gegevenswaarden aan dat in die kolom kan worden opgeslagen.
- Getal – mag alleen getallen opslaan, mogelijk met een decimaalteken. Kan positief of negatief zijn.
- Teken – kan cijfers, letters en leestekens bevatten. Access roept dit gegevenstype Text . aan .
- Datum – mag alleen datum- en tijdgegevens opslaan.
In sommige database-implementaties bestaan er andere gegevenstypen, zoals afbeeldingen (voor afbeeldingen of andere gegevens). De bovenstaande drie gegevenstypen worden echter het meest gebruikt.
Merk op dat de twee tabellen de kolom Klant-ID delen en dat de waarden van de kolom Klant-ID in de tabel Klant dezelfde zijn als de waarden in de kolom Klant-ID in de tabel Accounts. Deze relatie stelt ons in staat om te specificeren dat de klant Nathanial Axe heeft zowel een Betaalrekening als een Betaalrekening die beide op dezelfde dag zijn geopend:1 december 1994.
Een andere naam die aan zo'n relatie wordt gegeven is Hoofd/Detail . In een hoofd-/detailrelatie kan aan één hoofdrecord (zoals Klant 1003, Nathanial Axe) veel detailrecords (de twee accounts) zijn gekoppeld.
In een Master/Detail-relatie is het mogelijk dat er een Masterrecord bestaat zonder Details. Het is echter onmogelijk om een Detailrecord te hebben zonder een bijbehorend Masterrecord. Een Klant hoeft bijvoorbeeld helemaal niet over accountgegevens te beschikken. Alle accountgegevens moeten echter gekoppeld zijn aan een enkele klant.
Elke tabel moet ook een speciale kolom hebben genaamd de Sleutel die wordt gebruikt om rijen of records in de tabel op unieke wijze te identificeren. Waarden in een sleutelkolom (of kolommen) mogen nooit worden gedupliceerd. In de bovenstaande tabellen is de Klant-ID de sleutel voor de tabel Klant, terwijl het AccountNummer de sleutel is voor de tabel Accounts.
3 Een zakelijk voorbeeld
In deze sectie zullen we een zakelijk voorbeeld schetsen dat zal worden gebruikt als basis voor de voorbeelden in de tutorial. In organisaties wordt de taak van het analyseren van het bedrijf en het bepalen van de juiste databasestructuur (tabellen en kolommen) doorgaans uitgevoerd door Systeemanalisten . Een systeemanalist verzamelt informatie over hoe het bedrijf werkt en vormt een model van de vereisten voor gegevensopslag. Op basis van dit model maakt een databaseprogrammeur de databasetabellen en werkt vervolgens samen met de applicatieontwikkelaars om de rest van de databaseapplicatie te ontwikkelen.
Voor deze tutorial zullen we een eenvoudig bankbedrijf beschouwen. De bank heeft veel klanten die één of meerdere rekeningen openen en aanhouden. Voor elke klant houden we een register bij van hun naam en adres. We kennen ze ook een unieke CustomerID toe. We kennen deze unieke identificatiecode zowel voor het gemak als voor de nauwkeurigheid toe. Het is veel gemakkelijker om een enkele klant te identificeren met behulp van hun klant-ID in plaats van hun volledige naam en adres op te zoeken. Daarnaast is het mogelijk dat de bank twee klanten met dezelfde naam heeft (bijvoorbeeld Bill Smith). In dergelijke gevallen kan de unieke CustomerID altijd worden gebruikt om ze van elkaar te onderscheiden.
Op vergelijkbare wijze krijgen alle rekeningen een uniek rekeningnummer. Een rekening kan zowel een betaalrekening als een spaarrekening zijn. Spaarrekeningen verdienen rente, maar de enige toegestane transacties zijn stortingen en opnames. Het controleren van rekeningen levert geen rente op. Wij houden de datum bij waarop de rekening is geopend. Dit helpt ons bij het volgen van onze klanten en kan nuttig zijn voor marketingdoeleinden. Ten slotte behouden we het huidige saldo van een rekening.
In de vorige sectie hebben we de structuur en enkele voorbeeldgegevens gegeven voor de tabel Klant en de tabel Rekeningen. Deze zullen worden gebruikt om het gegevensopslaggedeelte van onze banktoepassing te ondersteunen.
Database-applicaties
In elke databasetoepassing heeft elk van de tabellen een middel nodig om er gegevens in te krijgen en om de gegevens op een later tijdstip op te halen en te wijzigen. De belangrijkste manier om gegevens in tabellen te krijgen, is door formulieren voor gegevensinvoer te gebruiken. De belangrijkste manieren om gegevens uit tabellen te halen of om gegevens in tabellen weer te geven, zijn door middel van query's of rapporten. In een complete databasetoepassing zijn alle formulieren en rapporten aan elkaar gekoppeld in een navigatieformulier - een enkele pagina met koppelingen naar elk van de onderdelen van de toepassing. Een grote databasetoepassing kan tientallen formulieren voor gegevensinvoer en rapporten hebben.
Voor deze zelfstudie maken we een gegevensinvoerformulier voor elke tabel, een query voor elke tabel en een rapport voor elke tabel.
In de volgende paragrafen zullen we eerst introduceren hoe u Access kunt starten en hoe u een nieuwe database kunt maken.
4 Microsoft Access starten
Zoals bij de meeste Windows-programma's, kan Access worden uitgevoerd door naar het menu Start in de linkerbenedenhoek van het Windows-bureaublad te navigeren.
Om Access te starten, klikt u op de knop Start, vervolgens op het menu Programma's, gaat u naar het Microsoft Office-menu en klikt u ten slotte op het menu-item Microsoft Access. Het MS Office Professional-menu wordt hieronder weergegeven.
Houd er rekening mee dat deze indeling van menu's kan variëren, afhankelijk van hoe MS Office is geïnstalleerd op de pc die u gebruikt.
Zodra Access actief is, wordt een beginscherm weergegeven:
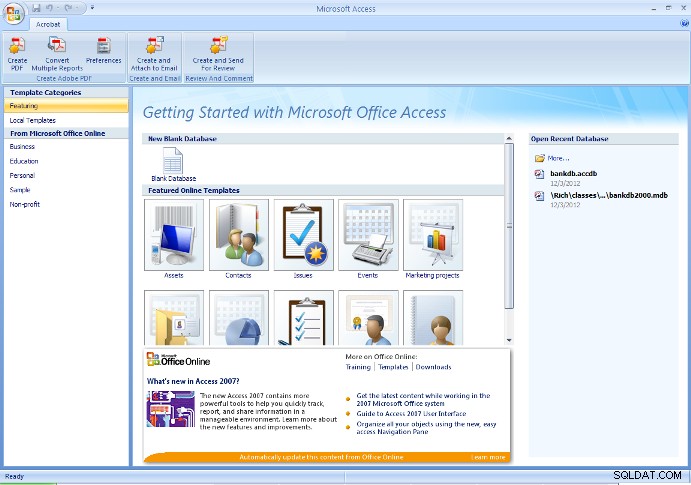
Vanaf dit eerste scherm kan de gebruiker een nieuwe database maken (hetzij blanco of met enkele tabellen die zijn gemaakt met de databasewizard), of een bestaande database openen.
Over het algemeen moet de eerste keer dat een project begint, een nieuwe, lege database worden gemaakt. Gebruik daarna de Bestaande database openen optie om de eerder gemaakte database opnieuw te openen.
Waarschuwing – Als u eerder een database hebt gemaakt en deze vervolgens opnieuw maakt met dezelfde naam, overschrijft u al het werk dat u hebt gedaan.
Als u deze stappen voor het eerst doorloopt, kiest u voor de doeleinden van deze zelfstudie de optie om een nieuwe, lege database te maken, zoals weergegeven in de bovenstaande afbeelding.
Klik in Access 2007 op de ronde Office-knop in de linkerbovenhoek en kies Nieuw in het vervolgkeuzemenu. Vul Bestandsnaam in als bankdb.accdb en klik op de knop Maken om de database aan te maken zoals in de onderstaande afbeelding.
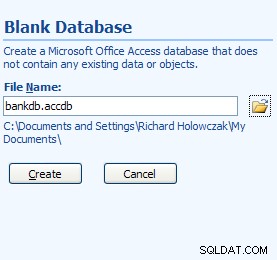
Nieuw databasescherm voor Access 2007
In de bovenstaande bestandsnaam is bankdb de naam die is gekozen voor deze specifieke database en .accdb is de bestandsnaamextensie die wordt gegeven voor Microsoft DataBase 2007, 2010 en 2013 bestanden.
Het is aan te raden de naam van de database (bankdb in bovenstaand voorbeeld) relatief kort te houden en geen spaties of andere leestekens in de naam van de database te gebruiken. Ook moet de naam van de database de inhoud van de database weerspiegelen.
Zodra de nieuwe database is aangemaakt, verschijnt het volgende hoofdscherm voor toegang:
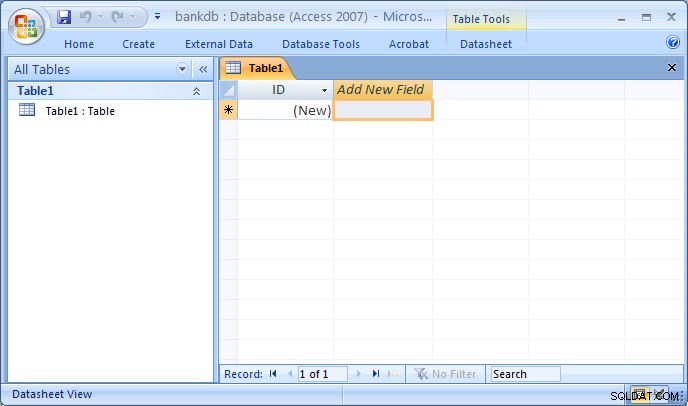
De schermindeling voor MS Access 2007 verschilt aanzienlijk van eerdere versies. De meeste tabbladen aan de bovenkant van het scherm zijn opnieuw gerangschikt. Bovendien schakelt het standaard hoofdscherm na het maken van een nieuwe database automatisch over naar de ontwerpweergave om een nieuwe tabel te maken.
De volgende tabbladen verschijnen bovenaan het scherm:
- Tabblad Start – Besturingselementen voor het wijzigen van lettertypen, het uitvoeren van query's, kopiëren/plakken/knippen van gegevens, enz.
- Tabblad maken – Bedieningselementen voor het maken van tabellen, formulieren, rapporten, enz.
- Tabblad Externe gegevens – Besturingselementen voor het laden van gegevens uit andere gegevensbronnen in MS Access.
- Tabblad Databasehulpmiddelen – Controles voor het beheer van databases (beveiliging, telefooncentrale, enz.)
- Tabblad Ontwerp – Dit zal verschijnen bij het ontwerpen van een nieuwe tabel, formulier, rapport, enz.
Houd er rekening mee dat de interfaces voor Access 2007, 2010 en 2013 allemaal vergelijkbaar zijn, hoewel de versie die u gebruikt er enigszins anders uit kan zien dan de afbeeldingen in deze zelfstudie.
4.1 Beoordeling van het starten van Microsoft Access
Microsoft Access starten:
- Gebruik de Start-knop op de taakbalk om te openen:Programma's -> MS Office -> Microsoft Access
- Als u een nieuwe database wilt maken, kiest u Lege database en geef een nieuwe bestandsnaam op voor de database. Zorg ervoor dat u een beschrijvende naam gebruikt voor de nieuwe database. Klik op de OK-knop om de nieuwe database aan te maken.
- Als u een bestaande database wilt openen, kiest u Open een bestaande database , markeer Meer bestanden... en klik op de OK-knop. Navigeer vervolgens naar de schijf, markeer het bestaande databasebestand op de harde schijf of USB-schijf en klik nogmaals op de knop OK om de database te openen.
Om Access af te sluiten, trekt u het menu Bestand (of Office-menu) naar beneden en selecteert u het menu-item Afsluiten.
5 Tabellen maken en bekijken
Tabellen zijn de belangrijkste eenheden voor gegevensopslag in Access. Bedenk dat een tabel bestaat uit een of meer kolommen (of velden ) en dat een bepaalde kolom in meer dan één tabel kan voorkomen om een verband tussen de tabellen aan te geven.
Uit het eerder besproken bedrijfsvoorbeeld hebben we geconcludeerd dat twee tabellen voldoende zouden zijn om de gegevens over Klanten op te slaan. en hun bank Rekeningen . We geven nu de stapsgewijze instructies voor het maken van deze twee tabellen in Access.
Er zijn een aantal manieren om een tabel te maken in Access. Access biedt wizards die de gebruiker begeleiden bij het maken van een tabel door namen voor tabellen en kolommen voor te stellen. De andere manier om een tabel te maken is door gebruik te maken van de Ontwerpweergave om de kolommen (velden) en hun gegevenstypes handmatig te definiëren.
Hoewel het gebruik van de wizards een snelle manier is om tabellen te maken, heeft de gebruiker minder controle over de kolomnamen (velden) en gegevenstypen. In deze zelfstudie beschrijven we de stappen om een tabel te maken met behulp van de Ontwerpweergave . Studenten worden aangemoedigd om zelf te experimenteren met het gebruik van de wizard Tabel maken.
5.1 Een tabel maken met de ontwerpweergave
Voer de volgende stappen uit om een tabel te maken in Access met behulp van de ontwerpweergave:
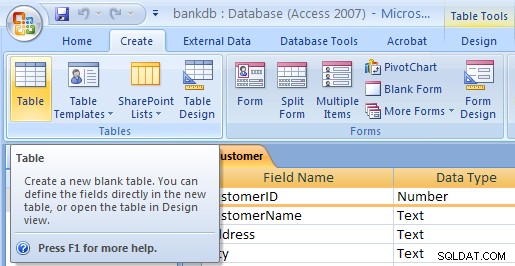
- In Access 2007, 2010 en 2013 moet het tabblad Nieuwe tabel maken al zijn gemarkeerd en moet een nieuwe tabel met de naam table1 zijn gemaakt. Als dit niet het geval is, klik dan op Maken en klik op de Tabel icoon. Trek vervolgens de Weergave menu en kies Ontwerpweergave .

- De weergave Tabelontwerp verschijnt. Vul de Veldnaam . in , Gegevenstype en Beschrijving voor elke kolom/veld in de tabel. Het veld Klant-ID wordt hieronder ingevuld:
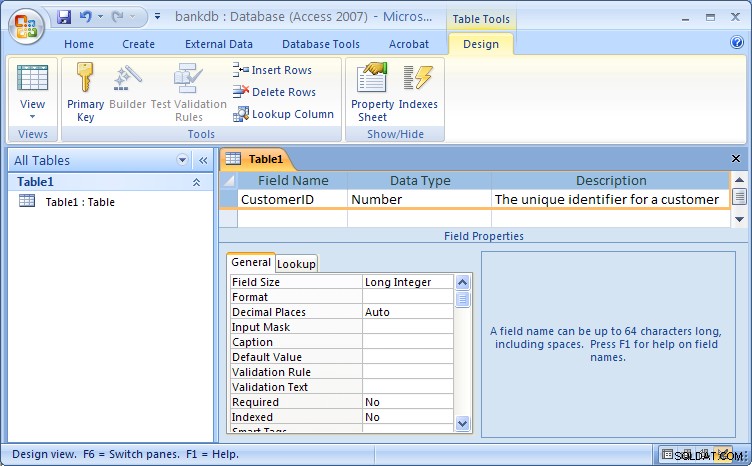
Tabelontwerpweergave voor Access 2007Merk op dat de standaardnaam voor de tabel Tabel1 is . In een latere stap zullen we een toepasselijke naam aan deze tabel toewijzen.
Vul de informatie voor de velden als volgt in:
Veldnaam Gegevenstype Beschrijving Klant-ID Nummer De unieke identificatie voor een klant Voornaam Tekst De voornaam van de klant Achternaam Tekst De achternaam van de klant StreetAddress Tekst Het adres van de klant Stad Tekst De stad van de klant Staat Tekst De thuisstaat van de klant Zip Tekst De postcode van de klant Hieronder ziet u een afbeelding van de ontwerpweergave met de nieuwe tabeldefinitie ingevuld:

De volgende stap is het definiëren van de sleutel voor de tafel en het opslaan van de tafel.
- Nu alle velden voor de tabel zijn gedefinieerd, moet een primaire sleutel worden gedefinieerd. Bedenk dat de primaire sleutel wordt gebruikt om een record in de tabel (in dit geval een klant) op unieke wijze te identificeren. Markeer de Klant-ID veld en klik op de knop Primaire sleutel op de knoppenbalk
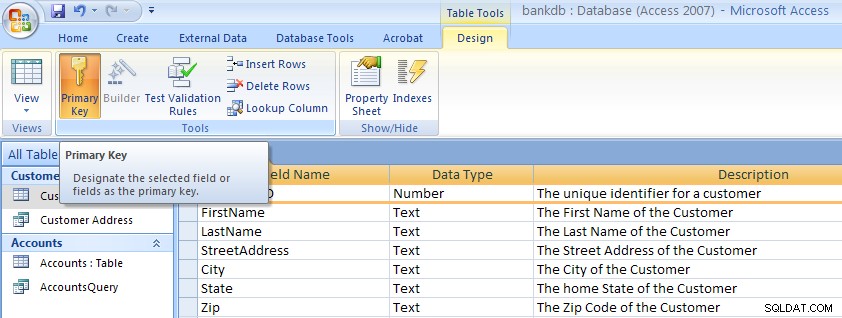 Merk op dat er een kleine sleutel verschijnt naast de veldnaam aan de linkerkant. Opmerking:om een primaire sleutel te verwijderen , herhaalt u deze procedure gewoon om de primaire sleutel uit te schakelen.
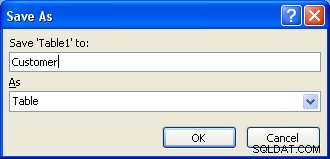
- Als laatste stap moet de tabel worden opgeslagen. Open het Office-menu en kies het menu-item Opslaan als. Er verschijnt een dialoogvenster waarin de naam van de nieuwe tabel moet worden opgegeven. Merk op dat Access een standaardnaam geeft, zoals Tabel1 of Tabel2 . Typ eenvoudigweg over deze standaardnaam de naam van de tabel. Geef de tabel in dit voorbeeld de naam:Klant Klik vervolgens op de OK-knop.
Op dit moment is de nieuwe klanttabel gemaakt en opgeslagen.
Een opmerking over het benoemen van velden (kolommen) in MS Access
Bij het definiëren van de velden (kolommen) voor een tabel is het belangrijk om veldnamen te gebruiken die een duidelijk begrip geven van de gegevensinhoud van de kolom. Geeft het veld CNO bijvoorbeeld een klantnummer of een containernummer aan?
Veldnamen in Access mogen maximaal 64 tekens lang zijn en mogen spaties bevatten. Echter, het gebruik van spaties in veldnamen en tabelnamen wordt sterk afgeraden . Als u veldnamen leesbaarder wilt maken, kunt u overwegen een onderstrepingsteken te gebruiken om woorden te scheiden. Zorg er echter voor dat er geen spaties voor of na het onderstrepingsteken verschijnen.
De volgende tabel geeft een overzicht van enkele verschillende manieren om veldnamen te geven:
| Beschrijving | Slecht | Goed |
|---|---|---|
| Unieke identificatie voor een klant | CID | Klant-ID of klant_ID |
| Beschrijving van een product | PDESC | Productbeschrijving |
| Thuistelefoonnummer werknemer | Employee_home_telephone_number | Thuistelefoon |
| Bankrekeningnummer | BA# | Accountnummer |
5.2 Oefening:Een tabel maken
Maak de Accounts tabel door dezelfde stappen te volgen die werden gebruikt om de tabel Klanten te maken.
- Klik op het tabblad Maken en klik vervolgens op de Tabel knop.
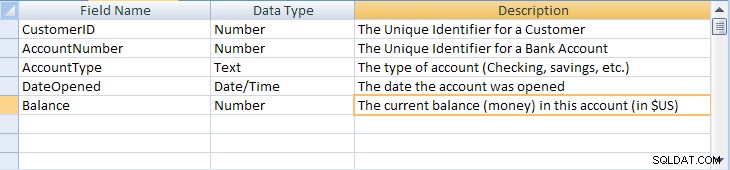
- Trek het menu Beeld naar beneden en kies Ontwerp. De weergave Tabelontwerp verschijnt. Vul de Veldnaam . in , Gegevenstype en Beschrijving voor elke kolom/veld in de tabel Accounts.
Veldnaam Gegevenstype Beschrijving Klant-ID Nummer De unieke identificatie voor een klant Accountnummer Nummer De unieke identificatie voor een bankrekening Accounttype Tekst Het type rekening (controleren, sparen, enz.) Datum geopend Datum De datum waarop de rekening is geopend Saldo Nummer Het huidige saldo (geld) op deze rekening (in $US) Hieronder ziet u een afbeelding van de ontwerpweergave met de nieuwe tabeldefinitie ingevuld:
- Definieer een primaire sleutel voor de tabel Accounts. Klik op het Accountnummer veld met de Rechts muisknop en kies Primaire sleutel in het pop-upmenu.
- Sla de nieuwe Accounts-tabel op door het menu Bestand naar beneden te trekken en het menu-item Opslaan te kiezen. Vul de naam van de tabel in:Accounts Klik vervolgens op de knop OK.
Merk op dat er een aantal extra stappen zijn die men kan nemen om tabellen in MS Access te verbeteren en te verfraaien, waaronder het specificeren van standaardwaarden, het creëren van opzoekwaarden en het maskeren van gegevensinvoer om een specifiek patroon te volgen. De details zijn niet belangrijk voor deze huidige tutorial, maar als je geïnteresseerd bent, bekijk dan de Advanced MS Access Table Design-pagina die hier is gelinkt.
5.3 Gegevens bekijken en toevoegen aan een tabel
Gegevens kunnen worden toegevoegd, verwijderd of gewijzigd in tabellen met behulp van een eenvoudige spreadsheet-achtige weergave. Om deze weergave van de gegevens van een enkele tabel weer te geven, markeert u de naam van de tabel en dubbelklikt u vervolgens op de naam van de tabel.
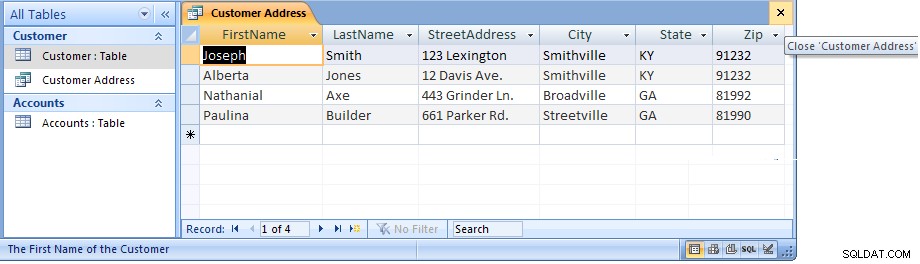
In deze weergave van de tabel Klant, weergegeven in de onderstaande afbeelding, verschijnen de velden (kolommen) boven aan het venster en de rijen of records eronder. Deze weergave is vergelijkbaar met hoe een spreadsheet zou zijn ontworpen.
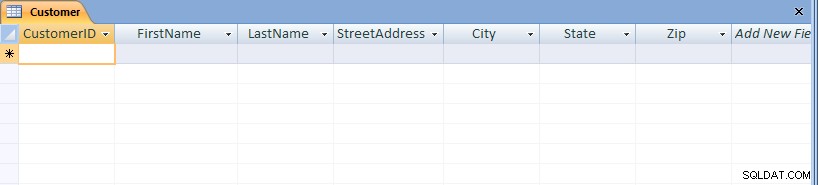
Noteer onderaan het venster het aantal records. In dit geval, aangezien de tabel zojuist is gemaakt, verschijnt er slechts één lege record.
Om gegevens aan de tabel toe te voegen, typt u eenvoudig waarden in voor elk van de velden (kolommen). Druk op de Tab-toets om tussen velden binnen een record te wisselen. Gebruik de pijltoetsen omhoog en omlaag om tussen records te wisselen. Voer de gegevens in zoals hieronder aangegeven:
| Klant-ID | Voornaam | Achternaam | StreetAdres | Stad | Staat | Zip |
|---|---|---|---|---|---|---|
| 1001 | Joseph | Smith | 123 Lexington | Smithville | KY | 91232 |
| 1002 | Alberta | Jones | Davis Ave. | Smithville | KY | 91232 |
| 1003 | Nathanial | Bijl | 443 Grinder Ln. | Broadville | GA | 81992 |
| 1004 | Paulina | Bouwer | 661 Parker Rd. | Streetville | GA | 81990 |

Om de nieuwe gegevens op te slaan, trekt u het Office-menu naar beneden en kiest u Opslaan.
Gebruik de navigatiebalk onder aan het scherm om naar andere records in de tabel te navigeren:
Om bestaande gegevens te wijzigen, navigeert u eenvoudig naar de record van belang en tab naar het juiste veld. Gebruik de pijltoetsen en de delete- of backspace-toetsen om de bestaande gegevens te wijzigen.
Om een record te verwijderen, navigeert u eerst naar het betreffende record. Trek vervolgens het menu Bewerken naar beneden en kies het menu-item Verwijderen.
Om de tabel te sluiten en terug te keren naar het hoofdscherm van Access, trekt u het menu Bestand naar beneden en kiest u het menu-item Sluiten.
5.4 Oefening:Gegevens toevoegen aan een tabel
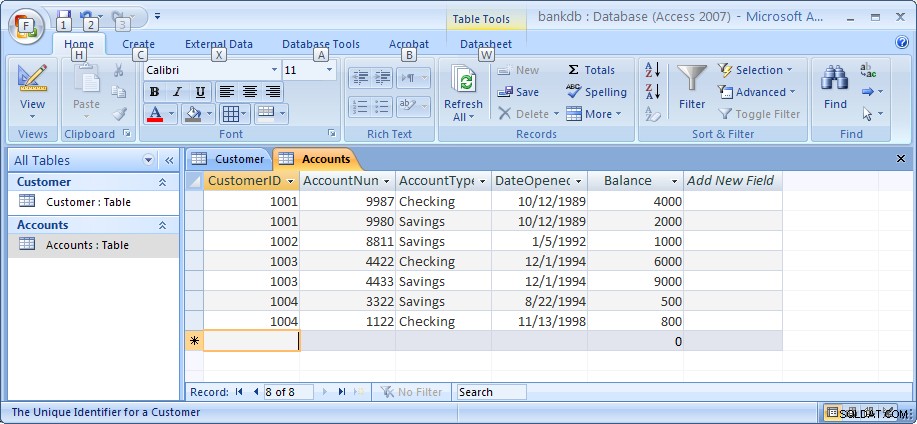
Open voor deze oefening de tabel Rekeningen en voeg gegevens toe voor de zeven rekeningen die in sectie 2 worden getoond. Zorg ervoor dat u de gegevens precies invoert zoals weergegeven, inclusief het hoofdlettergebruik van de gegevens in het veld Rekeningtype. typ bijvoorbeeld Besparingen in plaats van Besparingen of BESPARING.
Houd er rekening mee dat u bij het invoeren van de datums de volledige vier cijfers van het jaar moet invoeren. Standaard geeft Access alle 4 de cijfers van het jaar weer (oudere versie van Access gaf slechts twee cijfers weer).
Zorg ervoor dat u de gegevens opslaat als u klaar bent. De onderstaande afbeelding toont de rekeningentabel en gegevens zoals deze eruit zouden moeten zien als u klaar bent met deze oefening.
Op dit punt in de zelfstudie hebben we twee tabellen gemaakt, Klanten en Accounts, en aan elke tabel gegevens toegevoegd. In de volgende paragrafen bespreken we hoe u de gegevens in de tabellen kunt opvragen en rapporteren en hoe u een gebruiksvriendelijk gegevensinvoerformulier kunt maken met behulp van de Access-wizards.
Opmerking:mijn tutorial over MS Access Advanced Table Design is te vinden op deze link. Misschien wil je dat eens bekijken nadat je de rest van deze tutorial hebt voltooid.
5.5 Relaties maken tussen tabellen
Bedenk dat een van de belangrijkste kenmerken van relationele databases het feit is dat alle tabellen aan elkaar gerelateerd zijn. In de Bankdatabase is de tabel Klanten tot dusver gerelateerd aan de tabel Rekeningen doordat het veld Klant-ID in beide tabellen voorkomt. Access heeft een middel om deze relatie expliciet te maken met behulp van het scherm Relaties. Access gebruikt deze informatie bij het ontwerpen van rapporten, formulieren en query's waarvoor meer dan één tabel moet worden weergegeven.
Zorg er om te beginnen voor dat de tabel Rekeningen en de tabel Klant beide zijn gesloten. Access stopt het maken van relaties als de tabel momenteel is geopend. Om een tafel te sluiten, klikt u met de rechtermuisknop op de tafelnaam in het tabblad boven de tafel en kiest u het menu-item Sluiten, of klikt u op de kleine X rechts boven de tafel.

Geef vervolgens het scherm Relaties weer door op het tabblad Databasehulpmiddelen te klikken en klik vervolgens op de knop Relaties zoals hieronder weergegeven. 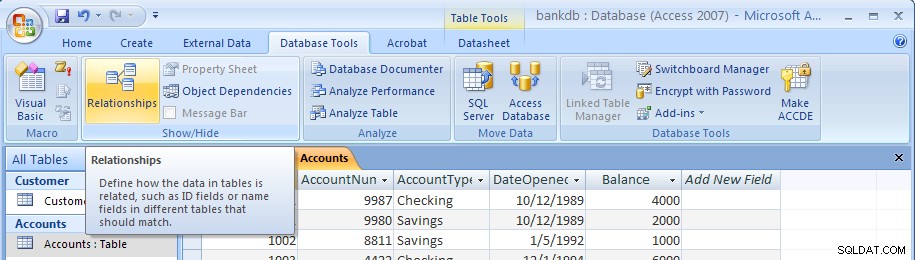
Het lege scherm Relaties zal er als volgt uitzien:
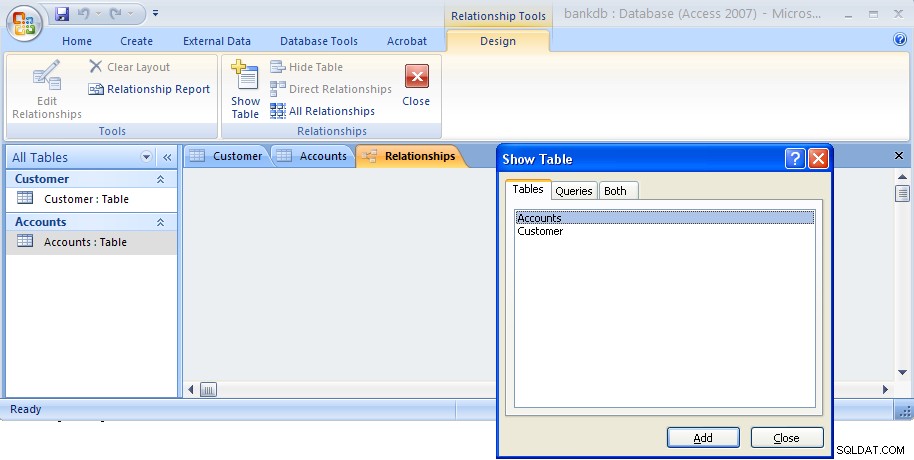
Het dialoogvenster Tabel weergeven wordt standaard weergegeven. Markeer zowel de tabel Klanten als de tabel Rekeningen zoals hieronder weergegeven en klik vervolgens op de knop Toevoegen.

Klik vervolgens op de knop Sluiten om dit dialoogvenster te sluiten. Het scherm Relaties verschijnt nu weer met de twee tabellen zoals hieronder weergegeven:
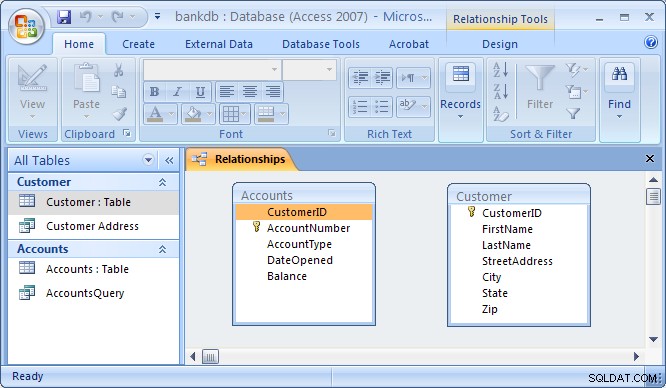
Om de tabel Klanten te verbinden met de tabel Rekeningen om een relatie te vormen, klikt u op het veld Klant-ID in de tabel Klanten en sleept u dit naar boven op het veld Klant-ID in de tabel Rekeningen. Als u de muisknop loslaat, verschijnt het dialoogvenster Relaties bewerken zoals hieronder:
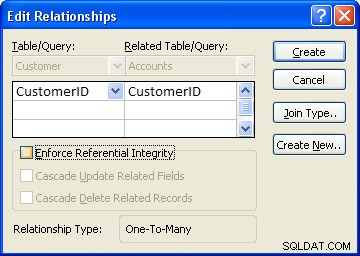
Access will do its best to determine the Relationship Type (almost always it will select One-to-Many ). For this example, Access knows that CustomerID is a key of the Customer table so it chooses this field as the “One” side. This makes the Accounts table the “Many” side as One customer may have Many accounts.
One additional step to be taken is the check off the box labeled “Enforce Referential Integrity”. This option puts constraints into effect such that an Accounts record can not be created without a valid Customer record, and Access will also prevent a user from deleting a Customer record if a related Accounts record exists. At this point, click on the Create button to create the relationship. The Relationships screen should reappear with the new relationship in place as follows:
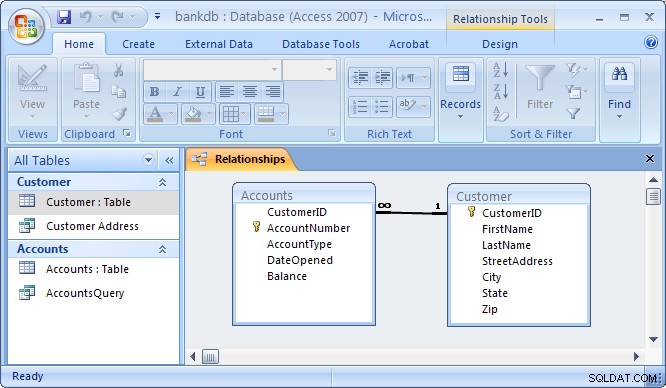
Note the symbols “1” (indicating the “One” side) and the infinity symbol (indicating the “Many” side) on the relationship. Close the relationships screen and select Yes to save the changes to the Relationships layout.
If the relationship does not appear in the above fashion, highlight it and press the delete key to delete it. Then go back to the table design view and make certain that the CustomerID field is designated as the key of the Customers table. Then go back to the Relationships screen and try to recreate the relationship.
5.6 Review of Creating and Viewing Tables
Creating a new table requires the following steps:
- Click on the Tables tab on the Access main screen
- Click on the New button.
- Choose the Design View and click the OK button.
- Fill in the name, data type and description of each of the fields in the table.
- Designate a primary key by clicking on one of the fields with the right mouse button and then choose Primary Key from the pop-up menu.
- Save the table by pulling down the File menu and choosing Save.
- Close the new table by pulling down the File menu and choosing Close.
To change the design of an existing table (e.g., to add, change or delete a field):
- Click on the Tables tab on the Access main screen
- Highlight the name of the table to be modified and click on the Design button.
- Make the necessary changes.
- Save the table by pulling down the File menu and choosing Save.
- Close the table by pulling down the File menu and choosing Close.
To add, delete or change data in an existing table:
- Click on the Tables tab on the Access main screen
- Highlight the name of the table to be modified and click on the Open button.
- Make the necessary changes to the data.
- Save the table data by pulling down the File menu and choosing Save.
- Close the table by pulling down the File menu and choosing Close.
To create or edit relationships between tables:
- Pull down the Tools menu and select the Relationships menu item.
- To display tables, right click and choose Add Tables
- To create new relationships, drag a key field from one table and drop it on the associated field in another table
- To edit an existing relationship, double click on the relationship line.
- To delete an existing relationship, click on the relationship line and press the delete key.
6 Creating and Running Queries
Queries are a fundamental means of accessing and displaying data from tables. Queries can access a single table or multiple tables. Examples of queries for our bank database might include:
- Which Customers live in Georgia ?
- Which Accounts have less than a $500 balance ?
- What is the total amount of money deposited by each Cusomter?
- Which Checking account has the largest balance?
Queries can be used to carry out other tasks such as for creating formatted reports and data entry forms, and for exporting subsets of data to Excel or another software program.
In this section, we show how to use the Access Wizards to create queries for a single table and for multiple tables.
6.1 Single Table Queries
In this section, we demonstrate how to query a single table. Single table queries are useful to gain a view of the data in a table that:
- only displays certain fields (columns) in the output
- sorts the records in a particular order
- performs some statistics on the records such as calculating the sum of data values in a column or counting the number of records, or
- filters the records by showing only those records that match some criteria. For example, show only those bank customers living in GA.
Creating a query can be accomplished by using either the query design view or the Query wizard. In the following example, we will use the query wizard to create a query.
To create a new query, click on the Create tab. Then click on the Query wizard button.
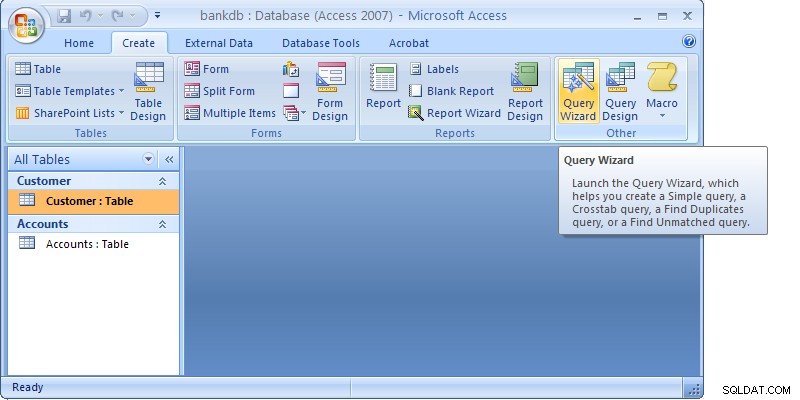
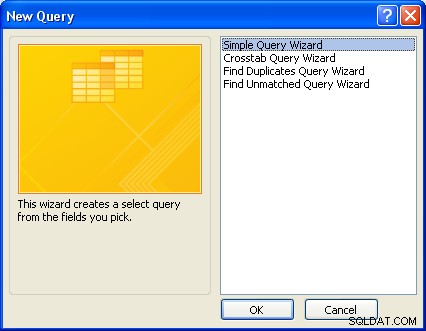
When the Query wizard appears, highlight the Simple Query Wizard selection and click on the OK button.
The first step in the Simple Query wizard is to specify the table for the query and which fields (columns) should be displayed in the query output. Three main sections of this step are:
- Tables/Queries – A pick list of tables or queries you have created.
- Available Fields – Those fields from the table that can be displayed.
- Selected Fields – Those fields from the table that will be displayed.
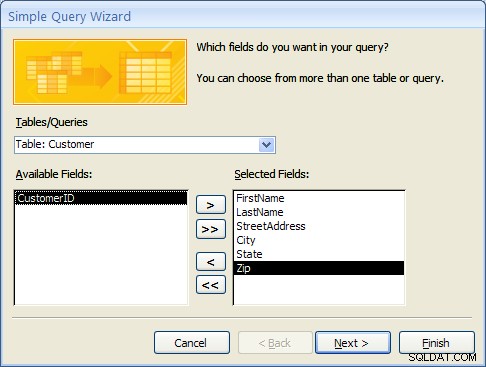
For this example, pull down the Tables/Queries list and choose the Customer table. Notice that the available fields change to list only those fields in the Customer table. This step is shown below:

From the list of Available fields on the left, move the FirstName, LastName, StreetAddress, City and State fields over to the Selected Fields area on the right. Highlight one of the fields and then click on the right arrow button  in the center between the two areas. Repeat this for each of the four fields to be displayed. When done with this step, the wizard should appear as below:
Click on the Next button to move to the next and final step in the Simple Query wizard.
In the final step, give your new query a name. For this example, name the query:Customer Address
At this point, the wizard will create the new query with the option to either:
- Open the query to view information – that is, the wizard will execute the query and show the data.
- Modify the query design – the wizard will switch to the Design View to allow further modification of the query.
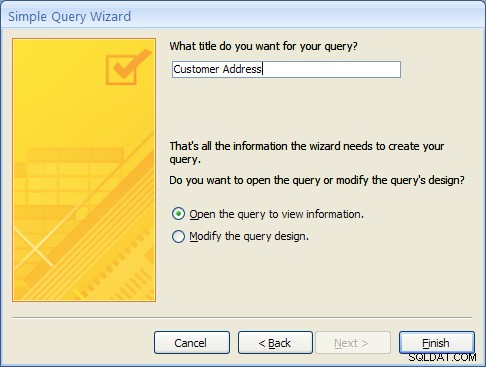
For this example, choose Open the query to view information and click on the Finish button. When this query executes, only the customer’s name, address, city and state fields appear, however, all of the rows appear as shown in the figure below:

Close this query by clicking on the X in the upper right corner of the query results as shown in the figure below:
The Access main screen showing the Queries tab should appear. Note the new query Customer Address appears under the Customers table.
6.1 Single Table Queries (Continued)
In the following example, we will modify the Customer Address query to only display customers in a certain state. To accomplish this, we will make use of the Query Design View.
Open up the Customer Address query in the design view by right-clicking on the name of the query. Then select the Design View menu item as shown below.
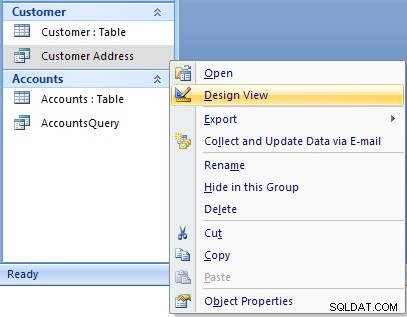
The design view will appear as in the figure below:
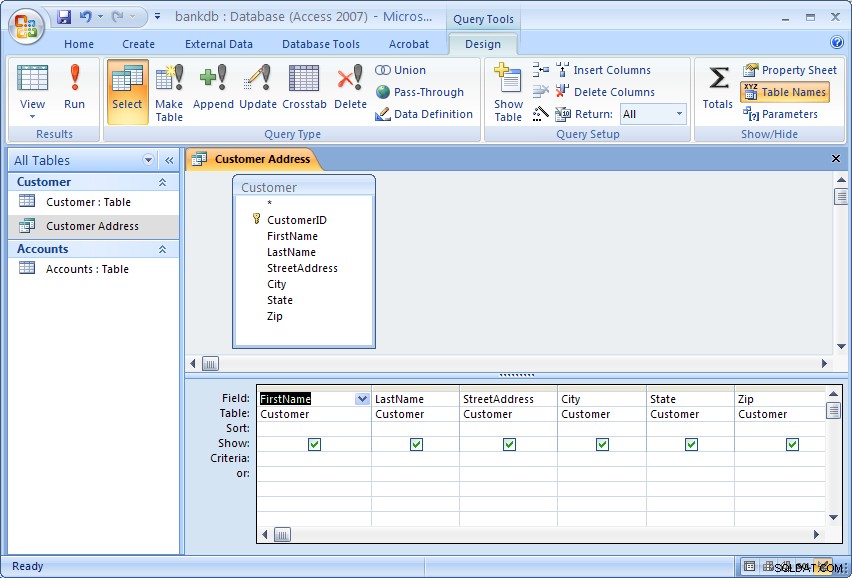
The Query Design view has two major sections. In the top section, the table(s) used for the query are displayed along with the available fields. In the bottom section, those fields that have been selected for use in the query are displayed.
Each field has several options associated with it:
- Field – The name of the field from the table
- Table – The table the field comes from
- Sort – The order in which to sort on this field (Ascending, Descending or Not Sorted)
- Show – Whether or not to display this field in the query output
- Criteria – Indicates how to filter the records in the query output.
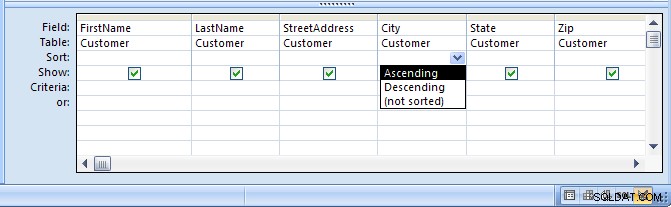
For this example, we will filter the records to only display those customers living in the State of Georgia (GA). We will also sort the records on the City field.
To sort the records on the City field, click in the Sort area beneath the City veld. Choose Ascending from the list as shown in the figure below:
To filter the output to only display Customers in Georgia, click in the Criteria area beneath the State field and type the following statement: ='GA'
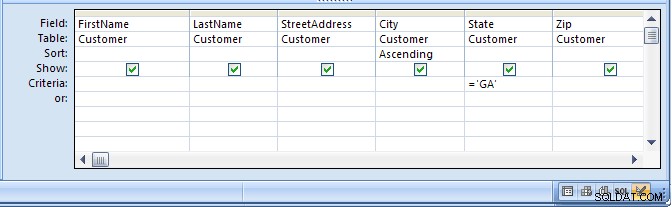
The ='GA' statement tells Access to only show those records where the value of the State field is equal to ‘GA’. Note the use of single quotes to surround the characters.
Run the query by clicking on the Run button (with the large red exclamation point). The output is shown in the figure below:
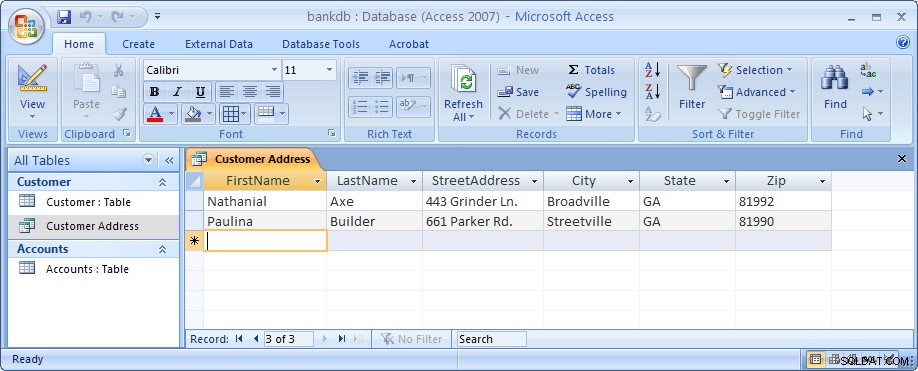
Finally, save and close this query to return to the Access main screen.
6.2 Exercise:Single Table Queries
For this exercise, use the Simple Query wizard to create a query on the Accounts table showing just the AccountNumber, AccountType and Balance fields.
- From the Access main screen, click on the Create tab. Then click on the Query Wizard button.
- Choose the Simple Query wizard option and click on the OK button.
- Under Table/Queries:choose the Accounts table. Then move the AccountNumber, AccountType and Balance fields over to the Selected fields area. Then click the Next button.
- In the next panel, you will be asked to choose between a detail or summary query. Choose detailed query and click on the Next button.
- Name the new Query :AccountsQuery and click on the Finish button.
The output is shown below:

Close this query by pulling down the Office menu and choosing Close.
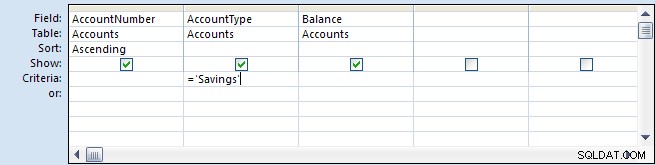
In the next part of the exercise, we will modify the query to sort the output on the account number and only display the Savings accounts.
- From the Queries tab on the Access main screen, highlight the AccountsQuery and click on the Design button.
- Change the Sort order for the AccountNumber field to Ascending.Add the following statement to the Criteria:are under the AccountType field:=‘Savings’
- Run the query by double-clicking on the AccountsQuery name. The output is shown below:
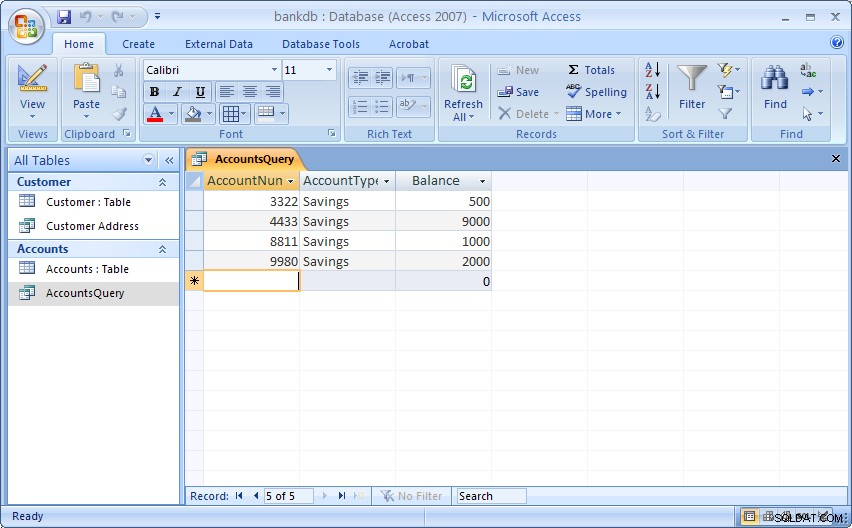
- Finally, save and close the query to return to the Access main screen.
6.3 Multiple Table Queries
Up to this point, queries involving only one table have been demonstrated. It is almost a given that queries will need to involve more than one table. For this example, assume that a manager would like to see a list of all of the customers and the type of account(s) that each one maintains at the bank. Such a query requires data from both the Customers table as well as the Accounts table. In such queries, Access will rely on the Relationships established between tables to guide how the data will be assembled to satisfy the query.
Before proceeding with these next instructions, make certain the One-to-Many relationship between the Customers and Accounts table has been created (see section 5.5 Creating Relationships for a review of this process).
To start the process of creating a multiple table query, highlight the Create tab and click on the Query Wizard button to create a new query. Select the “Simple Query Wizard” option as was done previously.
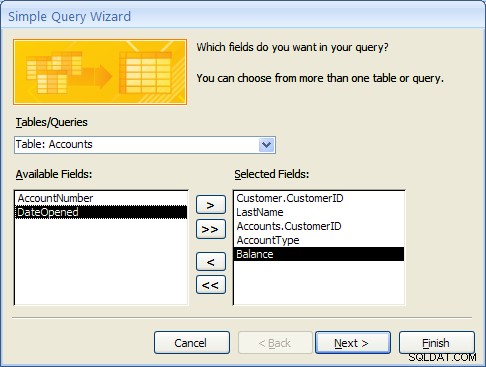
When the simple query wizard appears, select the CustomerID and LastName fields from the Customers table, then switch the Tables/Queries selection to the Accounts table and select the CustomerID, AccountType and Balance fields from the Accounts table. The result from this step is down below:
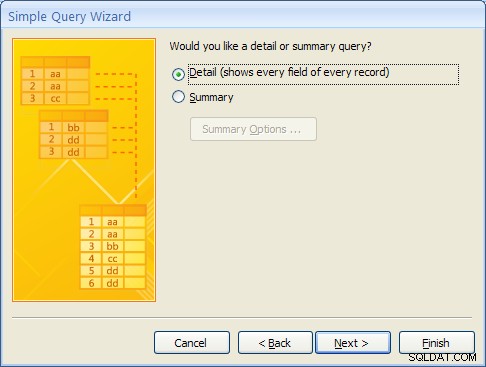
Click the Next button to continue. In the next step of the wizard, an option will appear to provide some level of Summary. For this example, leave the default at “Detail …” as shown below and then click on the Next button.
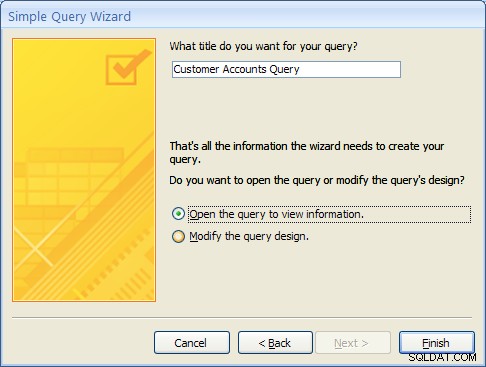
In the final step of the wizard, name the query “Customer Accounts Query” and click on the Finish button. The multiple table query results should appear as follows:
MS Access knows how to line up (or “join”) the accounts table to the Customer table for this query due to the relationship that was created when the tables were first defined.
As with single table queries demonstrated previously, one can change the query definition in design view by adding filters (e.g., show account information for all customers in ‘GA’).
6.4 Exercise:Multiple Table Queries
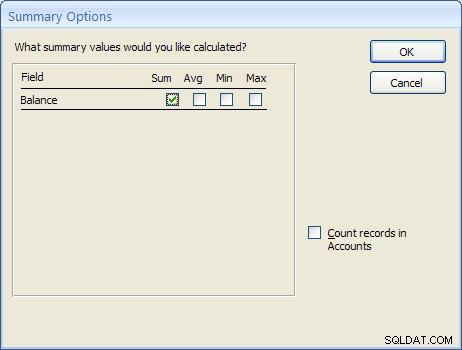
For this exercise, create a new query called “Accounts Summary Query” that joins the Customers table (include the CustomerID and LastName fields) with the Accounts table (include the Balance field only). In the second step of the wizard, click on the Summary choice (instead of Details) and then click on the Summary Options… button. Check off all of the Summary option boxes such as Sum , AVG , Min and Max as shown in the figure below:
The resulting query should appear as follows:
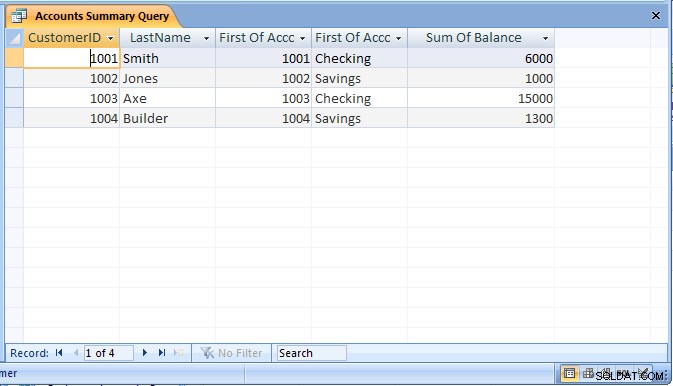
Be sure to save the query as “Accounts Summary Query”.
6.5 Review of Creating and Running Queries
In this section, the basic steps for creating and running queries were introduced. The query wizard can be used to create simple queries that access a single table. It is also possible to then modify the query to sort or filter the records.
Creating a query using the query wizard:
- From the Access main screen, click on the Queries tab. Then click on the New button.
- From the Queries tab on the main Access screen, click on the New button and choose the Simple Query wizard option.
- Under Table/Queries:choose the appropriate table for the query and then indicate which fields in the table will appear in the query output.If querying more than one table, change the Table/Queries:selection to display additional tables and select the necessary fields.
- If the table contains numeric fields, either detailed or summary information may be specified for the query.
- Finally, name the new query and click on the Finish button.
As a final note, Forms and Reports can be created based on existing queries.
7 Creating and Running a Data Entry Form
Data entry forms are the primary means of entering data into tables in the database. In a previous section, we described how to add data to a table using a spreadsheet-like view of the data. Data entry forms offer a more user-friendly interface by adding labels for each field and other helpful information.
Access provides several different ways of creating data entry forms. These include:
- Creating the forms by hand using a Design View
- Creating a default form based on all of the fields available in a table or a query
- Creating a form based on a number of different wizards that walk the user through the forms creation process.
As with queries, a data entry form can be based on a single table or it can work on multiple tables at the same time.
In this section, we cover the basic steps for using a wizard to create a data entry form based on a single table. After this exercise, a multiple-table form is demonstrated.
7.1 Creating a Single Table Form using the Wizard
In this example, we will create a simple data entry form for the Customer table. To begin the process, click on the Create tab on the Access main screen. As with the other components in Access, there are buttons for creating a New form, Open an existing form and Design an existing form. For this example, click on the New button to create a new form.
Several buttons for creating a new form will appear. For this tutorial, choose the Form wizard.
In the first step of the Form wizard, we need to specify the fields from the Customer table that will appear on the form. In this case, we want all of the fields to appear. Move each of the fields from the Available Fields side over to the Selected Fields side as in the following figure. Then click on the Next button.

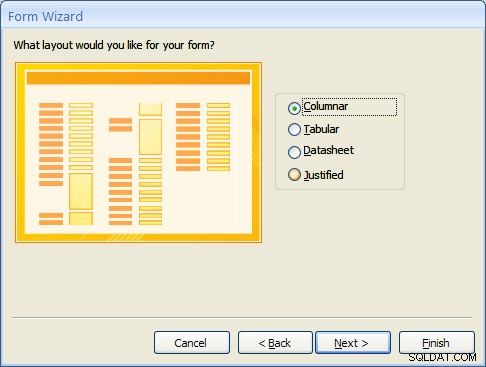
Forms can have several different layouts or arrangement of the labels and fields on the screen.
- Columnar – Places the labels to the left of each field. This is similar to a paper form. This layout is suitable for viewing data one record at a time.
- Tabular – Places the field labels at the top of the screen and the records are displayed below. This is similar to how a spreadsheet would display the data and is suitable for displaying multiple records of data at a time.
- Datasheet – The data appears in the same fashion as when viewing or adding data to a table.
- Justified – Places the labels above each field with the fields spread out on the form. This is suitable for viewing a single record at a time as with the columnar layout.
For this example, choose the columnar layout as shown in the figure below and click on the Next button.
At this point, MS Access 2007 and 2010/2013 versions are a bit different. Access 2007 will show several sample display styles that determine how the form will appear, including elements such as fonts, colors and the background used in the form. Access 2010 and 2013 skips this step in this wizard and provides styles that can be applied to the form in Design mode. For this example, for MS Access 2007, select the Office style as shown below and click on the Next button.

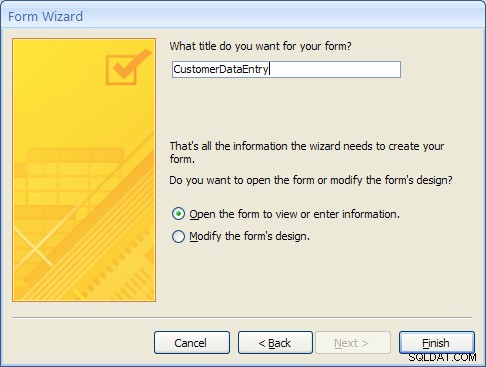
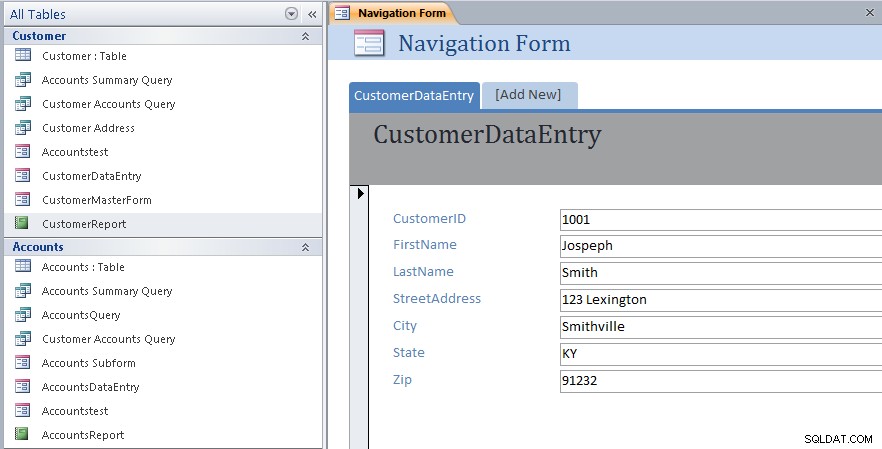
As a final step, give this new form the name:CustomerDataEntry and then click on the Finish button as shown below:
The new form will be created by the wizard and then opened. It should appear as in the figure below:
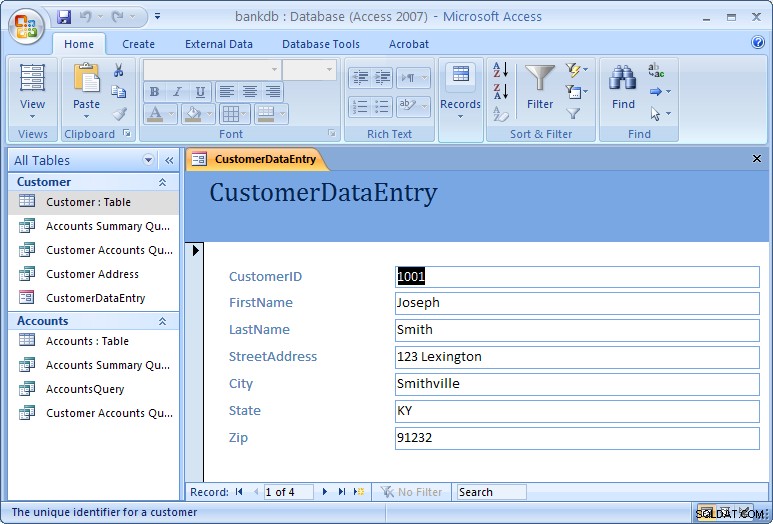
Use the tab key to navigate between fields in the form. To move to the next or previous record, use the record navigation bar at the bottom of the form:
The buttons on the navigation bar perform the following functions:
 | Go to the first record. |
 | Go to the previous record. |
 | Go to the next record. |
 | Go to the last record.  Go past the last record to add a new record. Go past the last record to add a new record. |
To close the form and return to the Access main screen, pull down the File menu and choose Close.
To open the form at any time, highlight the form name under the Forms tab on the Access main screen and click on the Open button.
One quick final note on forms. When the form is created, MS Access looks at how the table is designed and creates the form based on the properties of the table. If you make any changes to the table, you will need to re-create the form again in order to see those table changes reflected in the form. One example where this might happen is is if you change a column in your table from a text box to a combo box, or if you add or remove any columns from your table.
7.2 Exercise:Creating a Single Table Form
For this exercise, we will create a data entry form for the Accounts table created in a previous exercise.
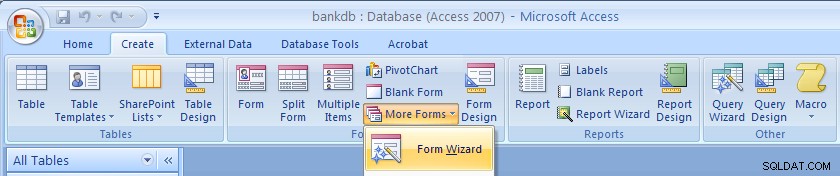
- Click on the Create tab on the Access main screen and then click on the More Forms… button and the “Forms Wizard” to create a new form.
- Select the Accounts table and all of the available fields and click on the Next button.
- Choose a Tabular layout and click on the Next button.
- For Access 2007 choose the Office style and click on the Next button.
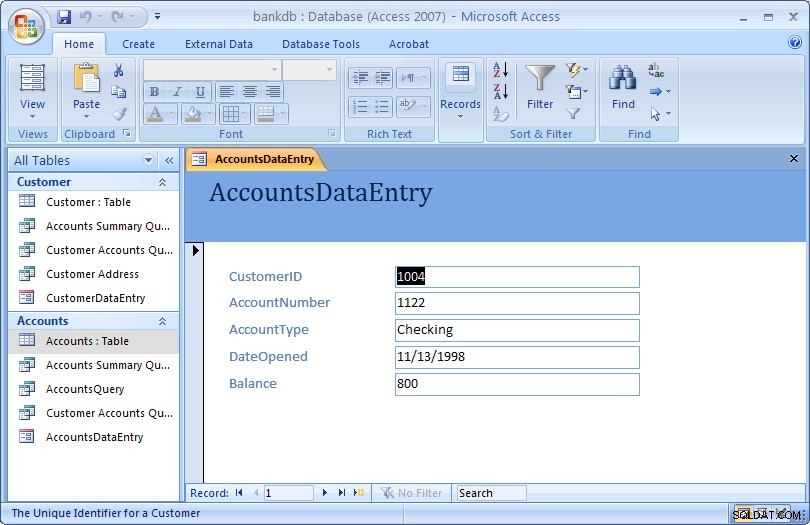
- Name the form:AccountsDataEntry Then click on the Finish button to create, save and view the new form.
The new form is shown in the figure below:
Close the form and return to the Access main screen, by pulling down the File (or Office) menu and choosing Close.
7.3 Review of Creating and Running a Data Entry Form
The basic steps for creating a simple data entry form are:
- Choose a table and a form wizard
- Specify the fields (columns) that will appear in the form
- Specify the layout for the form
- Specify the style (fonts/colors, etc.) for the form
- Save, create and run the new form
In this section we covered the basic steps required to create and run a data entry form. Access provides wizards which are adept at building simple forms with a minimal amount of work. More advanced work on forms would concentrate on using the Design View to change a form’s appearance and to add or remove fields and labels once a form is created. A more advanced tutorial on MS Access Forms Design is linked here.
8 Creating and Running a Report
Reports are similar to queries in that they retrieve data from one or more tables and display the records. Unlike queries, however, reports add formatting to the output including fonts, colors, backgrounds and other features. Reports are often printed out on paper rather than just viewed on the screen. They can also be attached to e-mail and exported and posted as web pages.
As with data entry forms, there are a number of ways to create reports in MS Access:
- A report can be created “by hand” in Design view
- A default report can be created automatically based on all of the firleds for a given table.
- A report can be created using the Create Report wizard.
In this section, we cover how to create simple reports using the Report wizard.
8.1 Creating a Single Table Report using the Wizard
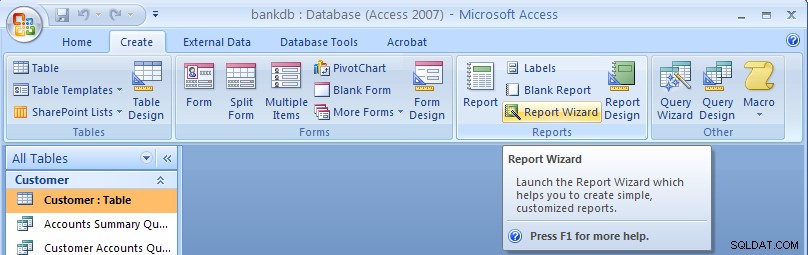
In this example, we will create a simple report for a single table using the Report wizard. As with the Queries and Forms, we begin by selecting the Create tab from the Access main screen.
To create a new report, click on the Report Wizard button.
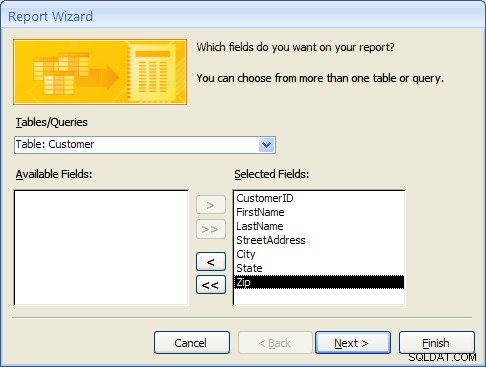
In the next step of the Report wizard, is used to specify the fields from the Customer table that will appear on the report. In this case, we want all of the fields to appear. Move each of the fields from the Available Fields side over to the Selected Fields side as in the following figure. Then click on the Next button.
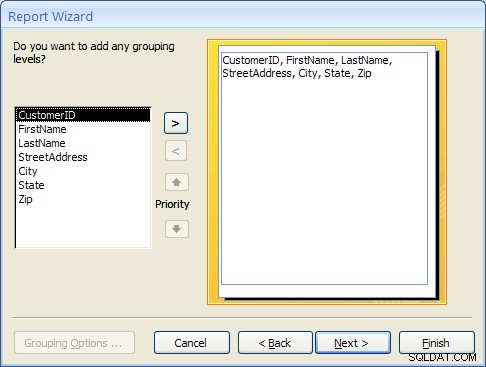
In the next step, we have the opportunity to add Grouping Levels to the report. A grouping level is where several records have the same value for a given field and we only display the value for the first records. In this case, we will not use any grouping levels so simply click on the Next button as shown below.
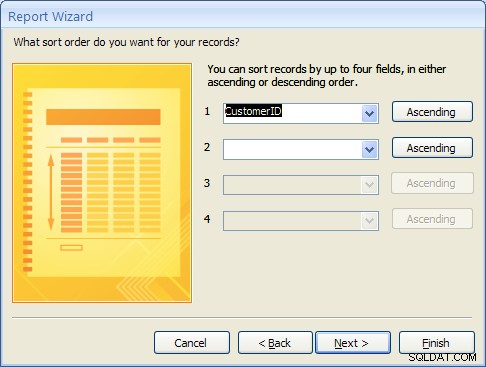
In the next step, the sorting order of the report can be specified. For this example, we will sort the records on the CustomerID field. To achieve this, pull down the list box next to the number 1:and choose the CustomerID field as shown in the figure below. Then click on the Next button.
8.1 Creating a Single Table Report using the Wizard (Continued)
The next step is to specify the layout of the report. The three options are:
- Columnar – Places the labels to the left of each field. This is similar to a paper form.
- Tabular – Places the field labels at the top of the report page and the records are displayed below. This is similar to how a spreadsheet would display the data.
- Justified – Places the labels above each field with the fields spread out on the report page.
Generally, reports use the tabular layout. For this example, choose Tabular layout and set the page Orientation to Landscape so that all of the fields will fit across one page. This is shown in the figure below. Click on the Next button to continue.

In the next step, the style of the report can be selected. For this example, choose the Office style and click on the Next button to continue.

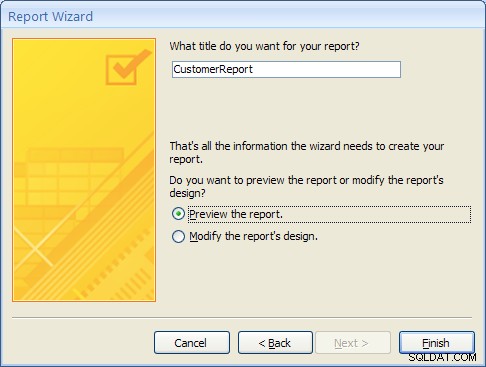
Finally, give a name for the new report:CustomerReport and then click on the Finish button to create, save and display the new report.
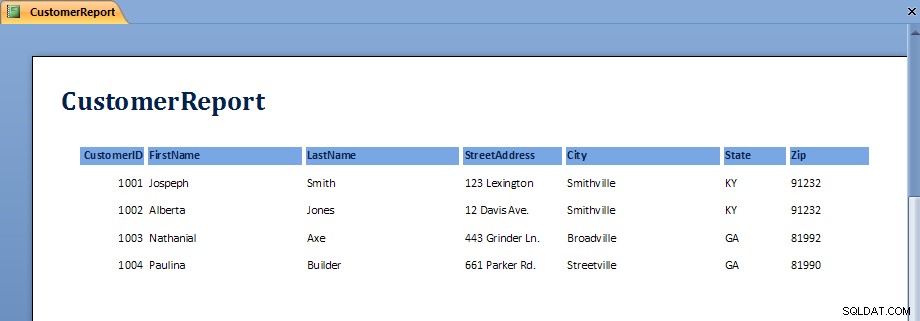
The output from the report is shown in the figure below. Note that on some screens, the last field, Zip, may not display without scrolling over to the right.
Once the report is displayed, it can be viewed, printed or transferred into Microsoft Word or Microsoft Excel. The button bar across the top of the screen has the following functions:
 | Print the report |
 | Zoom into a region of the report |
 | Display the report as one, two or multiple pages |
 | Zoom into or out of the report |
 | Transfer the report into MS Word |
 | Close the report |
To close the report and return to the Access main screen, click on the Close button.
8.2 Exercise:Creating a Single Table Report
For this exercise, we will create a report showing all of the Accounts information.
- From the Access main screen, click on the Create tab and Click on the Report wizard.
- Select all of the fields in the Accounts table by moving them all over to the Selected Fields side and then click Next
- Group the report by CustomerID by clicking on the CustomerID field and then clicking on the right arrow button. This is shown in the following figure:
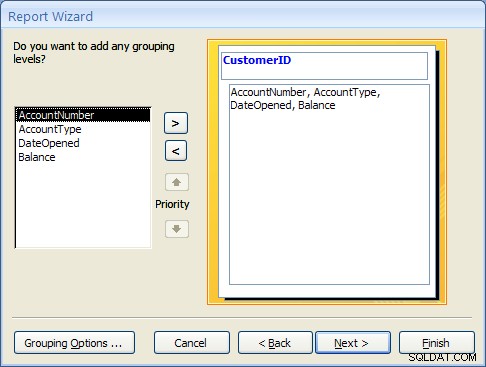
Click on the Next button to continue. - Choose to sort the report on the AccountNumber veld. Note that a new button will appear called Summary Options.
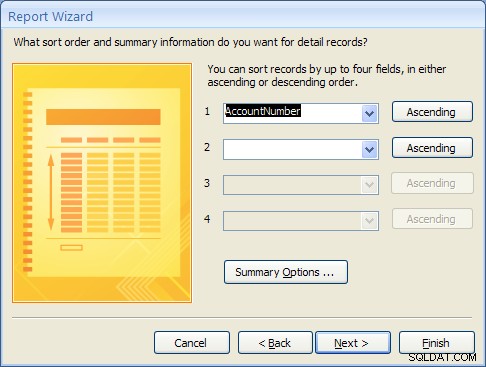
Click on the Summary Options button. Choose the Balance field and select the Sum option. Choose the option to show both Detail and Summary data. Then click on the OK button.

Click on the Next button. - Choose a Block layout and click on the Next button.
- Choose the Corporate style and the click on the Next button.
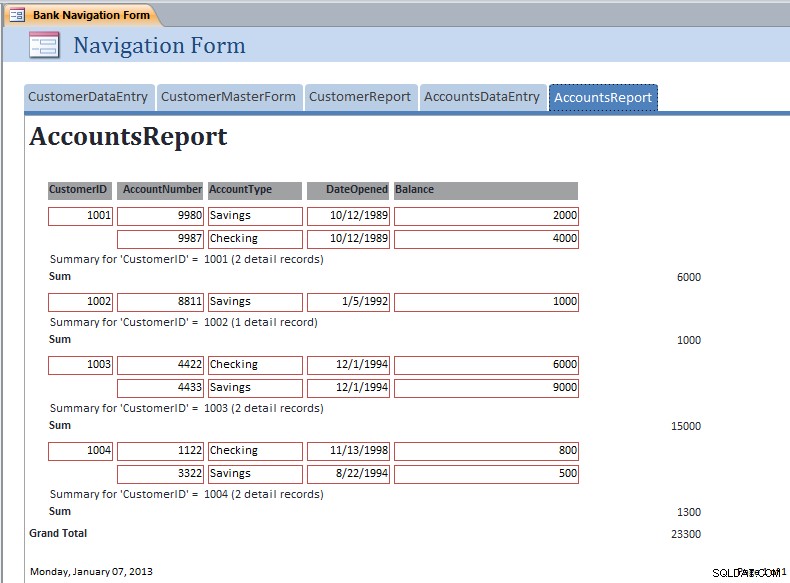
- Finally, name the report:AccountsReport and click on the Finish button to create, save and run the report.
The output from the AccountsReport is shown below:
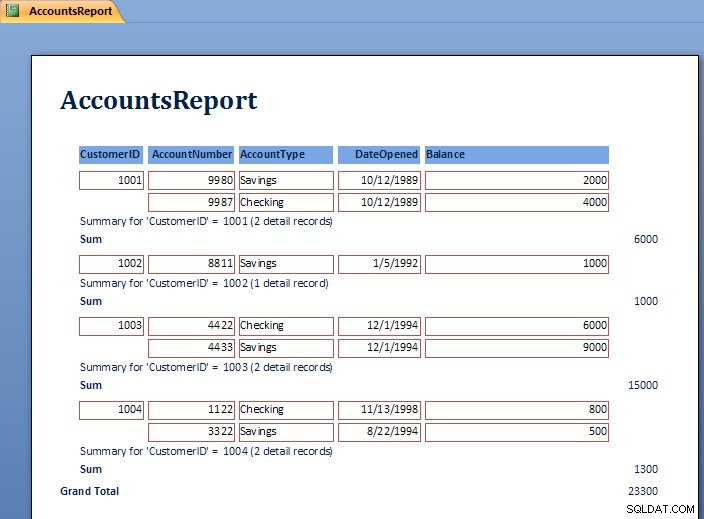
Note the Grouping at the level of the CustomerID and the Sum for each customer’s balances.
To close the report and return to the Access main screen, pull down the File menu and choose Close.
8.3 Review of Creating and Running a Report
As can be seen in the report exercise, there are many ways to create reports to show summation, sorting and layout of the data. Further study of Reports will show how to modify the layout using the Design View. Students are encouraged to work with the Report wizards to create different styles and types of reports.
9 Creating and Running a Master/Detail Form
Master/Detail forms are used to display data from two tables at the same time. MS Access calls the “details” a “subform”. The forms are linked according to the relationship between the tables. Recall that in the example database, the CustomerID is used to link the Customer table (Master) to the Accounts table (Detail). In this section a master / detail form for the Customer and Accounts tables will be created.
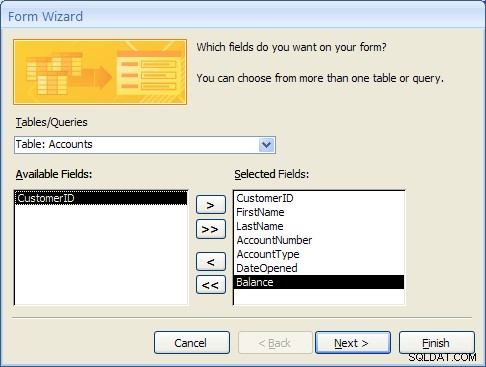
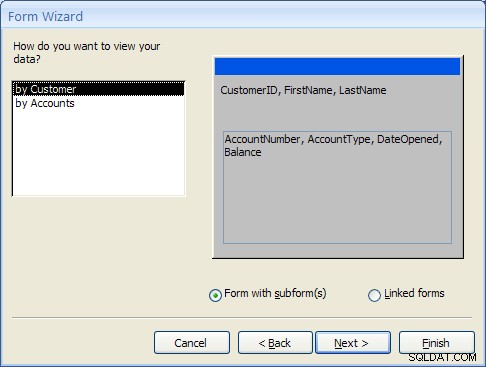
- From the Access main screen, click on the Create tab and Click on the “More Forms…” section and finally the “Forms Wizard”.Select the Customer table first and move the CustomerID, FirstName and LastName fields to the Selected Fields list.Next, select the Accounts table and move the AccountNumber, AccountType, DateOpened and Balance fields to the Selected Fields list as shown below.
Click the Next… button to move to the next step. - At this point MS Access detects that this form will involve data from two different tables. The first prompt asks how the form should be organized at the top or “Master” level. The “by Customer” selection should be highlighted.The second prompt asks how the forms should be created. For this example, select “Form with Subform(s)” as shown below and click the Next… button to move to the next step.
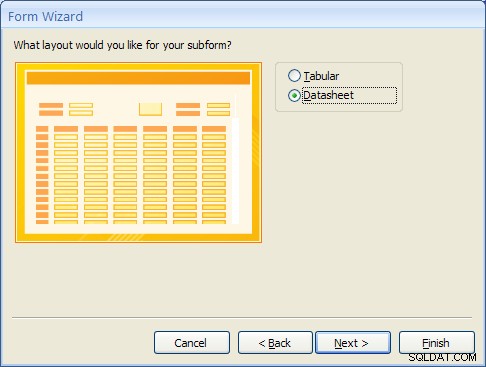
- The Subform is the form that will display the detailed data from the Accounts table. Selecting the “Datasheet” layout will make it easy for the user to view the multiple accounts a Customer may have. Select “Datasheet” and click the Next… button to move to the next step.
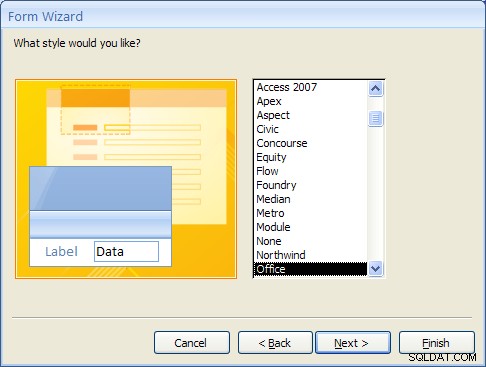
- For Access 2007, select the Office style and click the Next… button to move to the next step. (This step will not appear in MS Access 2010 or 2013).
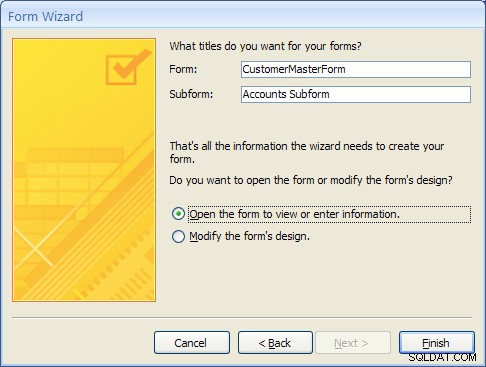
- Finally, give the main form the name “CustomerMasterForm” and the Subform the name “Accounts Subform”.
- After clicking on the Finish button the new Master/Detail form will appear as shown below.
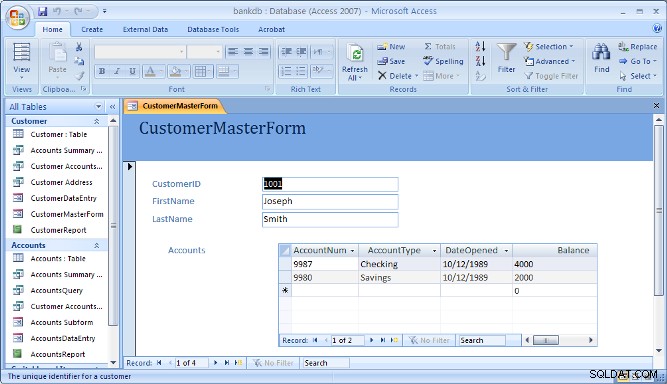
Note that the navigation bar at the bottom of the form is used to navigate through the records in the Master (or top) part of the form.
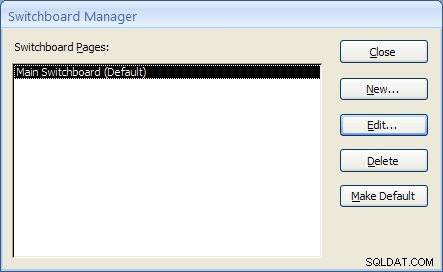
10 Creating and Running a Switchboard
A Switchboard is a type of form that displays a menu of items that a user can click on to launch data entry forms, reports, queries and other actions in the database. A switchboard is typically created after all of the forms and reports for a database application have been completed. It can be used to guide the user to an appropriate set of forms and reports.
Note that starting with Access 2010, Switchboards are not available by default (you will need to add this to the ribbon bar manually using the Options). Access 2010 and 2013 make use of the Navigation Forms.
In this section, a default switchboard will be created.
- From the Access main screen, click on the Database Tools tab and Click on the Switchboard Manager as shown in the figure below.

If this is the first switchboard made for this database, you will be prompted to create a new one as shown below. Click the Yes button.

- The Switchboard manager will appear as shown below:
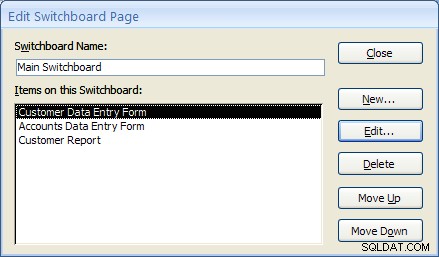
- Click on the Edit menu to edit the “Main Switchboard”. The Edit Switchboard Page will appear as shown below:
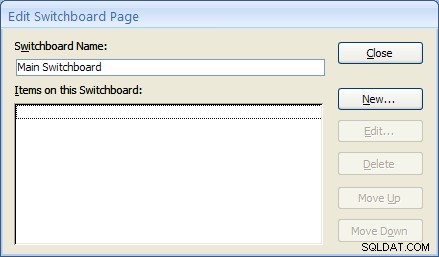
- Add a new switchboard item by clicking on the New… button. The Edit Switchboard Item form will appear as shown below. Fill in the fields as follows:
Text: Customer Data Entry Form Command: Select Open Form in Edit Mode from the drop down list. Form: Select the “CustomerDataEntry” form from the drop down list. 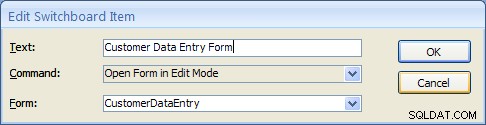
Click on the OK button to save this new Switchboard item.
- Repeat the above step two more times to add Switchboard items for the Accounts DataEntry form and the Customer Report.
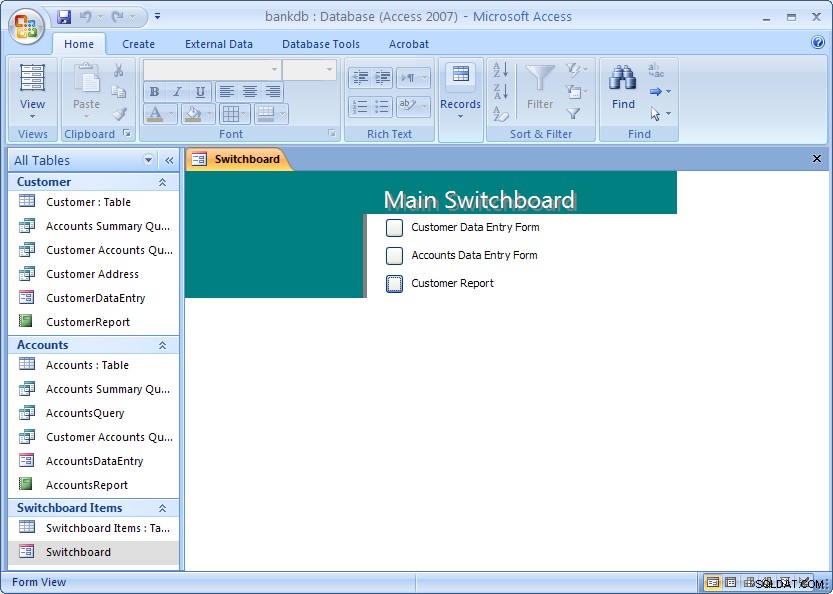
Once completed, click the Close button. Then click the Close button once more to close the Switchboard manager. - From the main MS Access screen look for a new section labeled Switchboard items. To view the switchboard, double-click on name “Switchboard”.
The next section covers creating a Navigation Form which is the recommended navigation screen for MS Access 2007, 2010 and newer versions.
11 Creating and Running a Navigation Form
MS Access 2010 introduced a new form called a Navigation Form. Navigation forms take the place of Switchboards but provide much the same functionality. Namely, they are designed to give the user the ability to run forms and reports without having to hunt through all of the different menus and lists objects. Typically a database application will have one main Navigation form that will appear when the database is opened.
In this section, the basic steps for creating and running a Navigation Form in MS Access 2010 will be demonstrated.
A Navigation Form is another type of form in MS Access 2010 and 2013
- To get started, click on the Create tab on the Access 2010 or 2013 ribbon bar. Under the section for Forms look for the item labeled Navigation Form. Note that this may be located on the button labeled Other Forms.
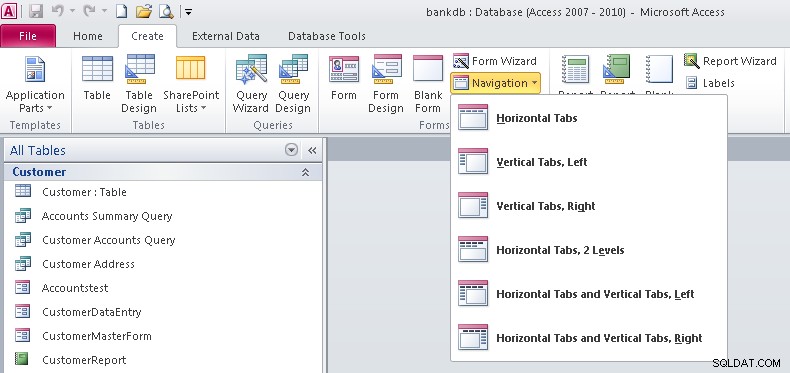
- Note that there are 6 different default styles of Navigation Forms. Each one places the buttons in a different configuration on the screem. Buttons can be aligned across the top, either side or some combination.For this tutorial select the Horizontal Tabs configuration which appears as the first item on the list.
- At this point a new Navigation Form will be created with a row of tabs across the top. The first tab will be labeled [Add New]
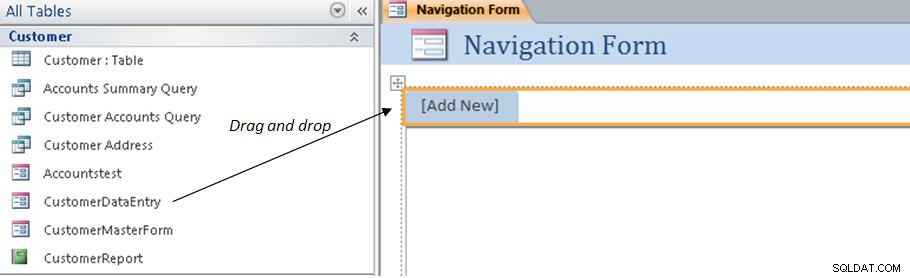
- To add items to the Navigation form, drag the items from the list on the left over to the spot on the Navigation Form labeled [Add New]. This is shown by the arrow in the above figure. For example, drag over the CustomerDataEntry form to the Navigation Form. The result is shown below.
- Next drag and drop the CustomerMasterForm as shown below.

- Next drag and drop the CustomerReport as shown below.
- At this point we have created a new navigation Form and added three items along the top of the page. Save the Navigation Form by right-clicking on the name of the form and choosing Save as shown below:
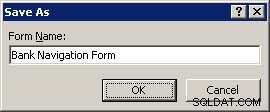
- Name the Navigation Form:Bank Navigation Form and click the OK button.
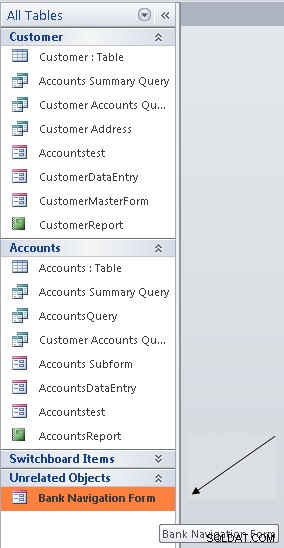
- Close up the Navigation Form by right-clicking again on the name of the form and choosing Close menu item.At this point the new Navigation Form has been created and saved. The next step will be to view the Navigation Form and navigate the different forms and reports linked to it.
- To view the Navigation Form, look for the Unrelated Objects group on the left side of the screen. Double click on the Bank Navigation Form item as shown below:
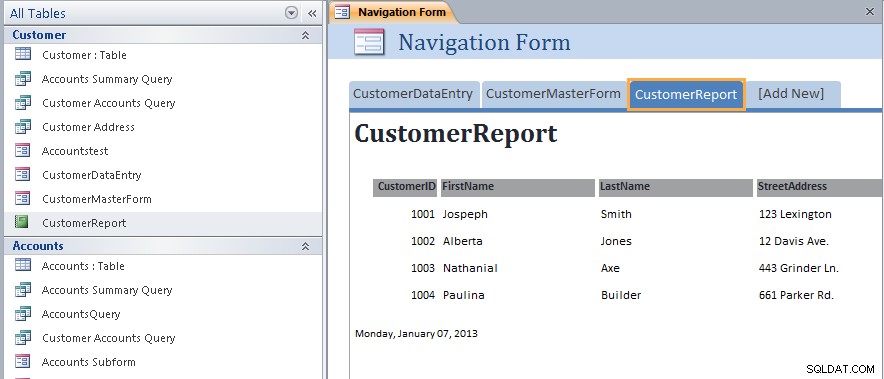
The Navigation Form will appear: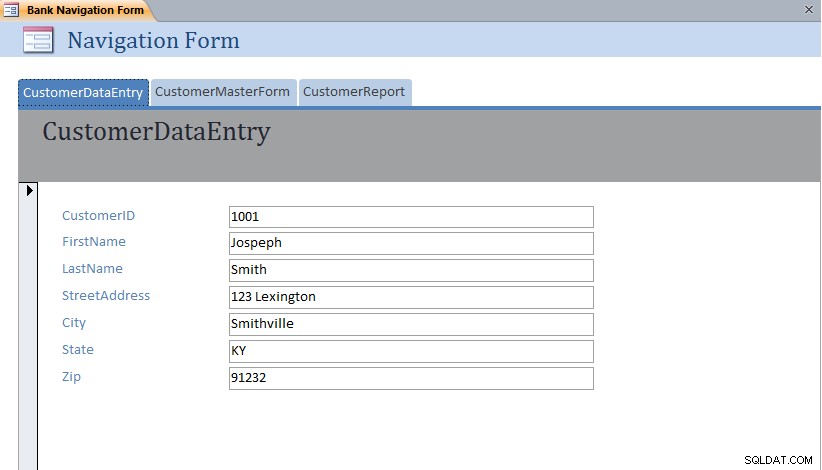 Note that each form or report can be displayed simply by clicking on the different tabs across the top of the Navigation Form.
11.1 Exercise:Modifying a Navigation Form
For this exercise, edit the Bank Navigation Form in Layout View and add the following new items to the Navigation Form:
- AccountsDataEntry
- AccountsReport
The resulting Navigation Form should appear as below with the AccountsReport opened:
11.2 Setting the Navigation Form as the Default
MS Access 2007 and 2010 (as well as earlier versions) have the ability to set a default form that will open up automatically once the MS Access data file is opened. This is especially useful for end users so that they always see the same form when they open up the database.
To set the Default Form, pull down the File menu and select the Options menu item.

The Database Options form will appear. Click on the Current Database item on the left hand side.
Under the Application Options heading, look for the Display Form:prompt and set this to the Bank Navigation Form as shown below:
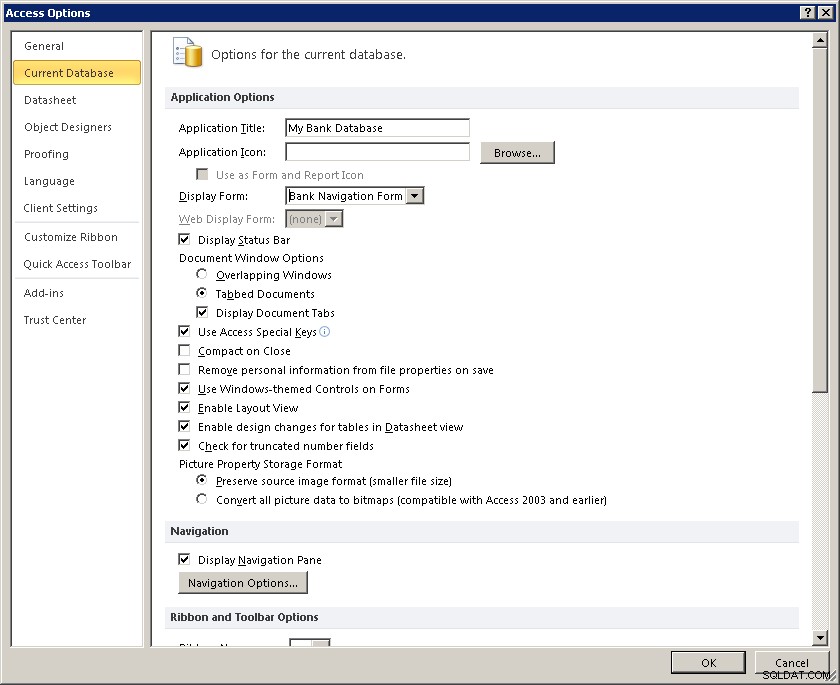
Click on the OK button to close up the Database Options screen.
The next time this database (bankdb.accdb) is opened, the Bank Navigation Form will open up.
12 Tutorial Summary
In this tutorial, we have covered the basics for creating an Access database including tables with data, queries to retrieve data, forms to enter data and reports to display and summarize data.
Students are encouraged to further their Access knowledge and skills by working through more advanced tutorials such as Advanced Access Database Table Design and Advanced Access Forms Design, and by reading the on-line help and Access documentation.
You may also be interested in this tutorial that covers up-sizing the Access database to Microsoft SQL Server using the Microsoft SQL Server Migration Assistant.