MySQL is een van de meest populaire databasebeheersystemen (DBMS'en) die momenteel op de markt zijn. Het stond op de tweede plaats na de Oracle DBMS in de DB-Engines Ranking van dit jaar. Aangezien de meeste softwaretoepassingen op een of andere manier met gegevens moeten communiceren, bieden programmeertalen zoals Python hulpmiddelen voor het opslaan en openen van deze gegevensbronnen.
Met behulp van de technieken die in deze tutorial worden besproken, kun je een MySQL-database efficiënt integreren met een Python-applicatie. Je ontwikkelt een kleine MySQL-database voor een filmbeoordelingssysteem en leert hoe je deze rechtstreeks vanuit je Python-code kunt opvragen.
Aan het einde van deze tutorial kun je:
- Identificeer unieke kenmerken van MySQL
- Verbind uw applicatie naar een MySQL-database
- Bezoek de database om vereiste gegevens op te halen
- Uitzonderingen afhandelen die optreden bij het openen van de database
- Gebruik best practices tijdens het bouwen van database-applicaties
Om het meeste uit deze tutorial te halen, moet je praktische kennis hebben van Python-concepten zoals for loops, functies, het afhandelen van uitzonderingen en het installeren van Python-pakketten met behulp van pip . Je moet ook een basiskennis hebben van relationele databasebeheersystemen en SQL-query's zoals SELECT , DROP , CREATE , en JOIN .
Gratis download: Ontvang een voorbeeldhoofdstuk uit Python Tricks:The Book dat je de beste praktijken van Python laat zien met eenvoudige voorbeelden die je direct kunt toepassen om mooiere + Pythonic-code te schrijven.
MySQL vergelijken met andere SQL-databases
SQL staat voor Structured Query Language en is een veelgebruikte programmeertaal voor het beheren van relationele databases. Je hebt misschien gehoord van de verschillende smaken van op SQL gebaseerde DBMS'en. De meest populaire zijn MySQL, PostgreSQL, SQLite en SQL Server. Al deze databases voldoen aan de SQL-standaarden, maar in verschillende mate.
open source zijn sinds de oprichting in 1995 werd MySQL al snel marktleider onder de SQL-oplossingen. MySQL maakt ook deel uit van het Oracle-ecosysteem. Hoewel de kernfunctionaliteit volledig gratis is, zijn er ook enkele betaalde add-ons. Momenteel wordt MySQL gebruikt door alle grote technologiebedrijven, waaronder Google, LinkedIn, Uber, Netflix, Twitter en anderen.
Naast een grote open source-community voor ondersteuning, zijn er nog vele andere redenen voor het succes van MySQL:
-
Eenvoud van installatie: MySQL is ontworpen om gebruiksvriendelijk te zijn. Het is vrij eenvoudig om een MySQL-database op te zetten en verschillende algemeen beschikbare tools van derden, zoals phpMyAdmin, stroomlijnen het installatieproces verder. MySQL is beschikbaar voor alle belangrijke besturingssystemen, waaronder Windows, macOS, Linux en Solaris.
-
Snelheid: MySQL heeft de reputatie een buitengewoon snelle database-oplossing te zijn. Het heeft een relatief kleinere footprint en is op de lange termijn extreem schaalbaar.
-
Gebruikersrechten en beveiliging: MySQL wordt geleverd met een script waarmee u het wachtwoordbeveiligingsniveau kunt instellen, beheerderswachtwoorden kunt toewijzen en gebruikersaccountrechten kunt toevoegen en verwijderen. Dit script vereenvoudigt het beheerproces voor een gebruikersbeheerportaal voor webhosting. Andere DBMS'en, zoals PostgreSQL, gebruiken configuratiebestanden die ingewikkelder zijn om te gebruiken.
Hoewel MySQL bekend staat om zijn snelheid en gebruiksgemak, kunt u met PostgreSQL meer geavanceerde functies krijgen. MySQL is ook niet volledig SQL-compatibel en heeft bepaalde functionele beperkingen, zoals geen ondersteuning voor FULL JOIN clausules.
U kunt ook problemen ondervinden met gelijktijdig lezen en schrijven in MySQL. Als uw software veel gebruikers tegelijk gegevens naar de software laat schrijven, is PostgreSQL wellicht een geschiktere keuze.
Opmerking: Voor een meer diepgaande vergelijking van MySQL en PostgreSQL in een reële context, ga je naar Waarom Uber Engineering overstapte van Postgres naar MySQL.
SQL Server is ook een zeer populaire DBMS en staat bekend om zijn betrouwbaarheid, efficiëntie en veiligheid. Het heeft de voorkeur van bedrijven, vooral in het bankwezen, die regelmatig te maken hebben met grote verkeersbelastingen. Het is een commerciële oplossing en is een van de systemen die het meest compatibel zijn met Windows-services.
In 2010, toen Oracle Sun Microsystems en MySQL overnam, maakten velen zich zorgen over de toekomst van MySQL. Oracle was destijds de grootste concurrent van MySQL. Ontwikkelaars vreesden dat dit een vijandige overname van Oracle was met als doel MySQL te vernietigen.
Verschillende ontwikkelaars onder leiding van Michael Widenius, de oorspronkelijke auteur van MySQL, creëerden een vork van de MySQL-codebasis en legden de basis voor MariaDB. Het doel was om de toegang tot MySQL te beveiligen en voor altijd gratis te houden.
Tot op heden blijft MariaDB volledig GPL-gelicentieerd, waardoor het volledig in het publieke domein blijft. Sommige functies van MySQL zijn daarentegen alleen beschikbaar met betaalde licenties. MariaDB biedt ook verschillende uiterst handige functies die niet worden ondersteund door de MySQL-server, zoals gedistribueerde SQL en kolomopslag. U kunt meer verschillen tussen MySQL en MariaDB vinden op de website van MariaDB.
MySQL gebruikt een syntaxis die erg lijkt op de standaard SQL. Er worden echter enkele opmerkelijke verschillen genoemd in de officiële documentatie.
MySQL Server en MySQL Connector/Python installeren
Om aan deze tutorial te beginnen, moet je twee dingen instellen:een MySQL-server en een MySQL-connector . MySQL-server biedt alle services die nodig zijn voor het verwerken van uw database. Zodra de server actief is, kunt u uw Python-toepassing ermee verbinden met behulp van MySQL Connector/Python.
MySQL-server installeren
De officiële documentatie beschrijft de aanbevolen manier om de MySQL-server te downloaden en te installeren. Je vindt instructies voor alle populaire besturingssystemen, waaronder Windows, macOS, Solaris, Linux en nog veel meer.
Voor Windows is de beste manier om MySQL Installer te downloaden en het hele proces te laten regelen. De installatiemanager helpt u ook bij het configureren van de beveiligingsinstellingen van de MySQL-server. Op de pagina Accounts en rollen moet u een wachtwoord invoeren voor de root (admin) account en optioneel ook andere gebruikers met verschillende privileges toevoegen:
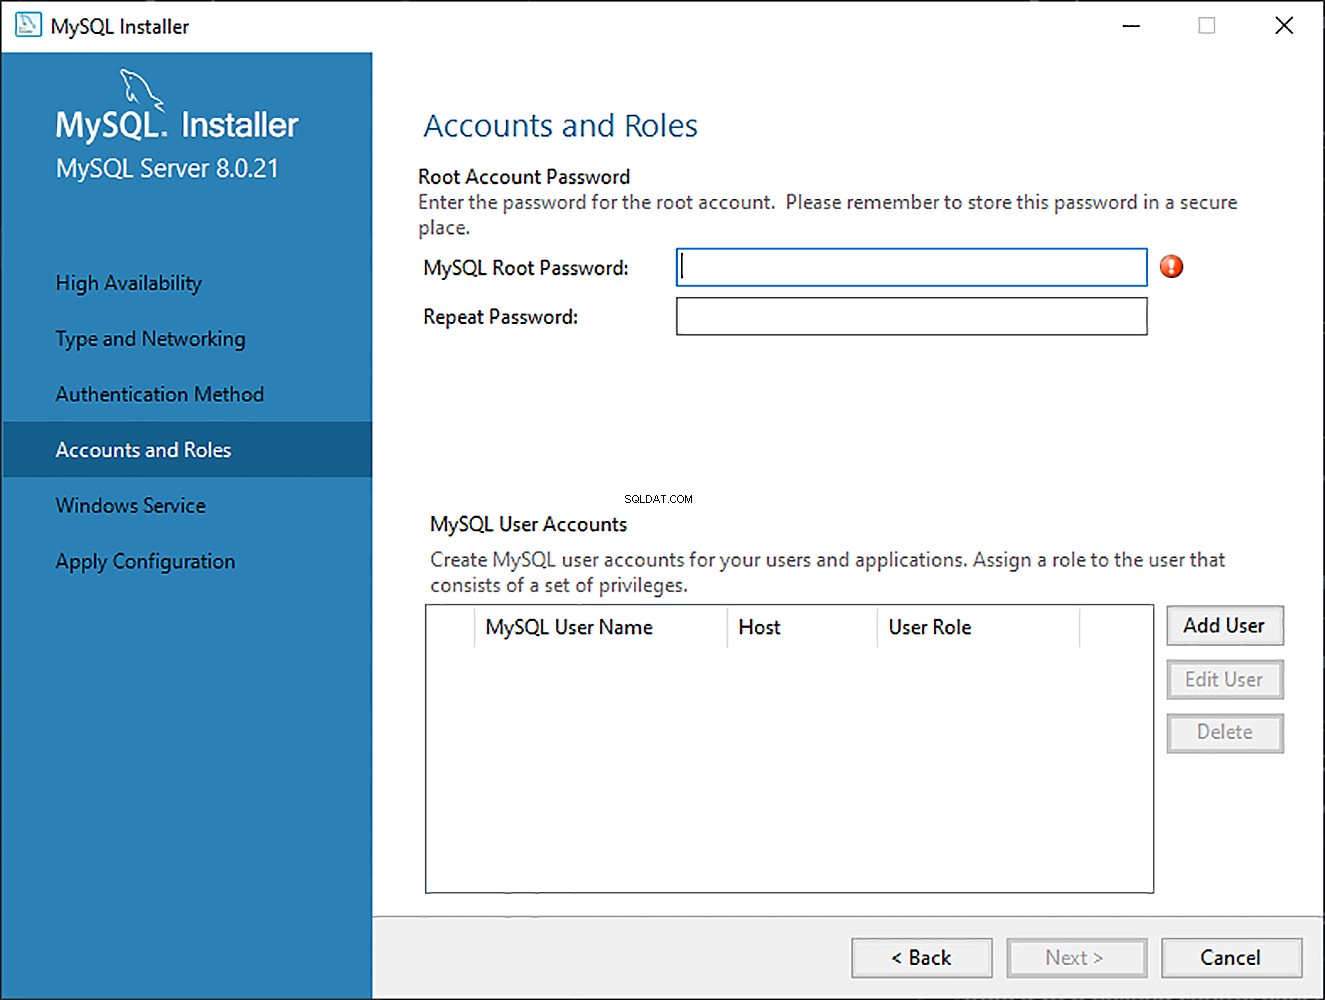
Hoewel u tijdens de installatie de inloggegevens voor het root-account moet opgeven, kunt u deze instellingen later wijzigen.
Opmerking: Onthoud de hostnaam, gebruikersnaam en wachtwoord, aangezien deze later nodig zijn om verbinding te maken met de MySQL-server.
Hoewel je voor deze tutorial alleen de MySQL-server nodig hebt, kun je met deze installatieprogramma's ook andere handige tools instellen, zoals MySQL Workbench. Als u MySQL niet rechtstreeks in uw besturingssysteem wilt installeren, is het implementeren van MySQL op Linux met Docker een handig alternatief.
MySQL-connector/Python installeren
Een databasestuurprogramma is een stukje software waarmee een toepassing verbinding kan maken met en interactie kan hebben met een databasesysteem. Programmeertalen zoals Python hebben een speciaal stuurprogramma nodig voordat ze met een database van een specifieke leverancier kunnen praten.
Deze stuurprogramma's worden meestal verkregen als modules van derden. De Python Database API (DB-API) definieert de standaardinterface waaraan alle Python-databasestuurprogramma's moeten voldoen. Deze details zijn gedocumenteerd in PEP 249. Alle Python-databasestuurprogramma's, zoals sqlite3 voor SQLite, psycopg voor PostgreSQL en MySQL Connector/Python voor MySQL, volgen deze implementatieregels.
Opmerking: De officiële documentatie van MySQL gebruikt de term connector in plaats van chauffeur . Technisch gezien worden connectoren alleen geassocieerd met het verbinden met een database, niet met interactie ermee. De term wordt echter vaak gebruikt voor de volledige databasetoegangsmodule die de connector en . omvat de chauffeur.
Om consistentie met de documentatie te behouden, zie je de term connector wanneer MySQL wordt genoemd.
Veel populaire programmeertalen hebben hun eigen database-API. Java heeft bijvoorbeeld de Java Database Connectivity (JDBC) API. Als u een Java-toepassing moet verbinden met een MySQL-database, moet u de MySQL JDBC-connector gebruiken, die de JDBC API volgt.
Evenzo moet u in Python een Python MySQL-connector installeren om te communiceren met een MySQL-database. Veel pakketten volgen de DB-API-standaarden, maar de meest populaire is MySQL Connector/Python. Je kunt het krijgen met pip :
$ pip install mysql-connector-python
pip installeert de connector als een module van derden in de momenteel actieve virtuele omgeving. Het wordt aanbevolen dat u een geïsoleerde virtuele omgeving voor het project opzet, samen met alle afhankelijkheden.
Om te testen of de installatie succesvol was, typt u de volgende opdracht op uw Python-terminal:
>>>>>> import mysql.connector
Als de bovenstaande code zonder fouten wordt uitgevoerd, dan mysql.connector is geïnstalleerd en klaar voor gebruik. Als u fouten tegenkomt, zorg er dan voor dat u zich in de juiste virtuele omgeving bevindt en dat u de juiste Python-interpreter gebruikt.
Zorg ervoor dat u de juiste mysql-connector-python . installeert pakket, dat een pure Python-implementatie is. Pas op voor gelijknamige maar nu afgeschreven connectoren zoals mysql-connector .
Een verbinding tot stand brengen met MySQL-server
MySQL is een servergebaseerd databasemanagementsysteem. Eén server kan meerdere databases bevatten. Om met een database te werken, moet u eerst een verbinding met de server tot stand brengen. De algemene workflow van een Python-programma dat interageert met een op MySQL gebaseerde database is als volgt:
- Verbind met de MySQL-server.
- Maak een nieuwe database.
- Maak verbinding met de nieuw aangemaakte of een bestaande database.
- Voer een SQL-query uit en haal de resultaten op.
- Informeer de database als er wijzigingen zijn aangebracht in een tabel.
- Sluit de verbinding met de MySQL-server.
Dit is een generieke workflow die kan variëren afhankelijk van de individuele toepassing. Maar wat de toepassing ook is, de eerste stap is om uw database met uw toepassing te verbinden.
Een verbinding tot stand brengen
De eerste stap bij interactie met een MySQL-server is het tot stand brengen van een verbinding. Om dit te doen, heb je connect() . nodig van de mysql.connector module. Deze functie neemt parameters op zoals host , user , en password en retourneert een MySQLConnection voorwerp. U kunt deze inloggegevens ontvangen als invoer van de gebruiker en deze doorgeven aan connect() :
from getpass import getpass
from mysql.connector import connect, Error

try:
    with connect(
        host="localhost",
        user=input("Enter username: "),
        password=getpass("Enter password: "),
    ) as connection:
        print(connection)
except Error as e:
    print(e)
De bovenstaande code gebruikt de ingevoerde inloggegevens om verbinding te maken met uw MySQL-server. In ruil daarvoor krijg je een MySQLConnection object, dat is opgeslagen in de connection variabel. Vanaf nu gebruik je deze variabele om toegang te krijgen tot je MySQL-server.
Er zijn verschillende belangrijke dingen om op te merken in de bovenstaande code:
-
U moet altijd omgaan met de uitzonderingen die kunnen optreden bij het tot stand brengen van een verbinding met de MySQL-server. Daarom gebruik je een
try…exceptblok om eventuele uitzonderingen op te vangen en af te drukken. -
U moet de verbinding altijd sluiten nadat u klaar bent met het openen van de database. Ongebruikte open verbindingen laten kan leiden tot verschillende onverwachte fouten en prestatieproblemen. De bovenstaande code maakt gebruik van een contextmanager die
with. gebruikt , die het proces voor het opschonen van de verbinding wegneemt. -
U moet uw inloggegevens nooit hardcoderen , dat wil zeggen, uw gebruikersnaam en wachtwoord, rechtstreeks in een Python-script. Dit is een slechte gewoonte voor implementatie en vormt een ernstige bedreiging voor de veiligheid. De bovenstaande code vraagt de gebruiker om inloggegevens. Het gebruikt de ingebouwde
getpassmodule om het wachtwoord te verbergen. Hoewel dit beter is dan hard-coderen, zijn er andere, veiligere manieren om gevoelige informatie op te slaan, zoals het gebruik van omgevingsvariabelen.
U hebt nu een verbinding tot stand gebracht tussen uw programma en uw MySQL-server, maar u moet nog steeds een nieuwe database maken of verbinding maken met een bestaande database binnen de server.
Een nieuwe database maken
In de laatste sectie heb je verbinding gemaakt met je MySQL-server. Om een nieuwe database aan te maken, moet u een SQL-statement uitvoeren:
CREATE DATABASE books_db;
De bovenstaande instructie maakt een nieuwe database aan met de naam books_db .
Opmerking: In MySQL is het verplicht om een puntkomma (; ) aan het einde van een instructie, die de beëindiging van een query aangeeft. MySQL Connector/Python voegt echter automatisch een puntkomma toe aan het einde van uw zoekopdrachten, dus u hoeft deze niet in uw Python-code te gebruiken.
Om een SQL-query in Python uit te voeren, moet u een cursor gebruiken, die de toegang tot databaserecords abstraheert. MySQL Connector/Python biedt u de MySQLCursor class, die objecten instantieert die MySQL-query's in Python kunnen uitvoeren. Een instantie van de MySQLCursor klasse wordt ook wel een cursor . genoemd .
cursor objecten maken gebruik van een MySQLConnection object om te communiceren met uw MySQL-server. Een cursor maken , gebruik de .cursor() methode van uw connection variabele:
cursor = connection.cursor()
De bovenstaande code geeft u een exemplaar van de MySQLCursor klasse.
Een query die moet worden uitgevoerd, wordt verzonden naar cursor.execute() in string-formaat. In dit specifieke geval stuurt u de CREATE DATABASE query naar cursor.execute() :
from getpass import getpass
from mysql.connector import connect, Error

try:
    with connect(
        host="localhost",
        user=input("Enter username: "),
        password=getpass("Enter password: "),
    ) as connection:
        create_db_query = "CREATE DATABASE online_movie_rating"
        with connection.cursor() as cursor:
            cursor.execute(create_db_query)
except Error as e:
    print(e)
Na het uitvoeren van de bovenstaande code, heb je een nieuwe database genaamd online_movie_rating in uw MySQL-server.
De CREATE DATABASE query wordt opgeslagen als een tekenreeks in de create_db_query variabele en vervolgens doorgegeven aan cursor.execute() voor uitvoering. De code gebruikt een contextmanager met de cursor bezwaar om het opruimproces af te handelen.
Mogelijk krijgt u hier een foutmelding als er al een database met dezelfde naam op uw server bestaat. Om dit te bevestigen, kunt u de naam van alle databases op uw server weergeven. Met dezelfde MySQLConnection object van eerder, voer de SHOW DATABASES . uit verklaring:
>>> show_db_query = "SHOW DATABASES"
>>> with connection.cursor() as cursor:
...     cursor.execute(show_db_query)
...     for db in cursor:
...         print(db)
...
('information_schema',)
('mysql',)
('online_movie_rating',)
('performance_schema',)
('sys',)
De bovenstaande code drukt de namen af van alle databases die zich momenteel op uw MySQL-server bevinden. De SHOW DATABASES commando voert ook enkele databases uit die u niet op uw server hebt gemaakt, zoals information_schema , performance_schema , enzovoort. Deze databases worden automatisch gegenereerd door de MySQL-server en bieden toegang tot verschillende database-metadata en MySQL-serverinstellingen.
U hebt in deze sectie een nieuwe database gemaakt door de opdracht CREATE DATABASE . uit te voeren uitspraak. In het volgende gedeelte ziet u hoe u verbinding kunt maken met een database die al bestaat.
Verbinding maken met een bestaande database
In de laatste sectie heb je een nieuwe database gemaakt met de naam online_movie_rating . U hebt er echter nog steeds geen verbinding mee gemaakt. In veel situaties heb je al een MySQL-database die je wilt verbinden met je Python-applicatie.
U kunt dit doen met dezelfde connect() functie die u eerder hebt gebruikt door een extra parameter te verzenden met de naam database :
from getpass import getpass
from mysql.connector import connect, Error

try:
    with connect(
        host="localhost",
        user=input("Enter username: "),
        password=getpass("Enter password: "),
        database="online_movie_rating",
    ) as connection:
        print(connection)
except Error as e:
    print(e)
De bovenstaande code lijkt erg op het verbindingsscript dat u eerder hebt gebruikt. De enige verandering hier is een extra database parameter, waarbij de naam van uw database wordt doorgegeven aan connect() . Zodra u dit script uitvoert, wordt u verbonden met de online_movie_rating database.
Een tabel maken, wijzigen en verwijderen
In dit gedeelte leert u hoe u enkele basis-DDL-query's uitvoert, zoals CREATE , DROP , en ALTER met Python. U krijgt een snelle blik op de MySQL-database die u in de rest van deze tutorial zult gebruiken. U maakt ook alle tabellen die nodig zijn voor de database en leert later hoe u wijzigingen aan deze tabellen kunt aanbrengen.
Het databaseschema definiëren
U kunt beginnen met het maken van een databaseschema voor een online beoordelingssysteem voor films. De database zal uit drie tabellen bestaan:
moviesbevat algemene informatie over films en heeft de volgende attributen:idtitlerelease_yeargenrecollection_in_mil
reviewersbevat informatie over mensen die recensies of beoordelingen hebben geplaatst en heeft de volgende kenmerken:idfirst_namelast_name
ratingsbevat informatie over beoordelingen die zijn gepost en heeft de volgende kenmerken:movie_id(vreemde sleutel)reviewer_id(vreemde sleutel)rating
Een echt filmbeoordelingssysteem, zoals IMDb, zou een heleboel andere attributen moeten opslaan, zoals e-mails, lijsten met filmcasts, enzovoort. Als u wilt, kunt u meer tabellen en attributen aan deze database toevoegen. Maar deze drie tabellen zijn voldoende voor het doel van deze tutorial.
De onderstaande afbeelding toont het databaseschema:
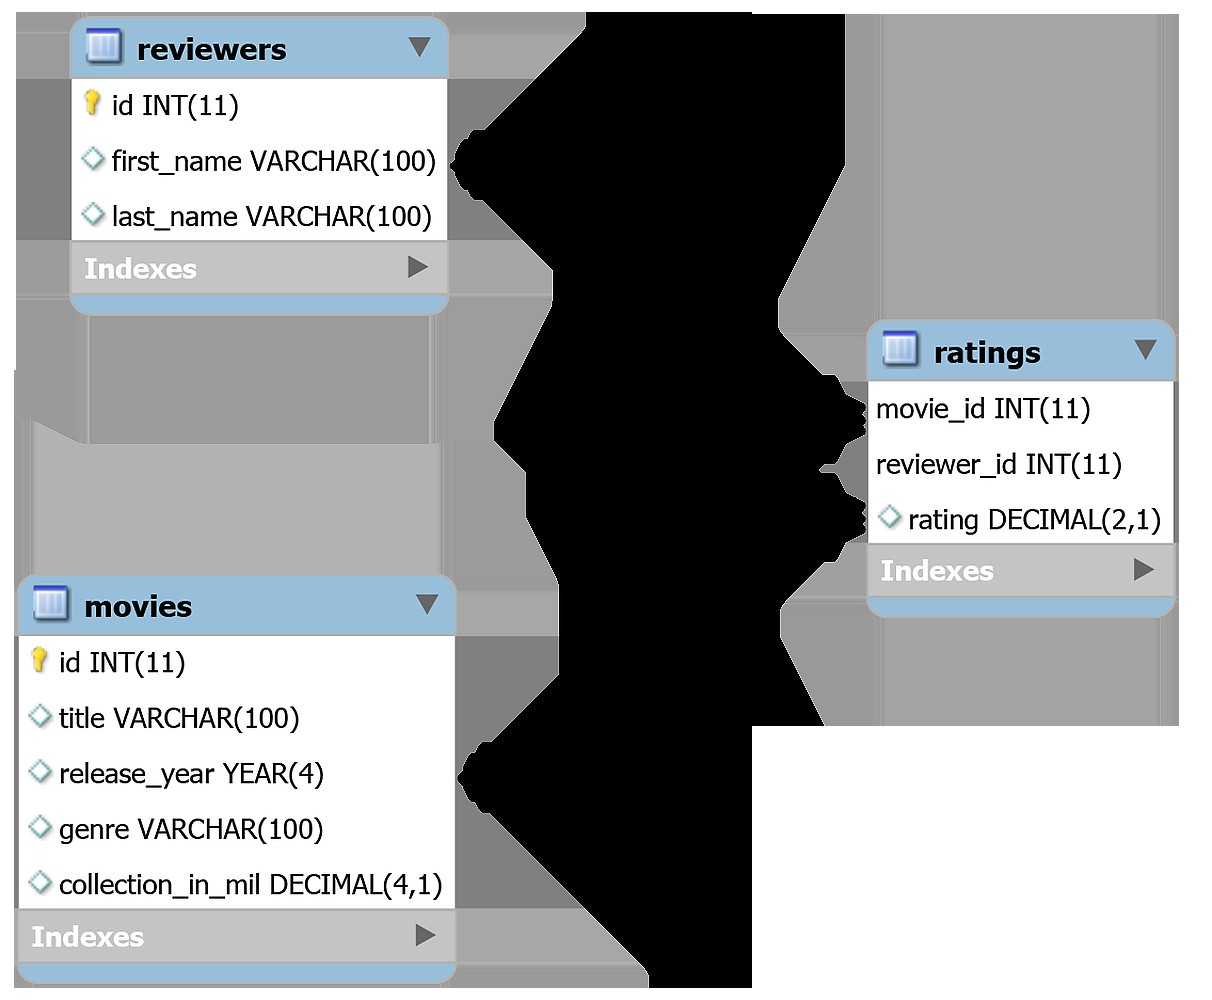
De tabellen in deze database zijn aan elkaar gerelateerd. movies en reviewers zal een veel-op-veel . hebben relatie aangezien één film door meerdere recensenten kan worden beoordeeld en één recensent meerdere films kan beoordelen. De ratings tabel verbindt de movies tafel met de reviewers tafel.
Tabellen maken met behulp van de CREATE TABLE Verklaring
Om nu een nieuwe tabel in MySQL te maken, moet u de CREATE TABLE gebruiken uitspraak. De volgende MySQL-query maakt de movies tabel voor uw online_movie_rating databank:
CREATE TABLE movies(
    id INT AUTO_INCREMENT PRIMARY KEY,
    title VARCHAR(100),
    release_year YEAR(4),
    genre VARCHAR(100),
    collection_in_mil INT
);
Als u eerder naar SQL-instructies hebt gekeken, zijn de meeste van de bovenstaande zoekopdrachten misschien logisch. Maar er zijn enkele verschillen in de MySQL-syntaxis waarvan u op de hoogte moet zijn.
MySQL heeft bijvoorbeeld een grote verscheidenheid aan gegevenstypen voor uw inzage, waaronder YEAR , INT , BIGINT , enzovoort. MySQL gebruikt ook de AUTO_INCREMENT trefwoord wanneer een kolomwaarde automatisch moet worden verhoogd bij het invoegen van nieuwe records.
Om een nieuwe tabel te maken, moet u deze query doorgeven aan cursor.execute() , die een MySQL-query accepteert en de query uitvoert op de aangesloten MySQL-database:
create_movies_table_query = """
CREATE TABLE movies(
    id INT AUTO_INCREMENT PRIMARY KEY,
    title VARCHAR(100),
    release_year YEAR(4),
    genre VARCHAR(100),
    collection_in_mil INT
)
"""
with connection.cursor() as cursor:
    cursor.execute(create_movies_table_query)
    connection.commit()
Nu heb je de movies tabel in uw database. Je slaagt voor create_movies_table_query naar cursor.execute() , die de vereiste uitvoering uitvoert.
Opmerking: De connection variabele verwijst naar de MySQLConnection object dat werd geretourneerd toen u verbinding maakte met uw database.
Let ook op de connection.commit() verklaring aan het einde van de code. Uw MySQL-connector voert standaard geen automatische transacties uit. In MySQL vinden wijzigingen die in een transactie worden genoemd alleen plaats wanneer u een COMMIT . gebruikt opdracht uiteindelijk. Roep deze methode altijd aan na elke transactie om wijzigingen in de eigenlijke tabel door te voeren.
Zoals je deed met de movies tabel, voer dan het volgende script uit om de reviewers . te maken tafel:
create_reviewers_table_query = """
CREATE TABLE reviewers (
    id INT AUTO_INCREMENT PRIMARY KEY,
    first_name VARCHAR(100),
    last_name VARCHAR(100)
)
"""
with connection.cursor() as cursor:
    cursor.execute(create_reviewers_table_query)
    connection.commit()
Indien nodig kunt u meer informatie over een reviewer toevoegen, zoals hun e-mail-ID of demografische informatie. Maar first_name en last_name zal je doel voor nu dienen.
Ten slotte kunt u de ratings . maken tabel met het volgende script:
create_ratings_table_query = """
CREATE TABLE ratings (
    movie_id INT,
    reviewer_id INT,
    rating DECIMAL(2,1),
    FOREIGN KEY(movie_id) REFERENCES movies(id),
    FOREIGN KEY(reviewer_id) REFERENCES reviewers(id),
    PRIMARY KEY(movie_id, reviewer_id)
)
"""
with connection.cursor() as cursor:
    cursor.execute(create_ratings_table_query)
    connection.commit()
De implementatie van externe-sleutelrelaties in MySQL is iets anders en beperkter in vergelijking met de standaard SQL. In MySQL moeten zowel de parent als de child in de externe sleutelbeperking dezelfde opslagengine gebruiken .
Een opslagengine is de onderliggende softwarecomponent die een databasebeheersysteem gebruikt voor het uitvoeren van SQL-bewerkingen. In MySQL zijn storage-engines verkrijgbaar in twee verschillende smaken:
-
Transactionele opslagengines zijn transactieveilig en stellen u in staat transacties terug te draaien met behulp van eenvoudige commando's zoals
rollback. Veel populaire MySQL-engines, waaronder InnoDB en NDB, behoren tot deze categorie. -
Niet-transactionele opslagengines afhankelijk zijn van uitgebreide handmatige code om uitspraken die zijn vastgelegd in een database ongedaan te maken. MyISAM, MEMORY en vele andere MySQL-engines zijn niet-transactioneel.
InnoDB is de standaard en meest populaire opslagengine. Het helpt de gegevensintegriteit te behouden door externe sleutelbeperkingen te ondersteunen. Dit betekent dat elke CRUD-bewerking op een externe sleutel wordt gecontroleerd om er zeker van te zijn dat deze niet leidt tot inconsistenties in verschillende tabellen.
Houd er ook rekening mee dat de ratings tabel gebruikt de kolommen movie_id en reviewer_id , beide externe sleutels, samen als de primaire sleutel . Deze stap zorgt ervoor dat een recensent dezelfde film niet twee keer kan beoordelen.
U kunt ervoor kiezen om dezelfde cursor opnieuw te gebruiken voor meerdere uitvoeringen. In dat geval zouden alle uitvoeringen één atomaire transactie worden in plaats van meerdere afzonderlijke transacties. U kunt bijvoorbeeld alle CREATE TABLE . uitvoeren afschriften met één cursor en voer vervolgens uw transactie slechts één keer uit:
with connection.cursor() as cursor:
    cursor.execute(create_movies_table_query)
    cursor.execute(create_reviewers_table_query)
    cursor.execute(create_ratings_table_query)
    connection.commit()
De bovenstaande code zal eerst alle drie CREATE . uitvoeren verklaringen. Dan stuurt het een COMMIT commando naar de MySQL-server die uw transactie vastlegt. Je kunt ook .rollback() . gebruiken om een ROLLBACK te sturen commando naar de MySQL-server en verwijder alle gegevenswijzigingen van de transactie.
Een tabelschema tonen met behulp van de DESCRIBE Verklaring
Nu u alle drie de tabellen hebt gemaakt, kunt u hun schema bekijken met behulp van de volgende SQL-instructie:
DESCRIBE <table_name>;
Om wat resultaten terug te krijgen van de cursor object, moet u cursor.fetchall() . gebruiken . Deze methode haalt alle rijen op uit de laatst uitgevoerde instructie. Ervan uitgaande dat u de MySQLConnection . al hebt object in de connection variabele, kunt u alle resultaten afdrukken die zijn opgehaald door cursor.fetchall() :
>>> show_table_query = "DESCRIBE movies"
>>> with connection.cursor() as cursor:
...     cursor.execute(show_table_query)
...     # Fetch rows from last executed query
...     result = cursor.fetchall()
...     for row in result:
...         print(row)
...
('id', 'int(11)', 'NO', 'PRI', None, 'auto_increment')
('title', 'varchar(100)', 'YES', '', None, '')
('release_year', 'year(4)', 'YES', '', None, '')
('genre', 'varchar(100)', 'YES', '', None, '')
('collection_in_mil', 'int(11)', 'YES', '', None, '')
Zodra u de bovenstaande code uitvoert, zou u een tabel moeten ontvangen met informatie over alle kolommen in movies tafel. Voor elke kolom ontvangt u details zoals het gegevenstype van de kolom, of de kolom een primaire sleutel is, enzovoort.
Een tabelschema wijzigen met de ALTER Verklaring
In de movies tabel, heb je een kolom met de naam collection_in_mil , die de kassacollectie van een film in miljoenen dollars bevat. U kunt de volgende MySQL-instructie schrijven om het gegevenstype van collection_in_mil te wijzigen attribuut van INT naar DECIMAL :
ALTER TABLE movies MODIFY COLUMN collection_in_mil DECIMAL(4,1);
DECIMAL(4,1) betekent een decimaal getal dat maximaal 4 . kan hebben cijfers, waarvan 1 is decimaal, zoals 120.1 , 3.4 , 38.0 , enzovoort. Na het uitvoeren van de ALTER TABLE statement, kunt u het bijgewerkte tabelschema weergeven met DESCRIBE :
>>> alter_table_query = """
... ALTER TABLE movies
... MODIFY COLUMN collection_in_mil DECIMAL(4,1)
... """
>>> show_table_query = "DESCRIBE movies"
>>> with connection.cursor() as cursor:
...     cursor.execute(alter_table_query)
...     cursor.execute(show_table_query)
...     # Fetch rows from last executed query
...     result = cursor.fetchall()
...     print("Movie Table Schema after alteration:")
...     for row in result:
...         print(row)
...
Movie Table Schema after alteration
('id', 'int(11)', 'NO', 'PRI', None, 'auto_increment')
('title', 'varchar(100)', 'YES', '', None, '')
('release_year', 'year(4)', 'YES', '', None, '')
('genre', 'varchar(100)', 'YES', '', None, '')
('collection_in_mil', 'decimal(4,1)', 'YES', '', None, '')
Zoals te zien is in de uitvoer, is de collection_in_mil attribuut is nu van het type DECIMAL(4,1) . Merk ook op dat je in de bovenstaande code cursor.execute() . aanroept tweemaal. Maar cursor.fetchall() haalt alleen rijen op van de laatst uitgevoerde query, namelijk de show_table_query .
Tabellen verwijderen met de DROP Verklaring
Om een tabel te verwijderen, moet u de DROP TABLE . uitvoeren verklaring in MySQL. Het verwijderen van een tafel is onomkeerbaar Verwerken. Als u de onderstaande code uitvoert, moet u de CREATE TABLE . aanroepen vraag opnieuw om de ratings . te gebruiken tabel in de komende secties.
Om de ratings te verwijderen tabel, stuur drop_table_query naar cursor.execute() :
drop_table_query = "DROP TABLE ratings"
with connection.cursor() as cursor:
    cursor.execute(drop_table_query)
Als u de bovenstaande code uitvoert, heeft u met succes de ratings . verwijderd tafel.
Records in tabellen invoegen
In de laatste sectie heeft u drie tabellen in uw database gemaakt:movies , reviewers , en ratings . Nu moet u deze tabellen vullen met gegevens. Deze sectie behandelt twee verschillende manieren om records in de MySQL Connector voor Python in te voegen.
De eerste methode, .execute() , werkt goed wanneer het aantal records klein is en de records hard gecodeerd kunnen worden. De tweede methode, .executemany() , is populairder en is beter geschikt voor realistische scenario's.
Gebruik .execute()
De eerste benadering gebruikt dezelfde cursor.execute() methode die u tot nu toe hebt gebruikt. U schrijft de INSERT INTO query in een string en geef het door aan cursor.execute() . U kunt deze methode gebruiken om gegevens in te voegen in de movies tafel.
Ter referentie, de movies tabel heeft vijf attributen:
idtitlerelease_yeargenrecollection_in_mil
U hoeft geen gegevens toe te voegen voor id als de AUTO_INCREMENT berekent automatisch id voor jou. Het volgende script voegt records toe aan de movies tafel:
insert_movies_query = """
INSERT INTO movies (title, release_year, genre, collection_in_mil)
VALUES
    ("Forrest Gump", 1994, "Drama", 330.2),
    ("3 Idiots", 2009, "Drama", 2.4),
    ("Eternal Sunshine of the Spotless Mind", 2004, "Drama", 34.5),
    ("Good Will Hunting", 1997, "Drama", 138.1),
    ("Skyfall", 2012, "Action", 304.6),
    ("Gladiator", 2000, "Action", 188.7),
    ("Black", 2005, "Drama", 3.0),
    ("Titanic", 1997, "Romance", 659.2),
    ("The Shawshank Redemption", 1994, "Drama",28.4),
    ("Udaan", 2010, "Drama", 1.5),
    ("Home Alone", 1990, "Comedy", 286.9),
    ("Casablanca", 1942, "Romance", 1.0),
    ("Avengers: Endgame", 2019, "Action", 858.8),
    ("Night of the Living Dead", 1968, "Horror", 2.5),
    ("The Godfather", 1972, "Crime", 135.6),
    ("Haider", 2014, "Action", 4.2),
    ("Inception", 2010, "Adventure", 293.7),
    ("Evil", 2003, "Horror", 1.3),
    ("Toy Story 4", 2019, "Animation", 434.9),
    ("Air Force One", 1997, "Drama", 138.1),
    ("The Dark Knight", 2008, "Action",535.4),
    ("Bhaag Milkha Bhaag", 2013, "Sport", 4.1),
    ("The Lion King", 1994, "Animation", 423.6),
    ("Pulp Fiction", 1994, "Crime", 108.8),
    ("Kai Po Che", 2013, "Sport", 6.0),
    ("Beasts of No Nation", 2015, "War", 1.4),
    ("Andadhun", 2018, "Thriller", 2.9),
    ("The Silence of the Lambs", 1991, "Crime", 68.2),
    ("Deadpool", 2016, "Action", 363.6),
    ("Drishyam", 2015, "Mystery", 3.0)
"""
with connection.cursor() as cursor:
    cursor.execute(insert_movies_query)
    connection.commit()
The movies table is now loaded with thirty records. The code calls connection.commit() at the end. It’s crucial to call .commit() after preforming any modifications to a table.
Using .executemany()
The previous approach is more suitable when the number of records is fairly small and you can write these records directly into the code. But this is rarely true. You’ll often have this data stored in some other file, or the data will be generated by a different script and will need to be added to the MySQL database.
This is where .executemany() comes in handy. It accepts two parameters:
- A query that contains placeholders for the records that need to be inserted
- A list that contains all records that you wish to insert
The following example inserts records for the reviewers tafel:
insert_reviewers_query = """
INSERT INTO reviewers
(first_name, last_name)
VALUES ( %s, %s )
"""
reviewers_records = [
    ("Chaitanya", "Baweja"),
    ("Mary", "Cooper"),
    ("John", "Wayne"),
    ("Thomas", "Stoneman"),
    ("Penny", "Hofstadter"),
    ("Mitchell", "Marsh"),
    ("Wyatt", "Skaggs"),
    ("Andre", "Veiga"),
    ("Sheldon", "Cooper"),
    ("Kimbra", "Masters"),
    ("Kat", "Dennings"),
    ("Bruce", "Wayne"),
    ("Domingo", "Cortes"),
    ("Rajesh", "Koothrappali"),
    ("Ben", "Glocker"),
    ("Mahinder", "Dhoni"),
    ("Akbar", "Khan"),
    ("Howard", "Wolowitz"),
    ("Pinkie", "Petit"),
    ("Gurkaran", "Singh"),
    ("Amy", "Farah Fowler"),
    ("Marlon", "Crafford"),
]
with connection.cursor() as cursor:
    cursor.executemany(insert_reviewers_query, reviewers_records)
    connection.commit()
In the script above, you pass both the query and the list of records as arguments to .executemany() . These records could have been fetched from a file or from the user and stored in the reviewers_records list.
The code uses %s as a placeholder for the two strings that had to be inserted in the insert_reviewers_query . Placeholders act as format specifiers and help reserve a spot for a variable inside a string. The specified variable is then added to this spot during execution.
You can similarly use .executemany() to insert records in the ratings tafel:
insert_ratings_query = """
INSERT INTO ratings
(rating, movie_id, reviewer_id)
VALUES ( %s, %s, %s)
"""
ratings_records = [
    (6.4, 17, 5), (5.6, 19, 1), (6.3, 22, 14), (5.1, 21, 17),
    (5.0, 5, 5), (6.5, 21, 5), (8.5, 30, 13), (9.7, 6, 4),
    (8.5, 24, 12), (9.9, 14, 9), (8.7, 26, 14), (9.9, 6, 10),
    (5.1, 30, 6), (5.4, 18, 16), (6.2, 6, 20), (7.3, 21, 19),
    (8.1, 17, 18), (5.0, 7, 2), (9.8, 23, 3), (8.0, 22, 9),
    (8.5, 11, 13), (5.0, 5, 11), (5.7, 8, 2), (7.6, 25, 19),
    (5.2, 18, 15), (9.7, 13, 3), (5.8, 18, 8), (5.8, 30, 15),
    (8.4, 21, 18), (6.2, 23, 16), (7.0, 10, 18), (9.5, 30, 20),
    (8.9, 3, 19), (6.4, 12, 2), (7.8, 12, 22), (9.9, 15, 13),
    (7.5, 20, 17), (9.0, 25, 6), (8.5, 23, 2), (5.3, 30, 17),
    (6.4, 5, 10), (8.1, 5, 21), (5.7, 22, 1), (6.3, 28, 4),
    (9.8, 13, 1)
]
with connection.cursor() as cursor:
    cursor.executemany(insert_ratings_query, ratings_records)
    connection.commit()
All three tables are now populated with data. You now have a fully functional online movie rating database. The next step is to understand how to interact with this database.
Reading Records From the Database
Until now, you’ve been building your database. Now it’s time to perform some queries on it and find some interesting properties from this dataset. In this section, you’ll learn how to read records from database tables using the SELECT statement.
Reading Records Using the SELECT Statement
To retrieve records, you need to send a SELECT query to cursor.execute() . Then you use cursor.fetchall() to extract the retrieved table in the form of a list of rows or records.
Try writing a MySQL query to select all records from the movies table and send it to .execute() :
>>> select_movies_query = "SELECT * FROM movies LIMIT 5"
>>> with connection.cursor() as cursor:
...     cursor.execute(select_movies_query)
...     result = cursor.fetchall()
...     for row in result:
...         print(row)
...
(1, 'Forrest Gump', 1994, 'Drama', Decimal('330.2'))
(2, '3 Idiots', 2009, 'Drama', Decimal('2.4'))
(3, 'Eternal Sunshine of the Spotless Mind', 2004, 'Drama', Decimal('34.5'))
(4, 'Good Will Hunting', 1997, 'Drama', Decimal('138.1'))
(5, 'Skyfall', 2012, 'Action', Decimal('304.6'))
The result variable holds the records returned from using .fetchall() . It’s a list of tuples representing individual records from the table.
In the query above, you use the LIMIT clause to constrain the number of rows that are received from the SELECT uitspraak. Developers often use LIMIT to perform pagination when handling large volumes of data.
In MySQL, the LIMIT clause takes one or two nonnegative numeric arguments. When using one argument, you specify the maximum number of rows to return. Since your query includes LIMIT 5 , only the first 5 records are fetched. When using both arguments, you can also specify the offset of the first row to return:
SELECT * FROM movies LIMIT 2,5;
The first argument specifies an offset of 2 , and the second argument constrains the number of returned rows to 5 . The above query will return rows 3 to 7.
You can also query for selected columns:
>>>>>> select_movies_query = "SELECT title, release_year FROM movies LIMIT 5"
>>> with connection.cursor() as cursor:
... cursor.execute(select_movies_query)
... for row in cursor.fetchall():
... print(row)
...
('Forrest Gump', 1994)
('3 Idiots', 2009)
('Eternal Sunshine of the Spotless Mind', 2004)
('Good Will Hunting', 1997)
('Skyfall', 2012)
Now, the code outputs values only from the two specified columns:title and release_year .
Filtering Results Using the WHERE Clause
You can filter table records by specific criteria using the WHERE clausule. For example, to retrieve all movies with a box office collection greater than $300 million, you could run the following query:
SELECT title, collection_in_mil
FROM movies
WHERE collection_in_mil > 300;
You can also use ORDER BY clause in the last query to sort the results from the highest to the lowest earner:
>>> select_movies_query = """
... SELECT title, collection_in_mil
... FROM movies
... WHERE collection_in_mil > 300
... ORDER BY collection_in_mil DESC
... """
>>> with connection.cursor() as cursor:
...     cursor.execute(select_movies_query)
...     for movie in cursor.fetchall():
...         print(movie)
...
('Avengers: Endgame', Decimal('858.8'))
('Titanic', Decimal('659.2'))
('The Dark Knight', Decimal('535.4'))
('Toy Story 4', Decimal('434.9'))
('The Lion King', Decimal('423.6'))
('Deadpool', Decimal('363.6'))
('Forrest Gump', Decimal('330.2'))
('Skyfall', Decimal('304.6'))
MySQL offers a plethora of string formatting operations like CONCAT for concatenating strings. Often, websites will show the movie title along with its release year to avoid confusion. To retrieve the titles of the top five grossing movies, concatenated with their release years, you can write the following query:
>>> select_movies_query = """
... SELECT CONCAT(title, " (", release_year, ")"),
...       collection_in_mil
... FROM movies
... ORDER BY collection_in_mil DESC
... LIMIT 5
... """
>>> with connection.cursor() as cursor:
...     cursor.execute(select_movies_query)
...     for movie in cursor.fetchall():
...         print(movie)
...
('Avengers: Endgame (2019)', Decimal('858.8'))
('Titanic (1997)', Decimal('659.2'))
('The Dark Knight (2008)', Decimal('535.4'))
('Toy Story 4 (2019)', Decimal('434.9'))
('The Lion King (1994)', Decimal('423.6'))
If you don’t want to use the LIMIT clause and you don’t need to fetch all the records, then the cursor object has .fetchone() and .fetchmany() methods as well:
.fetchone()retrieves either the next row of the result, as a tuple, orNoneif no more rows are available..fetchmany()retrieves the next set of rows from the result as a list of tuples. It has asizeargument, which defaults to1, that you can use to specify the number of rows you need to fetch. If no more rows are available, then the method returns an empty list.
Try retrieving the titles of the five highest-grossing movies concatenated with their release years again, but this time use .fetchmany() :
>>> select_movies_query = """
... SELECT CONCAT(title, " (", release_year, ")"),
...       collection_in_mil
... FROM movies
... ORDER BY collection_in_mil DESC
... """
>>> with connection.cursor() as cursor:
...     cursor.execute(select_movies_query)
...     for movie in cursor.fetchmany(size=5):
...         print(movie)
...     cursor.fetchall()
...
('Avengers: Endgame (2019)', Decimal('858.8'))
('Titanic (1997)', Decimal('659.2'))
('The Dark Knight (2008)', Decimal('535.4'))
('Toy Story 4 (2019)', Decimal('434.9'))
('The Lion King (1994)', Decimal('423.6'))
The output with .fetchmany() is similar to what you received when you used the LIMIT clausule. You might have noticed the additional cursor.fetchall() call at the end. You do this to clean all the remaining results that weren’t read by .fetchmany() .
It’s necessary to clean all unread results before executing any other statements on the same connection. Otherwise, an InternalError: Unread result found exception will be raised.
Handling Multiple Tables Using the JOIN Statement
If you found the queries in the last section to be quite straightforward, don’t worry. You can make your SELECT queries as complex as you want using the same methods from the last section.
Let’s look at some slightly more complex JOIN queries. If you want to find out the name of the top five highest-rated movies in your database, then you can run the following query:
>>> select_movies_query = """
... SELECT title, AVG(rating) as average_rating
... FROM ratings
... INNER JOIN movies
...     ON movies.id = ratings.movie_id
... GROUP BY movie_id
... ORDER BY average_rating DESC
... LIMIT 5
... """
>>> with connection.cursor() as cursor:
...     cursor.execute(select_movies_query)
...     for movie in cursor.fetchall():
...         print(movie)
...
('Night of the Living Dead', Decimal('9.90000'))
('The Godfather', Decimal('9.90000'))
('Avengers: Endgame', Decimal('9.75000'))
('Eternal Sunshine of the Spotless Mind', Decimal('8.90000'))
('Beasts of No Nation', Decimal('8.70000'))
As shown above, Night of the Living Dead and The Godfather are tied as the highest-rated movies in your online_movie_rating database.
To find the name of the reviewer who gave the most ratings, write the following query:
>>>>>> select_movies_query = """
... SELECT CONCAT(first_name, " ", last_name), COUNT(*) as num
... FROM reviewers
... INNER JOIN ratings
... ON reviewers.id = ratings.reviewer_id
... GROUP BY reviewer_id
... ORDER BY num DESC
... LIMIT 1
... """
>>> with connection.cursor() as cursor:
... cursor.execute(select_movies_query)
... for movie in cursor.fetchall():
... print(movie)
...
('Mary Cooper', 4)
Mary Cooper is the most frequent reviewer in this database. As seen above, it doesn’t matter how complicated the query is because it’s ultimately handled by the MySQL server. Your process for executing a query will always remain the same:pass the query to cursor.execute() and fetch the results using .fetchall() .
Updating and Deleting Records From the Database
In this section, you’ll be updating and deleting records from the database. Both of these operations can be performed on either a single record or multiple records in the table. You’ll select the rows that need to be modified using the WHERE clause.
UPDATE Command
One of the reviewers in your database, Amy Farah Fowler , is now married to Sheldon Cooper . Her last name has now changed to Cooper , so you need to update your database accordingly. For updating records, MySQL uses the UPDATE statement:
update_query = """
UPDATE
    reviewers
SET
    last_name = "Cooper"
WHERE
    first_name = "Amy"
"""
with connection.cursor() as cursor:
    cursor.execute(update_query)
    connection.commit()
The code passes the update query to cursor.execute() , and .commit() brings the required changes to the reviewers table.
Opmerking: In the UPDATE query, the WHERE clause helps specify the records that need to be updated. If you don’t use WHERE , then all records will be updated!
Suppose you need to provide an option that allows reviewers to modify ratings. A reviewer will provide three values, movie_id , reviewer_id , and the new rating . The code will display the record after performing the specified modification.
Assuming that movie_id = 18 , reviewer_id = 15 , and the new rating = 5.0 , you can use the following MySQL queries to perform the required modification:
UPDATE
    ratings
SET
    rating = 5.0
WHERE
    movie_id = 18 AND reviewer_id = 15;

SELECT *
FROM ratings
WHERE
    movie_id = 18 AND reviewer_id = 15;
The above queries first update the rating and then display it. You can create a complete Python script that establises a connection with the database and allows the reviewer to modify a rating:
from getpass import getpass
from mysql.connector import connect, Error

movie_id = input("Enter movie id: ")
reviewer_id = input("Enter reviewer id: ")
new_rating = input("Enter new rating: ")
update_query = """
UPDATE
    ratings
SET
    rating = "%s"
WHERE
    movie_id = "%s" AND reviewer_id = "%s";

SELECT *
FROM ratings
WHERE
    movie_id = "%s" AND reviewer_id = "%s"
""" % (
    new_rating,
    movie_id,
    reviewer_id,
    movie_id,
    reviewer_id,
)

try:
    with connect(
        host="localhost",
        user=input("Enter username: "),
        password=getpass("Enter password: "),
        database="online_movie_rating",
    ) as connection:
        with connection.cursor() as cursor:
            for result in cursor.execute(update_query, multi=True):
                if result.with_rows:
                    print(result.fetchall())
            connection.commit()
except Error as e:
    print(e)
Save this code to a file named modify_ratings.py . The above code uses %s placeholders to insert the received input in the update_query string. For the first time in this tutorial, you have multiple queries inside a single string. To pass multiple queries to a single cursor.execute() , you need to set the method’s multi argument to True .
If multi is True , then cursor.execute() returns an iterator. Each item in the iterator corresponds to a cursor object that executes a statement passed in the query. The above code runs a for loop on this iterator and then calls .fetchall() on each cursor voorwerp.
Opmerking: Running .fetchall() on all cursor objects is important. To execute a new statement on the same connection, you must ensure that there are no unread results from previous executions. If there are unread results, then you’ll receive an exception.
If no result set is fetched on an operation, then .fetchall() raises an exception. To avoid this error, in the code above you use the cursor.with_rows property, which indicates whether the most recently executed operation produced rows.
While this code should solve your purpose, the WHERE clause is a prime target for web hackers in its current state. It’s vulnerable to what is called a SQL injection attack, which can allow malicious actors to either corrupt or misuse your database.
Warning :Don’t try the below inputs on your database! They will corrupt your table and you’ll need to recreate it.
For example, if a user sends movie_id=18 , reviewer_id=15 , and the new rating=5.0 as input, then the output looks like this:
$ python modify_ratings.py
Enter movie id: 18
Enter reviewer id: 15
Enter new rating: 5.0
Enter username: <user_name>
Enter password:
[(18, 15, Decimal('5.0'))]
The rating with movie_id=18 and reviewer_id=15 has been changed to 5.0 . But if you were hacker, then you might send a hidden command in your input:
$ python modify_ratings.py
Enter movie id: 18
Enter reviewer id: 15"; UPDATE reviewers SET last_name = "A
Enter new rating: 5.0
Enter username: <user_name>
Enter password:
[(18, 15, Decimal('5.0'))]
Again, the output shows that the specified rating has been changed to 5.0 . What’s changed?
The hacker sneaked in an update query while entering the reviewer_id . The update query, update reviewers set last_name = "A , changes the last_name of all records in the reviewers table to "A" . You can see this change if you print out the reviewers tafel:
>>> select_query = """
... SELECT first_name, last_name
... FROM reviewers
... """
>>> with connection.cursor() as cursor:
...     cursor.execute(select_query)
...     for reviewer in cursor.fetchall():
...         print(reviewer)
...
('Chaitanya', 'A')
('Mary', 'A')
('John', 'A')
('Thomas', 'A')
('Penny', 'A')
('Mitchell', 'A')
('Wyatt', 'A')
('Andre', 'A')
('Sheldon', 'A')
('Kimbra', 'A')
('Kat', 'A')
('Bruce', 'A')
('Domingo', 'A')
('Rajesh', 'A')
('Ben', 'A')
('Mahinder', 'A')
('Akbar', 'A')
('Howard', 'A')
('Pinkie', 'A')
('Gurkaran', 'A')
('Amy', 'A')
('Marlon', 'A')
The above code displays the first_name and last_name for all records in the reviewers tafel. The SQL injection attack corrupted this table by changing the last_name of all records to "A" .
There’s a quick fix to prevent such attacks. Don’t add the query values provided by the user directly to your query string. Instead, update the modify_ratings.py script to send these query values as arguments to .execute() :
from getpass import getpass
from mysql.connector import connect, Error

movie_id = input("Enter movie id: ")
reviewer_id = input("Enter reviewer id: ")
new_rating = input("Enter new rating: ")
update_query = """
UPDATE
    ratings
SET
    rating = %s
WHERE
    movie_id = %s AND reviewer_id = %s;

SELECT *
FROM ratings
WHERE
    movie_id = %s AND reviewer_id = %s
"""
val_tuple = (
    new_rating,
    movie_id,
    reviewer_id,
    movie_id,
    reviewer_id,
)

try:
    with connect(
        host="localhost",
        user=input("Enter username: "),
        password=getpass("Enter password: "),
        database="online_movie_rating",
    ) as connection:
        with connection.cursor() as cursor:
            for result in cursor.execute(update_query, val_tuple, multi=True):
                if result.with_rows:
                    print(result.fetchall())
            connection.commit()
except Error as e:
    print(e)
Notice that the %s placeholders are no longer in string quotes. Strings passed to the placeholders might contain some special characters. If necessary, these can be correctly escaped by the underlying library.
cursor.execute() makes sure that the values in the tuple received as argument are of the required data type. If a user tries to sneak in some problematic characters, then the code will raise an exception:
$ python modify_ratings.py
Enter movie id: 18
Enter reviewer id: 15"; UPDATE reviewers SET last_name = "A
Enter new rating: 5.0
Enter username: <user_name>
Enter password:
1292 (22007): Truncated incorrect DOUBLE value: '15";
UPDATE reviewers SET last_name = "A'
cursor.execute() will raise an exception if it finds any unwanted characters in the user input. You should use this approach whenever you incorporate user input in a query. There are other ways of preventing SQL injection attacks as well.
DELETE Command
Deleting records works very similarly to updating records. You use the DELETE statement to remove selected records.
Opmerking: Deleting is an irreversible Verwerken. If you don’t use the WHERE clause, then all records from the specified table will be deleted. You’ll need to run the INSERT INTO query again to get back the deleted records.
It’s recommended that you first run a SELECT query with the same filter to make sure that you’re deleting the right records. For example, to remove all ratings given by reviewer_id = 2 , you should first run the corresponding SELECT query:
>>> select_movies_query = """
... SELECT reviewer_id, movie_id FROM ratings
... WHERE reviewer_id = 2
... """
>>> with connection.cursor() as cursor:
...     cursor.execute(select_movies_query)
...     for movie in cursor.fetchall():
...         print(movie)
...
(2, 7)
(2, 8)
(2, 12)
(2, 23)
The above code snippet outputs the reviewer_id and movie_id for records in the ratings table where reviewer_id = 2 . Once you’ve confirmed that these are the records that you need to delete, you can run a DELETE query with the same filter:
delete_query = "DELETE FROM ratings WHERE reviewer_id = 2"
with connection.cursor() as cursor:
    cursor.execute(delete_query)
    connection.commit()
With this query, you remove all ratings given by the reviewer with reviewer_id = 2 from the ratings table.
Other Ways to Connect Python and MySQL
In this tutorial, you saw MySQL Connector/Python, which is the officially recommended means of interacting with a MySQL database from a Python application. There are two other popular connectors:
-
mysqlclient is a library that is a close competitor to the official connector and is actively updated with new features. Because its core is written in C, it has better performance than the pure-Python official connector. A big drawback is that it’s fairly difficult to set up and install, especially on Windows.
-
MySQLdb is a legacy software that’s still used in commercial applications. It’s written in C and is faster than MySQL Connector/Python but is available only for Python 2.
These connectors act as interfaces between your program and a MySQL database, and you send your SQL queries through them. But many developers prefer using an object-oriented paradigm rather than SQL queries to manipulate data.
Object-relational mapping (ORM) is a technique that allows you to query and manipulate data from a database directly using an object-oriented language. An ORM library encapsulates the code needed to manipulate data, which eliminates the need to use even a tiny bit of SQL. Here are the most popular Python ORMs for SQL-based databases:
-
SQLAlchemy is an ORM that facilitates communication between Python and other SQL databases. You can create different engines for different databases like MySQL, PostgreSQL, SQLite, and so on. SQLAlchemy is commonly used alongside the pandas library to provide complete data-handling functionality.
-
peewee is a lightweight and fast ORM that’s quick to set up. This is quite useful when your interaction with the database is limited to extracting a few records. For example, if you need to copy selected records from a MySQL database into a CSV file, then peewee might be your best choice.
-
Django ORM is one of the most powerful features of Django and is supplied alongside the Django web framework. It can interact with a variety of databases such as SQLite, PostgreSQL, and MySQL. Many Django-based applications use the Django ORM for data modeling and basic queries but often switch to SQLAlchemy for more complex requirements.
You might find one of these approaches to be more suitable for your application. If you’re not sure which one to use, then it’s best to go with the officially recommended MySQL Connector/Python that you saw in action in this tutorial.
Conclusion
In this tutorial, you saw how to use MySQL Connector/Python to integrate a MySQL database with your Python application. You also saw some unique features of a MySQL database that differentiate it from other SQL databases.
Along the way, you learned some programming best practices that are worth considering when it comes to establishing a connection, creating tables, and inserting and updating records in a database application. You also developed a sample MySQL database for an online movie rating system and interacted with it directly from your Python application.
In this tutorial, you learned how to:
- Connect your Python app with a MySQL database
- Bring data from a MySQL database into Python for further analysis
- Execute SQL queries from your Python application
- Handle exceptions while accessing the database
- Prevent SQL injection attacks on your application
If you’re interested, Python also has connectors for other DBMSs like MongoDB and PostgreSQL. For more information, check out Python Database Tutorials.