Vandaag gaan we een nieuwsbriefsysteem bouwen met PHP met een MySQL-achtergrond. De tutorial behandelt het bouwen van een systeem dat meerdere nieuwsbrieflijsten mogelijk maakt en het verzenden van berichten naar specifieke lijsten.
Hallo allemaal, we gaan een behoorlijk complex nieuwsbriefsysteem bouwen, dus laten we beginnen! Je hebt twee bronnen nodig voor het project.
- De Silk Icon-set wordt gebruikt om wat visuele 'flair' aan de applicatie toe te voegen.
- De Swift PHP Mailer wordt gebruikt om onze e-mails te verzenden.
Stap 1:Maak het applicatieskelet
Bij het starten van een project, vind ik het leuk om de mappen in te delen voordat ik begin met coderen, dus laten we dat nu doen. Maak eerst de algemene projectdirectory. Maak vervolgens een map met de naam admin in uw projectmap. Voeg vervolgens in de admin-map twee mappen toe met de namen media en swift. Maak ten slotte een map met de naam afbeeldingen in de mediamap. U kunt ook de Swift lib-map in de Swift-map plaatsen die we hebben gemaakt. Je kunt ook de zes zijden iconen kopiëren die we gaan gebruiken:
- bullet_green.png
- bullet_red.png
- delete.png
- email_go.png
- find.png
- page_edit.png
Ik ga de rest-tutorial over het maken van de CRUD structureren:maken, lezen, bijwerken en verwijderen voor vier van onze zes modellen. Een andere zal worden bewerkt door andere acties, en de zesde zullen we niet de CRUD-acties maken.
Laten we nu eerst onze database maken en onze tabellen worden geleidelijk later gemaakt. We gaan nu beginnen met coderen. Eveneens, als een opmerking, ik ga ervan uit dat we zullen werken met bestanden in onze admin-map, tenzij ik anders specificeer, aangezien de meeste code zich in deze map bevindt.
Stap 2:Toepassingsconfiguratie
Elke toepassing heeft een soort configuratiebestand en we gaan het onze nu maken. Ga je gang en maak een bestand met de naam config.php en voeg het volgende toe:
# admin/config.php
	<?php
	// DB Settings
	define('DB_SERVER', 'localhost');
	define('DB_USER', 'root');
	define('DB_PASSWORD', '');
	define('DB_NAME', 'nettuts_ns_demo');

	define('FROM_EMAIL', 'no_reply@ohyeahemail.com');
	define('FROM_NAME', 'oh yeah email!');


	session_start();
	require_once 'classes.php';
	$mini = false;
	$nonav = false;
	error_reporting(0);
Dus de eerste sectie stelt onze databasevariabelen in, dus zorg ervoor dat u deze bewerkt zodat het eerst uw lokale configuratie is. Onze volgende blurb stelt enkele e-mailattributen in die we later zullen gebruiken. De laatste sectie start onze sessie zodat we er toegang toe hebben, vereist ons bestand classes.php (we zullen dat in een seconde maken), stelt de standaardwaarden in voor sommige lay-outopties en stelt vervolgens foutrapportage in op 0 om vervelende waarschuwingen te stoppen . Als je echter problemen lijkt te hebben, probeer dan commentaar te geven op deze regel.
Ga je gang en maak ons bestand classes.php aan en voeg toe:
# admin/classes.php
	<?php
	// Authentication
	function validate_user($username, $pw) {
	    if (check_username_and_pw($username, $pw)) {
	        header('Location: index.php');
	    } else {
	        $_SESSION['error'] = "Login error.";
	        header('Location: login.php');
	    }
	}

	function logged_in() {
	    if ($_SESSION['authorized'] == true) {
	        return true;
	    } else {
	        return false;
	    }
	}

	function login_required() {
	    if(logged_in()) {
	        return true;
	    } else {
	        header('Location: login.php');
	    }
	}
	// mysql
	function query($sql) {
	  $link = new mysqli(DB_SERVER, DB_USER, DB_PASSWORD, DB_NAME) or die('There was a problem connecting to the database.');

	  $stmt = $link->prepare($sql) or die('error');
	  $stmt->execute();
	  $meta = $stmt->result_metadata();

	  while ($field = $meta->fetch_field()) {
	    $parameters[] = &$row[$field->name];
	  }

	  $results = array();
	  call_user_func_array(array($stmt, 'bind_result'), $parameters);

	  while ($stmt->fetch()) {
	    foreach($row as $key => $val) {
	      $x[$key] = $val;
	    }
	    $results[] = $x;
	  }

	  return $results;
	  $results->close();
	  $link->close();
	}

	function count_query($query) {
	  $link = new mysqli(DB_SERVER, DB_USER, DB_PASSWORD, DB_NAME) or die('There was a problem connecting to the database.');
	  if($stmt = $link->prepare($query)) {
	    $stmt->execute();
	    $stmt->bind_result($result);
	    $stmt->fetch();
	    return $result;
	    $stmt->close();
	  }
	  $link->close();
	}

	function check_username_and_pw($u, $pw) {
	  $link = new mysqli(DB_SERVER, DB_USER, DB_PASSWORD, DB_NAME) or die('There was a problem connecting to the database.');

	  $query = "SELECT * FROM users WHERE username = ? AND password = ? LIMIT 1";
	  if($stmt = $link->prepare($query)) {
	    $p = md5($pw);
	    $stmt->bind_param('ss', $u, $p);
	    $stmt->execute();
	    $stmt->bind_result($id, $username, $pw);
	    if($stmt->fetch()) {
	      $_SESSION['authorized'] = true;
	      $_SESSION['username'] = $username;
	      return true;
	    } else {
	      return false;
	    }
	    $stmt->close();
	  }
	  $link->close();
	}
Dat is een enorm stuk code, en ik zal het doornemen. Onze eerste functie handelt af wanneer de gebruiker onze login plaatst en stuurt de gegevens vervolgens naar onze functie check_username_and_pw. Onze functie ingelogd_in geeft eenvoudig terug of een gebruiker is ingelogd. Onze functie login_required controleert of we zijn ingelogd, en zo niet, stuurt ons naar de inlogpagina.
De volgende functie genaamd query() voert een query uit op onze DB en is gemaakt door Jeffrey Way. Ik heb de functies voor het maken en sluiten van links toegevoegd om het nog gemakkelijker te maken. Onze volgende functie heb ik speciaal gemaakt zodat we gemakkelijk COUNT SQL-query's kunnen uitvoeren, en onze functie check_username_and_pw controleert of we een gebruiker kunnen vinden met hetzelfde e-mailadres en hetzelfde gehashte MD5-wachtwoord, en zo ja, stelt hij onze sessievariabelen in.
Stap 3:applicatie-indeling
Ons volgende bestand waar we aan zullen werken, is ons layout.php-bestand, dus ga je gang en maak het aan. In onze hoofdsectie declareren we eenvoudig onze reguliere XHTML-aangiften. Als je het merkt, voegen we automatisch de titel van de pagina toe aan een andere string voor onze titel. Dan hebben we een stylesheet (ga je gang en maak die ook aan in onze mediamap). Waarna we onze body-tag openen en controleren of we een mini-lay-out willen, en zo ja, een klasse toevoegen. Dan hebben we onze koptekst en controleren dan of we onze navigatie willen, en als we dat doen, tonen we onze tabbladen. Ik heb ook een manier toegevoegd om voor elk tabblad een huidige klasse toe te voegen. We hebben dan ook een uitloglink, en dan hebben we onze container div. Hierin voegen we een h3-tag toe met onze titel en echoën vervolgens onze inhoud.
# admin/layout.php
	<!DOCTYPE html PUBLIC "-//W3C//DTD XHTML 1.1//EN" "https://www.w3.org/TR/xhtml11/DTD/xhtml11.dtd">
	<html xmlns="https://www.w3.org/1999/xhtml" >
	    <head>
	        <meta http-equiv="Content-Type" content="text/html; charset=utf-8" />

	        <title><?php echo $title; ?> » my newsletter app</title>
	        <!-- Stylesheets -->
	        <!-- <link rel="stylesheet" href="media/style.css" type="text/css" media="all" /> -->
	    </head>
	    <body<?php if ($mini == true) { ?> class="mini"<?php } ?>>
	        <div id="header">
	            <h1><a href="index.php">my newsletter app</a></h1>
	        </div>
	        <?php if ($nonav == false) { ?>
	        <div id="nav">
	            <a href="messages.php"<?php if($tab == 'mess') {?>class="current"<?php } ?>>messages</a>
	            <a href="subscribers.php"<?php if($tab == 'sub') {?>class="current"<?php } ?>>subscribers</a>
	            <a href="newsletters.php"<?php if($tab == 'nl') {?>class="current"<?php } ?>>newsletters</a>
	            <a href="templates.php"<?php if($tab == 'temp') {?>class="current"<?php } ?>>templates</a>
	            <span class="right">
	                <a href="logout.php">log out</a>
	            </span>
	        </div>
	        <?php } ?>
	        <div id="container">
	            <h3><?php echo $title;?></h3>
	            <?php echo $content; ?>
	        </div>
	    </body>
	</html>
Nu gaan we onze index.php-pagina maken, zodat we kunnen stylen. Open index.php en voeg toe:
# admin/index.php
		<?php
		require_once 'config.php';
		$title = "Home!";
		$content = <<<EOF
		<h3>current stats</h3>
		Our home page!
		EOF;
		include 'layout.php'; ?>
Dus hierin hebben we ons configuratiebestand nodig, stellen we onze titel in en stellen dan onze inhoudsvariabele in, en als laatste hebben we ons lay-outbestand nodig. Wanneer je het voor het eerst opent, zou het er als volgt uit moeten zien:


Open nu ons stijlblad. Ik gebruik graag de 960.gs reset- en typografiestijlen, gecomprimeerd in TextMate. Dus de bovenkant van mijn CSS-bestand ziet er als volgt uit:
# admin/media/style.css
	/* reset */
	html,body,div,span,applet,object,iframe,h1,h2,h3,h4,h5,h6,p,blockquote,pre,a,abbr,acronym,address,big,cite,code,del,dfn,em,font,img,ins,kbd,q,s,samp,strike,strong,sub,sup,tt,var,b,u,i,center,dl,dt,dd,ol,ul,li,fieldset,form,label,legend,table,caption,tbody,tfoot,thead,tr,th,td{margin:0;padding:0;border:0;outline:0;font-size:100%;vertical-align:baseline;background:transparent}body{line-height:1}ol,ul{list-style:none}blockquote,q{quotes:none}blockquote:before,blockquote:after,q:before,q:after{content:'';content:none}:focus{outline:0}ins{text-decoration:none}del{text-decoration:line-through}table{border-collapse:collapse;border-spacing:0}
	/* typography */
	body{font:13px/1.5 Helvetica,Arial,'Liberation Sans',FreeSans,sans-serif}a:focus{outline:1px dotted invert}hr{border:0 #ccc solid;border-top-width:1px;clear:both;height:0}h1{font-size:25px}h2{font-size:23px}h3{font-size:21px}h4{font-size:19px}h5{font-size:17px}h6{font-size:15px}ol{list-style:decimal}ul{list-style:square}li{margin-left:30px}p,dl,hr,h1,h2,h3,h4,h5,h6,ol,ul,pre,table,address,fieldset{margin:10px 0;}
Laten we eerst onze hoofdelementen stylen, dus voeg de volgende stijlen toe:
# admin/media/style.css
	#header {width:85%; margin:0 auto;}
	#header h1 a {text-decoration:none; color:#000;}
	#container {width:85%; background: #111; margin:5px auto; color:#fff; padding:10px;}
Nu zou uw pagina er als volgt uit moeten zien:


Als we nu de tabbladen opmaken met een navigatie-achtergrond en vervolgens een zwevende achtergrond op elk van de links en je zou het volgende moeten zien:
# admin/media/style.css
	/* tabs */
	#nav {margin:0 auto 2px;padding:10px;width:85%; background:#444;}
	#nav a { padding:12px 10px; margin:0; color:#fff; text-decoration:none; text-align:center;}
	#nav a.current, #nav a:hover {background:#111;}
#nav span.right {float:right;} 


Nu, terwijl we aan het bestand werken, ga je gang en voeg je de volgende stijlen toe voor onze mini-layout, formulierinvoer, tabellen, grote links en onze fout- en succesberichten.
# admin/media/style.css
	body.mini #header {width:30%; text-align:center;}
	body.mini #container {width:30%;}

	/* form */
	form input.text {width:95%; font-size:16px;}
	form textarea {width:95%; height:100%;}
	/* table */
	table {width:98%; text-align:right; border:rgb(128,128,128); font-size:12px; margin:5px 10px; color:#000;background:#fff;}
	table th {background-color: rgb(229, 229, 229); border:1px solid rgb(187, 187, 187); padding:3px 6px; font-weight:normal; color:#000;}
	table tr td {border: 1px solid rgb(221, 221, 221); padding:3px 6px;}
	table tr:hover {background-color: rgb(240, 240, 240);color:#000;}
	/* a */
	a.large {padding: 5px; color:#000; background:#eee; text-decoration:none; margin:5px;}
	a.large.right {float:right;}
	a.large:hover, a.large.current {background:#444; color:#fff;}
	/* messages */
	#message {margin: 5px 10px; padding: 4px; display:block;text-align:center;}
	#message.error {background:#FFEBE8;border: 1px solid #CC0000;color:#CC0000;}
	#message.success {border:solid 1px #349534; background:#C9FFCA;color:#008000;}
Dat zijn enkele stijlen die ik graag in al mijn projecten gebruik. Nu we klaar zijn met de lay-out, gaan we verder met authenticatie.
Stap 4:Authenticatie
We gaan werken met een heel eenvoudig authenticatiesysteem. Maak een login.php en plaats het volgende erin:
# admin/login.php
	<?php
	require_once 'config.php';
	if(logged_in()) {header('Location: index.php');}
	$title = "login";
	$nonav = true;
	$mini = true;
	if($_POST && (!empty($_POST['username']) ) && (!empty($_POST['password']))) {
	    validate_user($_POST['username'], $_POST['password']);
	}
	$error = $_SESSION['error'];
	$content = <<<EOF
	$error
	<form action="login.php" method="post">
	    <p>
	        <label for="username">username:</label><br />
	        <input type="text" name="username" class="text" />
	    </p>
	    <p>
	        <label for="password">password:</label><br />
	        <input type="password" name="password" class="text" />
	    </p>
	    <p>
	        <input type="submit" value="login" />
	    </p>
	</form>
	EOF;
	include 'layout.php'; ?>
Ik zal elk deel van de code uitleggen. Eerst hebben we ons configuratiebestand nodig. Vervolgens controleren we of we ingelogd zijn, en zo ja, dan verwijzen we naar huis. Vervolgens stellen we de titel en onze lay-outopties in. Vervolgens controleren we of we een POST hebben en of de POST een gebruikersnaam en wachtwoord had, en zo ja, dan roepen we de functie valid_user aan vanuit ons klassenbestand. Vervolgens stellen we de variabele fout in op onze sessiefouten, en vervolgens stellen we ons formulier in en voeren we eventuele fouten uit. Nu gaan we onze uitlogpagina maken, dus maak logout.php aan en plaats het volgende erin:
# admin/logout.php
	<?php
	require_once 'config.php';
	$_SESSION = array();
	session_destroy();
	header('Location: login.php');
	?>
We hebben opnieuw ons configuratiebestand nodig, stellen onze sessie in op een lege array, vernietigen vervolgens onze sessie en verwijzen door naar onze inlogpagina. Nu je dit allemaal hebt gedaan, zou je inlogpagina er als volgt uit moeten zien:


We gaan ook een gebruikersrecord (en onze tabel) maken, zodat we de authenticatielogica kunnen toevoegen en u de pagina's met de code verderop kunt bekijken. Om een gebruiker aan te maken met de gebruikersnaam admin en een geheim wachtwoord. Voer deze SQL uit om dit toe te voegen:
CREATE TABLE `users` (
	   `id` int(10) AUTO_INCREMENT,
	   `username` varchar(50),
	   `password` varchar(32),
	   PRIMARY KEY (`id`)
	) ENGINE=MyISAM DEFAULT CHARSET utf8;

	INSERT INTO `users` (`id`, `username`, `password`) VALUES
	('1', 'admin', '5ebe2294ecd0e0f08eab7690d2a6ee69');
Stap 5:Nieuwsbrieven
Ik heb deze applicatie zo ontworpen dat hij erg flexibel is. Ik wilde dat jij (de gebruiker) zoveel nieuwsbrieven kon maken en beheren als je wilt. Dus eerst moeten we onze databasetabel maken. Hier is de SQL-code van de export op mijn demo-applicatie:
	CREATE TABLE `newsletters` (
	   `id` int(10) AUTO_INCREMENT,
	   `name` varchar(50),
	   `description` varchar(255),
	   `visible` varchar(10),
	   PRIMARY KEY (`id`)
	) ENGINE=MyISAM DEFAULT CHARSET utf8;
Dus nu we onze nieuwsbrieftabel hebben, gaan we de pagina's voor elke actie maken. Maak vier bestanden met de namen:newsletters.php, newsletters_delete.php, newsletters_edit.php en newsletters_new.php. Open eerst nieuwsbrieven.php:
# admin/newsletters.php
	<?php
	require_once 'config.php';
	login_required();
	$title = "newsletters";
	$newsletters = query("SELECT * FROM newsletters ORDER BY id ASC");
	$tab = 'nl';
	$table = "";
	foreach($newsletters as $row) {
	    $dlink = '<a href="newsletters_delete.php?id='.$row['id'].'" onclick="return confirm(\'Are you sure you want to delete this newsletter?\');" title="delete"><img src="media/images/delete.png" alt="delete"/></a>';
	    $elink = '<a href="newsletters_edit.php?id='.$row['id'].'" title="edit" ><img src="media/images/page_edit.png" alt="edit"/></a>';
	    if($row['visible'] == "1") {$visible = '<img src="media/images/bullet_green.png" />';} else {$visible = '<img src="media/images/bullet_red.png" />';}
	    $table .= "<tr><td>".$row['id']."</td><td>".$row['name']."</td><td>".$row['description']."</td><td>$visible</td><td>".$dlink." ".$elink."</td></tr>\n";
	}
	$message = error_messages();
	$content = <<<EOF
	<a href="newsletters_new.php" class="large">new newsletter »</a>
	$message
	<table>
	    <tr>
	        <th></th>
	        <th>name</th>
	        <th>description</th>
	        <th>visible</th>
	        <th></th>
	    </tr>
	    $table
	</table>
	EOF;
	include 'layout.php'; ?>
Dit bestand heeft dus hetzelfde basisgevoel als onze inlogpagina. We hebben onze configuratie nodig, zorg ervoor dat we zijn ingelogd, stel onze titel in. Vervolgens gebruiken we onze query()-functie om een SELECT-query uit te voeren om al onze nieuwsbrieven te vinden. Vervolgens stellen we het huidige tabblad voor onze lay-out in. Nadat we de array hebben doorlopen die door onze query is geretourneerd, en de tabellay-out hebben gemaakt. Dan roepen we een nog onbekende functie aan, en maken we onze pagina aan. Voordat je de pagina kunt bekijken, moet je het volgende toevoegen aan je classes.php-bestand om onze foutmeldingen gemakkelijk te kunnen verwerken:
# admin/classes.php
	// Render error messages
	function error_messages() {
	    $message = '';
	    if($_SESSION['success'] != '') {
	        $message = '<span class="success" id="message">'.$_SESSION['success'].'</span>';
	        $_SESSION['success'] = '';
	    }
	    if($_SESSION['error'] != '') {
	        $message = '<span class="error" id="message">'.$_SESSION['error'].'</span>';
	        $_SESSION['error'] = '';
	    }
	    return $message;
	}
Hoewel u waarschijnlijk geen gegevens zult hebben, ziet het er als u een paar records heeft als volgt uit:(hoewel een beetje minder geplet)


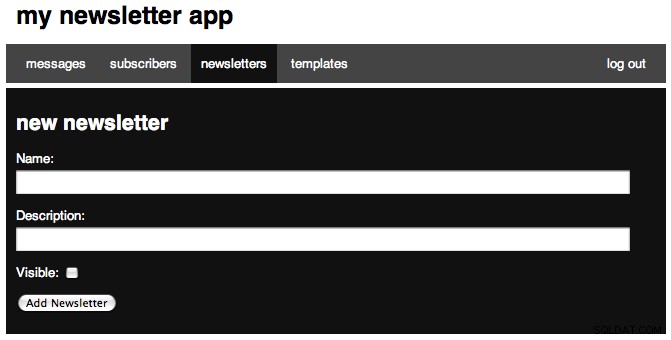
Nu gaan we werken aan onze nieuwe actie, dus open newsletters_new.php en voeg het volgende toe:
# admin/newsletters_new.php
	<?php
	require_once 'config.php';
	login_required();
	$tab = 'nl';

	if(isset($_POST['submitted'])) {
	    $link = new mysqli(DB_SERVER, DB_USER, DB_PASSWORD, DB_NAME) or die('There was a problem connecting to the database.');
	    $sql = "INSERT INTO NEWSLETTERS (name, description) VALUES ( '".$_POST['name']."' , '".$_POST['description']."' )";
	    $stmt = $link->query($sql) or die($link->error);
	    $stmt->close;
	    $_SESSION['success'] = "Added newsletter.";
	    header('Location: newsletters.php');
	}
	$title = "new newsletter";
	$content = <<<EOF
	<form action="newsletters_new.php" method='POST'>
	    <p>
	        <label for="name">Name:</label><br />
	        <input type='text' name='name' class="text" />
	    </p>
	    <p>
	        <label for="description">Description:</label>
	        <input type="text" name="description" class="text" />
	    </p>
	    <p>
	        <input type='submit' value='Add Newsletter' />
	        <input type='hidden' value='1' name='submitted' />
	    </p>
	</form>
	EOF;
	include 'layout.php'; ?>
Dus ik hoop dat je het patroon bovenaan elk van onze bestanden hebt opgemerkt. We hebben eerst ons config.php-bestand nodig, zorgen er dan voor dat we zijn ingelogd en stellen vervolgens ons huidige tabblad in, en we voegen dan wat extra logica toe voor het afhandelen van POST's en dan stellen we onze titel in, onze inhoud en geven dan de pagina weer. De POST-sectie is vrij eenvoudig te begrijpen, dus ik zal het snel uitleggen.
We controleren eerst of een item met de naam ingezonden is verzonden. Dit is het verborgen veld dat we hebben na de verzendknop. Vervolgens maken we een link naar onze database met behulp van de variabelen uit ons configuratiebestand. Vervolgens maken we onze SQL-invoegquery met behulp van onze POST-variabelen. Vervolgens bevragen we (niet onze functie) de database, en als er een fout optreedt, tonen we de geretourneerde fout. Vervolgens sluiten we de zoekopdracht, stellen we ons succesbericht in en verwijzen we door naar de lijstpagina. Uw pagina zou er als volgt uit moeten zien:


Vervolgens gaan we aan onze bewerkingspagina werken en het volgende toevoegen:
# admin/newsletters_edit.php
	<?php
	require_once 'config.php';
	login_required();
	$tab = 'nl';

	if(isset($_POST['submitted'])) {
	    $link = new mysqli(DB_SERVER, DB_USER, DB_PASSWORD, DB_NAME) or die('There was a problem connecting to the database.');
	    if(isset($_POST['visible'])) {$visible = 1;}else{$visible = 0;}
	    $sql = "UPDATE NEWSLETTERS SET name='".$_POST['name']."', description='".$_POST['description']."', visible=".$visible." WHERE id=".$_POST['id']."";
	    $stmt = $link->query($sql) or die($link->error);
	    $stmt->close;
	    $_SESSION['success'] = "Edited newsletter.";
	    header('Location: newsletters.php');
	}
	$title = "edit newsletter";
	$id = (int) $_GET['id'];
	$results = query("SELECT * FROM newsletters WHERE id='".$id."' LIMIT 1");
	$name = $results[0]['name'];
	$description = $results[0]['description'];
	$visible = ($results[0]['visible'] == "1") ? 'checked="checked"' : '';
	$content = <<<EOF
	<form action="newsletters_edit.php" method='POST'>
	    <p>
	        <label for="name">Name:</label><br />
	        <input type='text' name='name' class="text" value="$name" />
	    </p>
	    <p>
	        <label for="description">Description:</label>
	        <input type="text" name="description" class="text" value="$description" />
	    </p>
	    <p>
	        <label for="visible">Visible:</label>
	        <input type="checkbox" name="visible" value="true" $visible/>
	    </p>
	    <p>
	        <input type='submit' value='Edit Newsletter' />
	        <input type='hidden' value='1' name='submitted' />
	        <input type='hidden' value='$id' name='id' />
	    </p>
	</form>
	EOF;
	include 'layout.php'; ?>
Net als al onze bestanden beginnen we met hetzelfde blok. Na ons POST-blok (waar ik het zo meteen over zal hebben), stellen we id in op onze gevraagde id, waarbij we ervoor zorgen dat het een geheel getal is. Vervolgens gebruiken we onze zoekfunctie om de nieuwsbrief te vinden waarmee we werken, en stellen een paar variabelen in op de geretourneerde resultaten. U kunt zich afvragen waarom we een [0] plaatsen voordat we elke waarde hebben opgevraagd, en de reden is dat de queryfunctie een array van alle records retourneert, en elke record is een array, dus we moeten toegang krijgen tot de eerste array in onze resultatenvariabele . De regel waar we de variabele zichtbare if instellen, is eigenlijk een gecomprimeerde if/else-instructie. het if-gedeelte is de ==1, en als dat waar is, wordt de variabele ingesteld op gecontroleerd, anders op niets. Dan hebben we ons formulier.
Ons POST-blok lijkt erg op onze nieuwe pagina en zal op de rest van onze pagina's altijd op dezelfde manier beginnen. We controleren dan of het selectievakje is aangevinkt en stellen hier opnieuw een variabele in. Dan hebben we onze UPDATE-query, voeren de query opnieuw uit, stellen ons succesbericht in en leiden vervolgens naar huis. Zo ziet het formulier eruit en ziet het bericht eruit na het bewerken:


De laatste pagina voor deze sectie is de gemakkelijkste, omdat dit de verwijderpagina is. Open het bestand en plak het als volgt:
# admin/newsletters_delete.php
	<?php
	require_once 'config.php';
	login_required();
	$id = (int) $_GET['id'];
	$link = new mysqli(DB_SERVER, DB_USER, DB_PASSWORD, DB_NAME) or die('There was a problem connecting to the database.');
	$sql = "DELETE FROM newsletters WHERE id=$id LIMIT 1";
	$stmt = $link->query($sql) or die($link->error);
	if($link->affected_rows) {
	    $_SESSION['success'] = "Newsletter deleted.";
	} else {
	    $_SESSION['error'] = 'Nothing deleted.';
	}
	header('Location: newsletters.php');
In dit blok hebben we onze configuratie nodig, zorg ervoor dat we zijn ingelogd, sla de gevraagde id op in een variabele, maak een MySQL-verbinding, stel onze SQL-query in en voer de query uit. We controleren vervolgens of een rij is beïnvloed en stellen een bericht op de juiste manier in. We verwijzen dan door naar de nieuwsbriefpagina. Gefeliciteerd, je hebt de eerste van vier CRUD-secties voltooid. Vervolgens werken we aan de CRUD voor onze sjablonen.
Stap 6:Sjablonen
Onze applicatie staat ook meerdere sjablonen toe, allemaal opgeslagen in de database. Laten we eerst onze databasetabel maken:
	CREATE TABLE `templates` (
	   `id` int(10) AUTO_INCREMENT,
	   `name` varchar(50),
	   `columns` tinyint(5),
	   `body` text,
	   PRIMARY KEY (`id`)
	) ENGINE=MyISAM DEFAULT CHARSET utf8;
We hebben een automatisch oplopende id-kolom, een naamkolom, een kolommenkolom om het aantal kolommen op te slaan (de toepassing schaalt alleen naar 2 kolommen, wat voldoende zou moeten zijn, maar kan gemakkelijk worden uitgebreid. Dit kan ook worden gebruikt voor verschillende secties .), en ons lichaam. Net als de vorige keer moeten we elk van onze pagina's maken, en we zullen een templates.php-pagina hebben, evenals templates_new.php, templates_edit.php, templates_delete.php en templates_preview.php. We gaan eerst aan ons templates.php-bestand werken, dus open het en plak het:
# admin/templates.php
	<?php
	require_once 'config.php';
	login_required();
	$title = "templates";
	$tab = 'temp';
	$templates = query("SELECT id,name,columns FROM templates ORDER BY id ASC");
	$table = "";
	foreach($templates as $row) {
	    $plink = '<a href="" onClick="window.open(\'templates_preview.php?id='.$row['id'].'\',width=800,height=600)" title="preview"><img src="media/images/find.png" alt="preview"/></a>';
	    $dlink = '<a href="templates_delete.php?id='.$row['id'].'" onclick="return confirm(\'Are you sure you want to delete this template?\');" title="delete"><img src="media/images/delete.png" alt="delete"/></a>';
	    $elink = '<a href="templates_edit.php?id='.$row['id'].'" title="edit"><img src="media/images/page_edit.png" alt="edit"/></a>';
	    $table .= "<tr><td>".$row['id']."</td><td>".$row['name']."</td><td>".$row['columns']."</td><td>".$plink." ".$dlink." ".$elink."</td></tr>\n";
	}
	$message = error_messages();
	$content = <<<EOF
	<a href="templates_new.php" class="large">new template »</a>
	$message
	<table>
	    <tr>
	        <th></th>
	        <th>name</th>
	        <th>columns</th>
	        <th></th>
	    </tr>
	    $table
	</table>
	EOF;
	include 'layout.php'; ?>
We beginnen weer bij de basis. Vervolgens voeren we een query uit om al onze sjablonen te vinden. Vervolgens doorlopen we elke array in sjablonen en maken we een tabel. We krijgen dan onze foutmeldingen (en succes) en vervolgens onze inhoud. Uw pagina zou er ongeveer zo uit moeten zien:


Ga nu naar onze nieuwe pagina en plak het volgende:
# admin/templates_new.php
	<?php
	require_once 'config.php';
	login_required();
	$tab = 'temp';
	if(isset($_POST['submitted'])) {
	    $link = new mysqli(DB_SERVER, DB_USER, DB_PASSWORD, DB_NAME) or die('There was a problem connecting to the database.');
	    $sql = "INSERT INTO templates (name, columns, body) VALUES ( '".$_POST['name']."' , ".$_POST['columns'].", '".mysql_real_escape_string($_POST['body'])."' )";
	    $stmt = $link->query($sql) or die($link->error);
	    $stmt->close;
	    $_SESSION['success'] = "Added template.";
	    header('Location: templates.php');
	}
	$title = "new template";
	$content = <<<EOF
	<form action="templates_new.php" method='POST'>
	    <p>
	        <label for="name">Name:</label><br />
	        <input type='text' name='name' class="text" />
	    </p>
	    <p>
	        <label for="columns">Columns</label>
	        <select name="columns">
	            <option value="1">Single Column Layout</option>
	            <option value="2">Two Column Layout</option>
	        </select>
	    </p>
	    <p>
	        <label for="description">Body: (raw html)</label><br />
	        Use %content% for a single column layout, %leftcol% and %rightcol% for a two column layout.<br />
	        <textarea name="body" rows="35"></textarea>
	    </p>
	    <p>
	        <input type='submit' value='Add Template' />
	        <input type='hidden' value='1' name='submitted' />
	    </p>
	</form>
	EOF;
	include 'layout.php'; ?>
Dus nogmaals, we hebben dezelfde header. Onze POST maakt opnieuw een MySQL-verbinding, vervolgens maken we onze query en gebruiken we mysql_real_escape_string om tekens in de record toe te staan, en dan voeren we onze query uit, stellen ons succesbericht in en verwijzen door naar onze sjablonenlijst. Als je naar ons formulier kijkt, vraag ik ook om variabelen in te voegen voor onze inhoud, en ik zal je laten zien hoe dit later in het spel komt als we een bericht matchen met een sjabloon. Uw pagina zou er als volgt uit moeten zien:


Vervolgens gaan we aan de slag met onze bewerkingspagina. Als het je is opgevallen, is een groot deel van deze code kopiëren en plakken over dezelfde acties, dus maak het jezelf gemakkelijk.
# admin/templates/edit.php
	<?php
	require_once 'config.php';
	login_required();
	$tab = 'temp';
	if(isset($_POST['submitted'])) {
	    $link = new mysqli(DB_SERVER, DB_USER, DB_PASSWORD, DB_NAME) or die('There was a problem connecting to the database.');
	    $sql = "UPDATE templates SET name='".$_POST['name']."', body='".mysql_real_escape_string($_POST['body'])."', columns=".$_POST['columns']." WHERE id=".$_POST['id']."";
	    $stmt = $link->query($sql) or die($link->error);
	    $stmt->close;
	    $_SESSION['success'] = "Edited template.";
	    header('Location: templates.php');
	}
	$title = "edit template";
	$id = (int) $_GET['id'];
	$results = query("SELECT * FROM templates WHERE id='".$id."' LIMIT 1");
	$name = $results[0]['name'];
	$templatedata = stripslashes(htmlspecialchars($results[0]['body']));
	$content = <<<EOF
	<form action="templates_edit.php" method='POST'>
	    <p>
	        <label for="name">Name:</label><br />
	        <input type='text' name='name' class="text" value="$name"/>
	    </p>
	    <p>
	        <label for="columns">Columns</label>
	        <select name="columns">
	            <option value="1">Single Column Layout</option>
	            <option value="2">Two Column Layout</option>
	        </select>
	    </p>
	    <p>
	        <label for="body">Body: (raw html)</label><br />
	        Use %content% for a single column layout, %leftcol% and %rightcol% for a two column layout.<br />
	        <textarea name="body" rows="35">$templatedata</textarea>
	    </p>
	    <p>
	        <input type='submit' value='Edit Template' />
	        <input type='hidden' value='1' name='submitted' />
	        <input type='hidden' value='$id' name='id' />
	    </p>
	</form>
	EOF;
	include 'layout.php'; ?>
We start with the same intro, then our POST block, our title, then our requested id. After, we try and find the template we are working with, then sets three variables so that we can inset them into our content block. We also convert all of the tags we stored to HTML characters so everything will display. When looking at our POST block, you will notice we create our link, then our query and again use mysql_real_escape_string to save everything, execute our query, and then set our message, and redirect to our templates list. Your edit page (with a sample record) should look like:


Now we will create another delete page, so open up our delete page and paste in:
# admin/templates_delete.php
	<?php
	require_once 'config.php';
	login_required();
	$id = (int) $_GET['id'];
	$link = new mysqli(DB_SERVER, DB_USER, DB_PASSWORD, DB_NAME) or die('There was a problem connecting to the database.');
	$sql = "DELETE FROM templates WHERE id=$id LIMIT 1";
	$stmt = $link->query($sql) or die($link->error);
	if($link->affected_rows) {
	    $_SESSION['success'] = "Template deleted.";
	} else {
	    $_SESSION['error'] = 'Nothing deleted.';
	}
	header('Location: templates.php');
I hope you have picked up the pattern here, this is a very simple page. Now we are going to work on an extra page that is not part of the CRUD spectrum; we are going to create a preview page. The binoculars in the action part on the table is the link for each one (in a new window). So open up our preview page. The page is very simple, we find our template and echo the data, and then append a javascript close button. The code looks like:
# admin/templates_preview.php
	<?php
	require_once 'config.php';
	login_required();
	$id = (int) $_GET['id'];
	$data = query("SELECT body FROM templates WHERE id=$id LIMIT 1");
	$template = $data[0]['body'];
	?>
	<?php echo $template; ?>
	<center><button type="button" onclick="self.close();">close window</button></center>
And an example preview looks like:


Now we have finished with our Templates, we are ready to move onto the next step!
Step 7:Subscribers
So now we are going to work with our subscribers! We are going to create two tables. The first:
CREATE TABLE `subscribers` (
	   `id` tinyint(10) AUTO_INCREMENT,
	   `name` varchar(50),
	   `email` varchar(50),
	   PRIMARY KEY (`id`)
	) ENGINE=MyISAM DEFAULT CHARSET utf8;
Refers to each subscriber, and the second:
CREATE TABLE `subscriptions` (
	   `id` tinyint(10) AUTO_INCREMENT,
	   `subscriber_id` tinyint(10),
	   `newsletter_id` tinyint(10),
	   PRIMARY KEY (`id`)
	) ENGINE=MyISAM DEFAULT CHARSET utf8;
Creates a table for our many-to-many relationship with our newsletters. A subscriber can have multiple subscription to newsletters, so they can subscribe to multiple ones, and each newsletter can have many subscribers. To create the most dynamic solution, we have a linking table.
Let's first create our files. The files we are going are going to have are subscribers.php, subscribers_delete.php, and subscribers_edit.php. Our create action will be created later for the front-end. First open up subscribers.php and paste in:
# admin/subscribers.php
	<?php
	require_once 'config.php';
	login_required();
	$title = "subscribers";
	$tab = 'sub';
	$table = "";
	$messages = query("SELECT * FROM subscribers ORDER BY id ASC");
	foreach($messages as $row) {
		$dlink = '<a href="subscribers_delete.php?id='.$row['id'].'" onclick="return confirm(\'Are you sure you want to delete this subscriber?\');" title="delete"><img src="media/images/delete.png" alt="delete"/></a>';
		$elink = '<a href="subscribers_edit.php?id='.$row['id'].'" title="edit"><img src="media/images/page_edit.png" alt="edit"/></a>';
		$table .= '<tr><td>'.$row['id'].'</td><td>'.$row['name'].'</td><td>'.$row['email'].'</td><td>'.$dlink.' '.$elink.'</td></tr>';
	}
	$message = error_messages();
	$content = <<<EOF
	$message
	<table>
		<tr>
			<th></th>
			<th>name</th>
			<th>email</th>
			<th></th>
		</tr>
		$table
	</table>
	EOF;
	include 'layout.php'; ?>
We have basically the same listing pages as before, except this time we will be finding our subscribers. Your page (with some sample data) should look like:


Now we will move on to our edit page:
# admin/subscribers_edit.php
	<?php
	require_once 'config.php';
	login_required();
	$tab = 'sub';

	if(isset($_POST['submitted'])) {
	    $id = (int) $_POST['id'];
	    $link = new mysqli(DB_SERVER, DB_USER, DB_PASSWORD, DB_NAME) or die('There was a problem connecting to the database.');
	    $sql = "UPDATE subscribers SET name='".$_POST['name']."', email='".$_POST['email']."' WHERE id=$id";
	    $stmt = $link->query($sql) or die($link->error);
	    $stmt->close;

	    foreach($_POST['newsletter'] as $n) {
	        if($n['exists'] != '1' && $n['subscribe'] == "true") { // If we want to subscribe but the record doesnt exist
	            $nlid = $n['nlid'];
	            $sql = "INSERT INTO subscriptions (subscriber_id, newsletter_id) VALUES ('$id', '$nlid')";
	            $stmt = $link->query($sql) or die($link->error);
	            $stmt->close;
	        } elseif ($n['exists'] == '1' && $n['subscribe'] != "true") {// Else if we had an exits but we want to unsubscribe
	            $subid = $n['subid'];
	            $sql = "DELETE FROM subscriptions WHERE id=$subid LIMIT 1";
	            $stmt = $link->query($sql) or die($link->error);
	            $stmt->close;
	        }
	    }
	    $_SESSION['success'] = "Edited subscriber.";
	    header('Location: subscribers.php');
	}
	$title = "edit newsletter";
	$id = (int) $_GET['id'];

	$subscriber = query("SELECT * FROM subscribers WHERE id='$id'");
	$name = $subscriber[0]['name'];
	$email = $subscriber[0]['email'];

	$newsletters = query("SELECT * FROM newsletters");
	$subs = query("SELECT * FROM subscriptions WHERE subscriber_id='".$id."'");
	$subscriptions = '';
	foreach($newsletters as $nl) {
	    $s = false;
	    $subid = '';
	    foreach($subs as $sub) {
	        if($sub['newsletter_id'] == $nl['id']) {$s = true; $subid = $sub['id'];}
	    }
	    $checked = ($s == true) ? 'checked="checked"' : '';
	    $subscriptions .= '
	    <input type="checkbox" name="newsletter['.$nl["id"].'][subscribe]" value="true" '.$checked.'/>
	    <label for="newsletter['.$nl["id"].']">'.$nl['name'].'</label>
	    <input type="hidden" name="newsletter['.$nl["id"].'][exists]" value="'.$s.'" />
	    <input type="hidden" name="newsletter['.$nl["id"].'][nlid]" value="'.$nl['id'].'" />
	    <input type="hidden" name="newsletter['.$nl["id"].'][subid]" value="'.$subid.'" /><br />
	    ';


	}
	$content = <<<EOF
	<form action="subscribers_edit.php" method='POST'>
	    <p>
	        <label for="name">Name:</label><br />
	        <input type='text' name='name' class="text" value="$name" />
	    </p>
	    <p>
	        <label for="email">Email</label><br />
	        <input type="text" name="email" class="text" value="$email" />
	    </p>
	    <p>
	        <strong>Newsletters:</strong><br />
	        $subscriptions
	    </p>
	    <p>
	        <input type='submit' value='Edit Subscriber' />
	        <input type='hidden' value='1' name='submitted' />
	        <input type='hidden' value='$id' name='id' />
	    </p>
	</form>
	EOF;
	include 'layout.php'; ?>
This page is fairly different so I will explain each part. The header is the same we have been using. I'll skip the POST block and come back to it. We then continue the same code. We next find our current subscriber. Next we find all newsletters (this includes ones that are not visible - visible mean visible to the public) and then all of the subscriber's subscriptions. We next loop through every newsletter record returned, we next reset some values. Next, we loop through every subscription the user has, and if the subscription's newsletter_id is equal to the current newsletter we are looping we set $s true, and $subid equal to the subscription id. We then set the variable $checked equal to either checked or nothing depending on whether a subscription was found for this subscriber and the current newsletter in the loop. Next we create the checkbox form area, with a lot of hidden fields. First, we have the actual checkbox with a name that will create an array for each checkbox. We then have our label, and next we output whether or not the subscription exists, the newsletter_id and then the subscription_id for when the subscription exists. After which we have our normal content.
Now, if we move on to our POST block. We first get the id posted from our hidden field at the bottom. We next create our MySQL link. Next we have our first SQL query where we update the subscriber record. Next we loop through every newsletter checkbox. The first conditional statement checks to see if the POSTed data says we do not have an existing subscription, and the user wants to subscribe to the newsletter. To handle this, we are going to perform a SQL INSERT into our subscriptions table where our subscriber_id is the same as the user_id we are editing, and newsletter_id equal to the 'nlid' value POSTed by one of our hidden fields. We then execute that SQL INSERT query. The elseif conditional statement says that if our subscription exists, but the checkbox was unchecked so we unsubscribe, we need to delete the subscription. We handle this with a SQL DELETE query. To form our query we set $subid equal to the posted value for our 'subid'. We then create our query by deleting the record where the subscription id equals our variable of $subid. Next we execute the query, set our session success message, and then redirect back to our subscribers page. Your final edit page should look like:(filled with sample data)


We have one last page to work on for the subscribers part of the backend:the delete page. Just like before, this page is very simple:
# admin/subscribers_delete.php
	<?php
	require_once 'config.php';
	login_required();
	$id = (int) $_GET['id'];
	$link = new mysqli(DB_SERVER, DB_USER, DB_PASSWORD, DB_NAME) or die('There was a problem connecting to the database.');
	$sql = "DELETE FROM subscribers WHERE id=$id LIMIT 1";
	$stmt = $link->query($sql) or die($link->error);
	if($link->affected_rows) {
	    $_SESSION['success'] = "Subscriber deleted.";
	} else {
	    $_SESSION['error'] = 'Nothing deleted.';
	}
	header('Location: subscribers.php');
Step 8:Messages
I will tell you upfront, this section has the most pages. We will be working with seven now, and creating one more in Step 10. First, we are going to create our messages table with this SQL:
CREATE TABLE `messages` (
	   `id` tinyint(10) AUTO_INCREMENT,
	   `subject` varchar(255),
	   `leftcol` text,
	   `rightcol` text,
	   `template_id` tinyint(10),
	   PRIMARY KEY (`id`)
	) ENGINE=MyISAM DEFAULT CHARSET utf8;
Next, we'll create the files for this step. Creates seven files, each named messages.php, messages_delete.php, messages_edit.php, messages_new.php, messages_new_step2.php, messages_new_step3.php, and messages_preview.php. Let's first open up messages.php and make it look like:
# admin/messages.php
	<?php
	require_once 'config.php';
	login_required();
	$title = "messages";
	$tab = 'mess';
	$table = "";
	$messages = query("SELECT * FROM messages ORDER BY id ASC");
	foreach($messages as $row) {
	    $slink = '<a href="messages_send.php?id='.$row['id'].'" title="send message"><img src="media/images/email_go.png" alt="send message"/></a>';
	    $plink = '<a href="messages_preview.php?id='.$row['id'].'" target="_new" title="preview"><img src="media/images/find.png" alt="preview"/></a>';
	    $dlink = '<a href="messages_delete.php?id='.$row['id'].'" onclick="return confirm(\'Are you sure you want to delete this message?\');" title="delete"><img src="media/images/delete.png" alt="delete"/></a>';
	    $elink = '<a href="messages_edit.php?id='.$row['id'].'" title="edit"><img src="media/images/page_edit.png" alt="edit"/></a>';
	    $table .= '<tr><td>'.$row['id'].'</td><td>'.$row['subject'].'</td><td><a href="" onClick="window.open(\'templates_preview.php?id='.$row['template_id'].'\',width=800,height=600)" title="preview"><img src="media/images/find.png" alt="preview"/></a></td><td>'.$slink.' '.$plink.' '.$dlink.' '.$elink.'</td></tr>';
	}
	$message = error_messages();
	$content = <<<EOF
	<a href="messages_new.php" class="large">new message »</a>
	$message
	<table>
	    <tr>
	        <th></th>
	        <th>subject</th>
	        <th>template</th>
	        <th></th>
	    </tr>
	    $table
	</table>
	EOF;
	include 'layout.php'; ?>
This is our routine table, except we now have 4 'extra' links now, one to send the message, one to preview, one to edit, and one to delete. Your page should look like:


Now we are going to start work on our new pages. The first page is where all messages start out, and then you can progress on and enter the actual message on the next page. The reason for this is because we first need to create the initial message in the DB and so we can find information about the template. The step2 page is basically the edit page (there are six line differences according to FileMerge). Open up our new file and paste the following:
# admin/messages_new.php
	<?php
	require_once 'config.php';
	login_required();
	$tab = 'mess';
	if(isset($_POST['subject'])) {
	    $link = new mysqli(DB_SERVER, DB_USER, DB_PASSWORD, DB_NAME) or die('There was a problem connecting to the database.');
	    $sql = "INSERT INTO messages (subject, template_id) VALUES ( '".$_POST['subject']."' , ".$_POST['template'].")";
	    $stmt = $link->query($sql) or die($link->error);
	    $i = query("SELECT id FROM messages WHERE subject='".$_POST['subject']."' AND template_id=".$_POST['template']." ");
	    $id = $i[0]['id'];
	    $stmt->close;
	    $_SESSION['success'] = "Added template.";
	    header('Location: messages_new_step2.php?id=' + $id);
	}
	$title = "new message";
	$templates = query("SELECT id,name,columns FROM templates");
	$tselect = '<select name="template">';
	foreach($templates as $row) {
	    $tselect .= '<option value="'.$row['id'].'">'.$row['name'].'</option>';
	}
	$tselect .= "</select>";
	$content = <<<EOF
	<form action="messages_new.php" method='POST'>
	    <p>
	        <label for="subject">Subject:</label><br />
	        <input type='text' name='subject' class="text" />
	    </p>
	    <p>
	        <label for="template">Template:</label>
	        $tselect
	    </p>
	    <p>
	        <button onclick="">Continue »</button>
	    </p>
	</form>
	EOF;
	include 'layout.php'; ?>
This page is very similar to what our other new pages look like, but this one was one change in the POST block. Right after we perform the SQL INSERT, we find the most recent insert id. Now this is not the perfect solution, but I prefer it to performing another SQL query to find a row using unindexed columns. This step should look like:


We then redirect to step2, so let's open up the file:
# admin/messages_new_step2.php
	<?php
	require_once 'config.php';
	login_required();
	$title = "new message - step 2";
	$tab = 'mess';
	$id = (int) $_GET['id'];

	$mess = query("SELECT * FROM messages WHERE id=$id");
	$message = $mess[0];
	$subject = $message['subject'];

	$templates = query("SELECT id,name,columns FROM templates");
	$tselect = '<select name="template">';
	foreach($templates as $row) {
	    if($message['template_id'] == $row['id']) {
	        $selected = ' selected="selected"';
	        if($row['columns'] == "1") {
	            $textareas = '<p><label for="body">Body: (raw html)</label><br /><textarea name="body" rows="35"></textarea></p>';
	        } else {
	            $textareas = '<p><label for="leftcol">Left column: (raw html)</label><br /><textarea name="leftcol" rows="35"></textarea></p>
	            <p><label for="rightcol">Right column: (raw html)</label><br /><textarea name="rightcol" rows="35"></textarea></p>';
	        }

	    } else {$selected = '';}
	    $tselect .= '<option value="'.$row['id'].'"'.$selected.'>'.$row['name'].'</option>';
	}
	$tselect .= '</select>';

	// Check for a POST
	if(isset($_POST['submitted'])) {
	    $link = new mysqli(DB_SERVER, DB_USER, DB_PASSWORD, DB_NAME) or die('There was a problem connecting to the database.');
		$template = query("SELECT columns FROM templates WHERE id=".$message['template_id']);
	    if($template[0]['columns'] == "1") {
	        $body = mysql_real_escape_string($_POST['body']);
	        $sql = "UPDATE messages SET subject='".$_POST['subject']."', leftcol='$body' WHERE id=$id";
	    } else {
	        $leftcol = mysql_real_escape_string($_POST['leftcol']);
	        $rightcol = htmlentities($_POST['rightcol']);
	        $sql = "UPDATE messages SET subject='".$_POST['subject']."', leftcol='$leftcol', rightcol='$rightcol' WHERE id=$id";
	    }
	    $stmt = $link->query($sql) or die($link->error);
	    $stmt->close;
	    header('Location: messages_new_step3.php?id='.$id);
	}

	$content = <<<EOF
	<form action="messages_new_step2.php?id=$id" method='POST'>
	    <p>
	        <label for="subject">Subject:</label><br />
	        <input type='text' name='subject' class="text" value="$subject"/>
	    </p>
	    <p>
	        <label for="template">Template:</label>
	        $tselect
	    </p>
	    $textareas
	    <p>
	        <input type='submit' value='Continue »' />
	        <input type='hidden' value='1' name='submitted' />
	    </p>
	</form>
	EOF;
	include 'layout.php'; ?>
Hopefully you have gotten the gist of all the pages and understand the page above. We have our normal heading. we then set our id from our GET request. Next we find the message we are working with, then we find all the templates and construct a drop down. We also use this look to define whether we will have one or two textareas. Next we have our POST block, which creates the link, then checks to see if we are working with one or two columns and creates the appropriate SQL query. After that we have our form. Your form should look like:


Now we will continue onto step 3, so open up the file and paste:
# admin/messages_new_step3.php
	<?php
	require_once 'config.php';
	login_required();
	$title = "new message - step 3";
	$id = (int) $_GET['id'];
	$tab = 'mess';

	$mess = query("SELECT * FROM messages WHERE id=$id");
	$message = $mess[0];
	$subject = $message['subject'];

	$content = <<<EOF
	<a href="messages_preview.php?id=$id" class="large" target="_new">preview »</a><br />
	<p>Do you want to <a href="messages.php" class="large">return to messages</a> or <a href="messages_send.php?id=$id" class="large">send the message</a>?</p>
	EOF;
	include 'layout.php';
	?>
The page is very simple and is the end of creating a message. It offers us a few links. The first is a link to preview the message. The next offers to take us back home. The third offers to take us to send the message (Step 10). The page looks like:


Now we are going to continue on to our edit page. I will not explain it as it is the same file as messages_new_step2.php, so you can refer there.
# admin/messages_edit.php
	<?php
	require_once 'config.php';
	login_required();
	$title = "edit message";
	$id = (int) $_GET['id'];
	$tab = 'mess';

	$mess = query("SELECT * FROM messages WHERE id=$id");
	$message = $mess[0];
	$subject = $message['subject'];

	$templates = query("SELECT id,name,columns FROM templates");
	$tselect = '<select name="template">';
	foreach($templates as $row) {
	    if($message['template_id'] == $row['id']) {
	        $selected = ' selected="selected"';
	    } else {$selected = '';}
	    $tselect .= '<option value="'.$row['id'].'"'.$selected.'>'.$row['name'].'</option>';
	}
	$tselect .= '</select>';

	$mid = $message['template_id'];
	$template = query("SELECT id,name,columns FROM templates WHERE id=$mid");
	if($template[0]['columns'] == "1") {
	    $textareas = '<p><label for="body">Body: (raw html)</label><br /><textarea name="body" rows="35">'.$message['leftcol'].'</textarea></p>';
	} else {
	    $textareas = '<p><label for="leftcol">Left column: (raw html)</label><br /><textarea name="leftcol" rows="35">'.$message['leftcol'].'</textarea></p>
	    <p><label for="rightcol">Right column: (raw html)</label><br /><textarea name="rightcol" rows="35">'.$message['rightcol'].'</textarea></p>';
	}

	// Check for a POST
	if(isset($_POST['submitted'])) {
	    $link = new mysqli(DB_SERVER, DB_USER, DB_PASSWORD, DB_NAME) or die('There was a problem connecting to the database.');
	    if($template[0]['columns'] == "1") {
	        $body = mysql_real_escape_string($_POST['body']);
	        $sql = "UPDATE messages SET subject='".$_POST['subject']."', leftcol='$body' WHERE id=$id";
	    } else {
	        $leftcol = mysql_real_escape_string($_POST['leftcol']);
	        $rightcol = htmlentities($_POST['rightcol']);
	        $sql = "UPDATE messages SET subject='".$_POST['subject']."', leftcol='$leftcol', rightcol='$rightcol' WHERE id=$id";
	    }
	    $stmt = $link->query($sql) or die($link->error);
	    $stmt->close;
	    $_SESSION['success'] = "Edited message.";
	    header('Location: messages.php');
	}

	$content = <<<EOF
	<form action="messages_edit.php?id=$id" method='POST'>
	    <p>
	        <label for="subject">Subject:</label><br />
	        <input type='text' name='subject' class="text" value="$subject"/>
	    </p>
	    <p>
	        <label for="template">Template:</label>
	        $tselect
	    </p>
	    $textareas
	    <p>
	        <input type='submit' value='Save »' />
	        <input type='hidden' value='1' name='submitted' />
	    </p>
	</form>
	EOF;
	include 'layout.php'; ?>
The page will look almost identical to our step 2, but the textarea will have content. Now we will create the delete page with:
# admin/messages_delete.php
	<?php
	require_once 'config.php';
	login_required();
	$id = (int) $_GET['id'];
	$link = new mysqli(DB_SERVER, DB_USER, DB_PASSWORD, DB_NAME) or die('There was a problem connecting to the database.');
	$sql = "DELETE FROM messages WHERE id=$id LIMIT 1";
	$stmt = $link->query($sql) or die($link->error);
	if($link->affected_rows) {
	    $_SESSION['success'] = "Message deleted.";
	} else {
	    $_SESSION['error'] = 'Nothing deleted.';
	}
	header('Location: messages.php'); ?>
That page should also look familiar. The final page we are going to work on in this step is our preview page, so open it up and place:
# admin/messages_preview.php
	<?php
	require_once 'config.php';
	login_required();
	$id = (int) $_GET['id'];

	$mess = query("SELECT * FROM messages WHERE id=$id");
	$message = $mess[0];
	$subject = $message['subject'];
	$tid = $message['template_id'];

	$data = query("SELECT body,columns FROM templates WHERE id=$tid LIMIT 1");
	$template = $data[0]['body'];

	if($data[0]['columns'] == "1") {
	    $leftcol = $message['leftcol'];
	    $body = str_replace('%content%', $leftcol, $template);
	} else {
	    $leftcol = $message['leftcol'];
	    $rightcol = $message['rightcol'];
	    $b = str_replace('%leftcol%', $leftcol, $template);
	    $body = str_replace('%rightcol%', $rightcol, $b);
	}
	?>
	<?php echo $body; ?>
	<button type="button" onclick="self.close();">close window</button>
This file is somewhat different than you have seen, so I'll walk you through it. First have have our normal heading. Next we find the current message we are working with, and set a few variables to the results. Next we find the template we are working with and set a variable equal to the body. Next, we have a conditional statement that checks to see the number of columns the template has. If it has we use the PHP function str_replace to replace the %content% tag we have with our actual content. Otherwise, we first perform a str_replace for the left column, and then on the result of that we perform str_replace again for the right column. Now we are ready to continue onto the front-end.
Step 9:The Front-End
We have finally reached the front-end! For this step and this step only, I will assume the files we are working with are in the root of the project (so not the admin folder, the one containing it). We are going to be working with four files here, so go ahead and create index.php, preferences.php, subscribe.php and a style.css file. First open up our index.php file and paste:
# index.php
	<?php
	require_once 'admin/config.php';
	$newsletters = query("SELECT * FROM newsletters WHERE visible=1");
	$subscriptions = '';
	foreach($newsletters as $nl) {
	    $subscriptions .= '
	    <input type="checkbox" name="newsletter['.$nl["id"].'][subscribe]" value="true" '.$checked.'/>
	    <label for="newsletter['.$nl["id"].']">'.$nl['name'].'</label>
	    <input type="hidden" name="newsletter['.$nl["id"].'][nlid]" value="'.$nl['id'].'" /><br />
	    '.$nl["description"].'<br />
	    ';
	}
	?>
	<!DOCTYPE html PUBLIC "-//W3C//DTD XHTML 1.1//EN" "https://www.w3.org/TR/xhtml11/DTD/xhtml11.dtd">
	<html xmlns="https://www.w3.org/1999/xhtml" >
	    <head>
	        <meta http-equiv="Content-Type" content="text/html; charset=utf-8" />

	        <title>my newsletters</title>
	        <!-- Stylesheets -->
	        <link rel="stylesheet" href="style.css" type="text/css" media="all" />
	    </head>
	    <body>
	        <div id="header">
	            <h1>my newsletters</h1>
	        </div>
	        <div id="container">
	            <h3>Subscribe to our newsletters!</h3>
	            <form action="subscribe.php" method="POST">
	                <p>
	                    <label for="name">Name:</label><br />
	                    <input type='text' name='name' class="text" />
	                </p>
	                <p>
	                    <label for="email">Email</label><br />
	                    <input type="text" name="email" class="text" />
	                </p>
	                <p>
	                    <strong>Newsletters:</strong><br />
	                    <?php echo $subscriptions; ?>
	                </p>
	                <p>
	                    <input type='submit' value='Subscribe »' />
	                    <input type='hidden' value='1' name='submitted' />
	                </p>
	            </form>
	        </div>
	    </body>
	</html>
I'll explain the page first and then we will get to the picture so-far and the page styling. In the PHP section at the top we require our config.php file (now in the admin directory), then find all of our publicly visible newsletters and create a check box array. You will notice that we are not handling the POSTed data here, and I chose to do that in our subscribe.php, and we will get to that, but first let's style the page. The page should currently look like:

First I added the 960.gs reset file like I did in our other stylesheet. Then I added the three following styles to make the design look like:
# style.css
	#header, #container {width:65%;margin:0 auto; padding:0.7%;}
	#container {background:#ccc;}
	form input.text {width:95%; font-size:16px;}
#message.success {border:solid 1px #349534; background:#C9FFCA;color:#008000;} 

So now that we have a clean and simple page, we are going to continue on and work on our subscribe.php file. Go ahead and open the file and paste:
# subscribe.php
	<?php
	require_once 'admin/config.php';

	if(isset($_POST['submitted'])) {
	    $link = new mysqli(DB_SERVER, DB_USER, DB_PASSWORD, DB_NAME) or die('There was a problem connecting to the database.');
	    $name = $_POST['name'];
	    $email = $_POST['email'];

	    $sql = "INSERT INTO subscribers (name, email) VALUES ('$name', '$email')";
	    $stmt = $link->query($sql) or die($link->error);
	    $stmt->close;

	    $sql = "SELECT id FROM subscribers WHERE name='$name' AND email='$email' LIMIT 1";
	    $subscriber = query($sql);
	    $id = $subscriber[0]['id'];

	    foreach($_POST['newsletter'] as $n) {
	        if($n['subscribe'] == "true") { // If we want to subscribe but the record doesnt exist
	            $nlid = $n['nlid'];
	            $sql = "INSERT INTO subscriptions (subscriber_id, newsletter_id) VALUES ('$id', '$nlid')";
	            $stmt = $link->query($sql) or die($link->error);
	            $stmt->close;
	        }
	    }
	} else {header('Location: index.php');}
	?>
	<!DOCTYPE html PUBLIC "-//W3C//DTD XHTML 1.1//EN" "https://www.w3.org/TR/xhtml11/DTD/xhtml11.dtd">
	<html xmlns="https://www.w3.org/1999/xhtml" >
	    <head>
	        <meta http-equiv="Content-Type" content="text/html; charset=utf-8" />

	        <title>my newsletters</title>
	        <!-- Stylesheets -->
	        <link rel="stylesheet" href="style.css" type="text/css" media="all" />
	    </head>
	    <body>
	        <div id="header">
	            <h1>my newsletters</h1>
	        </div>
	        <div id="container">
	            <h3>Thank you for subscribing!</h3>
	        </div>
	    </body>
	</html>
This page is very much like our edit subscribers page, but no DELETE SQL queries happen here. We simply check to make sure we have all POSTed data. We then set a few variables to our POSTed data, and then create and perform a SQL INSERT query to add the person to our subscribers table. After which we perform a SQL query to find that just created subscriber (insert_id was not working this time for me). We then loop through all of the POSTed newsletters and check to see if we want to subscribe to them, and perform SQL INSERTs when needed. If all goes to plan, you see a nice screen like the one below:


We have on last page here to work on, and that is the preferences.php file. This is where a user can edit their email subscription. I am going to split the page in two. First we have our PHP block:
# preferences.php
	<?php
	require_once 'admin/config.php';

	if(isset($_POST['submitted'])) {
	    $id = (int) $_POST['id'];
	    $link = new mysqli(DB_SERVER, DB_USER, DB_PASSWORD, DB_NAME) or die('There was a problem connecting to the database.');
	    $sql = "UPDATE subscribers SET name='".$_POST['name']."', email='".$_POST['email']."' WHERE id=$id";
	    $stmt = $link->query($sql) or die($link->error);
	    $stmt->close;

	    foreach($_POST['newsletter'] as $n) {
	        if($n['exists'] != '1' && $n['subscribe'] == "true") { // If we want to subscribe but the record doesnt exist
	            $nlid = $n['nlid'];
	            $sql = "INSERT INTO subscriptions (subscriber_id, newsletter_id) VALUES ('$id', '$nlid')";
	            $stmt = $link->query($sql) or die($link->error);
	            $stmt->close;
	        } elseif ($n['exists'] == '1' && $n['subscribe'] != "true") {// Else if we had an exits but we want to unsubscribe
	            $subid = $n['subid'];
	            $sql = "DELETE FROM subscriptions WHERE id=$subid LIMIT 1";
	            $stmt = $link->query($sql) or die($link->error);
	            $stmt->close;
	        }
	    }
	    $_SESSION['success'] = "Preferences saved.";
	}

	if(isset($_GET['email'])) {$email = $_GET['email']; $display = 'form';} else {$display = 'find';}

	$subscriber = query("SELECT * FROM subscribers WHERE email='$email'");
	if($subscriber || $display == 'find') {
	    $id = $subscriber[0]['id'];
	    $name = $subscriber[0]['name'];
	    $email = $subscriber[0]['email'];
	} else {header('Location: index.php');}

	$newsletters = query("SELECT * FROM newsletters WHERE visible=1");
	$subs = query("SELECT * FROM subscriptions WHERE subscriber_id='".$id."'");
	$subscriptions = '';
	foreach($newsletters as $nl) {
	    $s = false;
	    $subid = '';
	    foreach($subs as $sub) {
	        if($sub['newsletter_id'] == $nl['id']) {$s = true; $subid = $sub['id'];}
	    }
	    $checked = ($s == true) ? 'checked="checked"' : '';
	    $subscriptions .= '
	    <input type="checkbox" name="newsletter['.$nl["id"].'][subscribe]" value="true" '.$checked.'/>
	    <label for="newsletter['.$nl["id"].']">'.$nl['name'].'</label>
	    <input type="hidden" name="newsletter['.$nl["id"].'][exists]" value="'.$s.'" />
	    <input type="hidden" name="newsletter['.$nl["id"].'][nlid]" value="'.$nl['id'].'" />
	    <input type="hidden" name="newsletter['.$nl["id"].'][subid]" value="'.$subid.'" /><br />
	    ';
	}
	$message = error_messages();
	?>
In this block, a lot is going on. First, we include our config file. Next, we check for a POST, and if we have one, we update our database. This portion is copied exactly from our subscribers_edit.php file so you can look there for a bit more explanation. Next depending on if we have a get request, we set our variable (this variable is used in the HTML section of the page). We then look for a subscriber with that email, and if one exists or we are showing the find portion, we continue, otherwise we are redirected home. Next we find all of our newsletters, and all of the subscriber's subscriptions, and then create our checkbox form. The HTML portion looks like:
# preferences.php
	<!DOCTYPE html PUBLIC "-//W3C//DTD XHTML 1.1//EN" "https://www.w3.org/TR/xhtml11/DTD/xhtml11.dtd">
	<html xmlns="https://www.w3.org/1999/xhtml" >
	    <head>
	        <meta http-equiv="Content-Type" content="text/html; charset=utf-8" />

	        <title>my newsletters - my preferences</title>
	        <!-- Stylesheets -->
	        <link rel="stylesheet" href="style.css" type="text/css" media="all" />
	    </head>
	    <body>
	        <div id="header">
	            <h1>my newsletters</h1>
	        </div>
	        <div id="container">
	            <h3>my preferences</h3>
	            <?php if($display == 'form') {?>
	            <form action="preferences.php" method="POST">
	                <p>
	                    <label for="name">Name:</label><br />
	                    <input type='text' name='name' class="text" value="<?php echo $name; ?>"/>
	                </p>
	                <p>
	                    <label for="email">Email</label><br />
	                    <input type="text" name="email" class="text" value="<?php echo $email; ?>"/>
	                </p>
	                <p>
	                    <strong>Newsletters:</strong><br />
	                    <?php echo $subscriptions; ?>
	                </p>
	                <p>
	                    <input type='submit' value='Save my preferences »' />
	                    <input type='hidden' value='1' name='submitted' />
	                    <input type='hidden' value='<?php echo $id; ?>' name='id' />
	                </p>
	            </form>
	            <?php } else { ?>
	            <?php echo $message; ?>
	            <form action='preferences.php' method="get">
	                <p>
	                    <label for="email">Email</label><br />
	                    <input type="text" name="email" class="text" />
	                </p>
	                <p>
	                    <input type='submit' value='Find »' />
	                </p>

	            </form>
	            <?php } ?>
	        </div>
	    </body>
	</html>
In our HTML block we have two forms and some PHP to choose which one to display. The top form is the form the user sees if a record in the database has been found. The second form is for entering your email and having the system find it. The second form looks like:


And the first looks like:

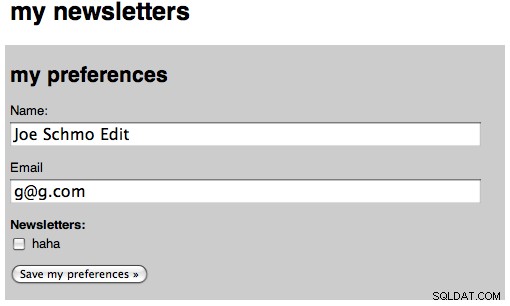
And the second form after we saved our preferences:


Now that we have finished the front-end, we have one last step:sending the emails!
Step 10:Sending Messages
Our last step is to work on the page to send our message. We will be working in the admin directory, and only one file will be created. Go ahead and create our messages_send.php file and place the following in it:
# admin/messages_send.php
	<?php
	require_once 'config.php';
	login_required();
	$title = "send message";
	$id = (int) $_GET['id'];
	$tab = 'mess';

	if(isset($_POST['submitted'])) {
	    $query = "SELECT * FROM subscribers WHERE id=0 ";
	    $emails = array();
	    foreach($_POST['newsletter'] as $n) {
	        if($n['send'] == "true") {
	            $nlid = $n['nlid'];
	            $e = query("SELECT subscriber_id FROM subscriptions WHERE newsletter_id=$nlid");
	            foreach($e as $s) {
	                $sqlids .= " OR id=".$s['subscriber_id'];
	            }
	            $query .= $sqlids;
	        }
	    }
	    $subscribers = query($query);
	    foreach($subscribers as $sub) {
	        $emails[$sub['email']] = $sub['name'];
	    }
	    $from = array(FROM_EMAIL => FROM_NAME);
	    // BODY RENDERING
	    $mess = query("SELECT * FROM messages WHERE id=$id");
	    $message = $mess[0];
	    $subject = $message['subject'];
	    $tid = $message['template_id'];

	    $data = query("SELECT body FROM templates WHERE id=$tid LIMIT 1");
	    $template = $data[0]['body'];

	    if($message['rightcol'] == '') {
	        $leftcol = $message['leftcol'];
	        $body = str_replace('%content%', $leftcol, $template);
	    } else {
	        $leftcol = $message['leftcol'];
	        $rightcol = $message['rightcol'];
	        $b = str_replace('%leftcol%', $leftcol, $template);
	        $body = str_replace('%rightcol%', $rightcol, $b);
	    }

	    send_email_to_mass($from, $emails, $body, $subject) or die('lol');
	    header('Location: index.php');
	}

	$newsletters = query("SELECT * FROM newsletters");
	foreach($newsletters as $nl) {
	    $nls .= '
	    <input type="hidden" name="newsletter['.$nl["id"].'][nlid]" value="'.$nl['id'].'" />
	    <input type="checkbox" name="newsletter['.$nl["id"].'][send]" value="true" '.$checked.'/>
	    <label for="newsletter['.$nl["id"].']">'.$nl['name'].'</label> - '.$nl['description'].'<br />
	    ';
	}
	$mess = query("SELECT * FROM messages WHERE id=$id");
	$message = $mess[0];
	$subject = $message['subject'];

	$content = <<<EOF
	<a href="messages_preview.php?id=$id" class="large" target="_new">preview »</a><br />
	<form action='messages_send.php?id=$id' method="POST">
	    <p>
	        Subject: $subject<br />
	    </p>
	    <p>Send to:<br />
	        $nls
	    </p>
	    <p>
	        <input type='submit' value='Send »' />
	        <input type='hidden' value='1' name='submitted' />
	    </p>
	</form>
	EOF;
	include 'layout.php'; ?>
The first part we again require our config, then make sure the user is logged in, then our title, make sure our id is an integer, and then set our tab. Next we have our complicated post block. First we set up our base query, and running just that would return 0 records, which is good because that means no users will be send the newsletter. Next we loop through every newsletter that we want to send to, and find all of the subscriptions for that newsletter. We then create a string that will be appended to our original SQL query so that we can find every subscriber. Now, we run that query and create an array where the keys are the emails and the name is the value, and this helps us use names when the user looks at the email in their mail application, showing the TO:as their name. We next find the message we are working with, and set the subject, message, and template id to variables. We then find our template and set the body to a variable. Then we use the same code from the message preview to replace the strings inside the template the the parts of the message. Then we call our yet-to-be-created-function send_email_to_mass and then redirect home.
Leaving our POST block, we create the same checkbox list of newsletters so the admin can pick which one(s) he wants to send the message to. Then we have a simple form that looks like:


Now, open up our classes.php file and add the following function:
# admin/classes.php
	// EMAIL
	function send_email_to_mass($from, $recipients, $body, $subject) {
	    require_once 'swift/lib/swift_required.php'; //require lib

	    $transport = Swift_MailTransport::newInstance();
	    $mailer = Swift_Mailer::newInstance($transport) or die('Error creating mailer.');
	    $message = Swift_Message::newInstance($subject)
	        ->setFrom($from)
	        ->setTo($recipients)
	        ->setBody($body, 'text/html') or die('error here.');
	    $result = $mailer->batchSend($message);

	    return true;
	}
So first, we have our function declaration, and it expects four variables to be passed to it, from, recipients, body, and subject. Next we require the sqift_required.php file of our Swift Mailer Library. Next we create a new Mail Transport (this uses the PHP mail function, so it would be sending from your local machine, for the documentation on the three transport types, see the documentation). Next we create a mailer using that transport. Then we create a new message from our subject, then set our from, to, and body. Then we use the batch_send function so that each recipient only sees themselves on the email, and no one else.
There is one possibly downside of doing it the way I have, and that is if you are sending many messages, the page may take forever to load. A solution to tthis would be running a Javascript AJAX request to send each and every message, but I won't cover that here. Now that we have finished working on sending messages, we are going to spice up the home page and then we will be done!
Step 11:The Homepage
When you load the admin index, the page does not really do much. I want to have some 'stats' on our homepage, and we will finally use the count_query function. Open up the admin index file and change it to look like:
# admin/index.php
	<?php
	require_once 'config.php';
	login_required();
	$users = count_query("SELECT COUNT(*) AS num FROM users");
	$emails = count_query("SELECT COUNT(*) AS num FROM subscribers");
	$subs = count_query("SELECT COUNT(*) AS num FROM subscriptions");
	$nls = count_query("SELECT COUNT(*) AS num FROM newsletters");
	$mess = count_query("SELECT COUNT(*) AS num FROM messages");
	$temps = count_query("SELECT COUNT(*) AS num FROM templates");
	$title = "Home!";
	$content = <<<EOF
	<h3>current stats</h3>
	<p>$users user registered</p>
	<p>$emails subscribers</p>
	<p>$subs newsletter subscriptions</p>
	<p>$nls newsletters</p>
	<p>$mess messages</p>
	<p>$temps templates</p>
	EOF;
	include 'layout.php'; ?>
The page is very simple. We require our config, make sure we are logged in, then we perform six count queries, one for each of our tables and then output that. This is what the final page look like:


