Bouwprojecten is misschien wel een van de meer benaderbare en effectieve manieren om te leren programmeren. Echte projecten vereisen dat je verschillende en gevarieerde codeervaardigheden toepast. Ze moedigen je ook aan om onderwerpen te onderzoeken die opduiken terwijl je problemen in het ontwikkelingsproces oplost. In deze tutorial maak je een contactboektoepassing met Python, PyQt en SQLite.
In deze zelfstudie leert u hoe u:
- Maak een grafische gebruikersinterface (GUI) voor uw contactboektoepassing met Python en PyQt
- Verbind de applicatie met een SQLite-database met behulp van PyQt's SQL-ondersteuning
- Contactgegevens beheren met behulp van PyQt's Model-View-architectuur
Aan het einde van dit project heb je een functionele contactenboektoepassing waarmee je je contactgegevens kunt opslaan en beheren.
Klik op de onderstaande link om de volledige broncode voor de toepassing te krijgen, evenals de code voor elke stap die u in deze zelfstudie doorloopt:
Verkrijg de broncode: Klik hier voor de broncode die u in deze zelfstudie gaat gebruiken om een contactenboek met Python, PyQt en SQLite samen te stellen.
Demo:een contactboek met Python
Contactboeken zijn een nuttige en veelgebruikte toepassing. Ze zijn overal. Je hebt waarschijnlijk een contactenboek op je telefoon en op je computer. Met een contactenboek kunt u contactgegevens van uw familieleden, vrienden, collega's, enzovoort opslaan en beheren.
In deze zelfstudie codeert u een GUI-toepassing voor een contactenboek met Python, SQLite en PyQt. Hier is een demo van hoe uw contactenboek eruitziet en werkt nadat u de stappen in deze zelfstudie hebt gevolgd:
Uw contactenboek biedt de minimaal vereiste set functies voor dit soort toepassingen. U kunt de informatie in uw contactenlijst weergeven, maken, bijwerken en verwijderen.
Projectoverzicht
Om uw contactboektoepassing te bouwen, moet u de code in modules en pakketten organiseren en uw project een coherente structuur geven. In deze zelfstudie gebruikt u de volgende mappen- en bestandsstructuur:
rpcontacts_project/
│
├── rpcontacts/
│   ├── __init__.py
│   ├── views.py
│   ├── database.py
│   ├── main.py
│   └── model.py
│
├── requirements.txt
├── README.md
└── rpcontacts.py
Hier is een korte samenvatting van de inhoud van uw projectdirectory:
rpcontacts_project/is de hoofdmap van het project. Het zal de volgende bestanden bevatten:requirements.txtbiedt de lijst met vereisten van het project.README.mdgeeft algemene informatie over het project.rpcontacts.pybiedt het startpuntscript om de toepassing uit te voeren.
rpcontacts/is een submap die het hoofdpakket van de toepassing bevat. Het biedt de volgende modules:__init__.pyviews.pydatabase.pymain.pymodel.py
In deze zelfstudie behandelt u elk van deze bestanden stap voor stap. De naam van elk bestand geeft een idee van zijn rol in de toepassing. Bijvoorbeeld views.py bevat de code om de GUI van vensters en dialoogvensters te genereren, database.py zal code bevatten om met de database te werken, en main.py zal de applicatie zelf hosten. Tot slot, model.py zal het model implementeren om de gegevens in de database van de applicatie te beheren.
Over het algemeen heeft de applicatie een hoofdvenster om contacten weer te geven, toe te voegen, te verwijderen en bij te werken. Het heeft ook een dialoogvenster om nieuwe contacten aan de database toe te voegen.
Vereisten
Om het meeste uit dit project te halen, zou enige voorkennis van GUI-programmering met Python en PyQt helpen. In dit opzicht moet u de basis kennen van hoe u:
- GUI-applicaties maken met PyQt en Python
- GUI's bouwen en indelen met PyQt
- SQL-databases beheren met Python en PyQt
- Werken met SQLite-databases
Om deze onderwerpen op te frissen, kun je de volgende bronnen raadplegen:
- Python en PyQt:een GUI-desktopcalculator bouwen
- Python en PyQt:menu's, werkbalken en statusbalken maken
- PyQt-lay-outs:maak professioneel ogende GUI-toepassingen
- Omgaan met SQL-databases met PyQt:de basis
- Inleiding tot Python SQL-bibliotheken
- Gegevensbeheer met Python, SQLite en SQLAlchemy
Maak je geen zorgen als je geen expert bent op deze gebieden voordat je aan deze tutorial begint. Je leert door het proces om je handen vuil te maken aan een echt project. Als je vastloopt, neem dan de tijd en bekijk de bronnen die hierboven zijn gelinkt. Ga dan terug naar de code.
De contactboektoepassing die u in deze zelfstudie gaat bouwen, heeft één externe afhankelijkheid:PyQt.
Opmerking: In deze zelfstudie gebruikt u PyQt-versie 5.15.2 om uw contactboektoepassing te bouwen. Versie 5.15.2 is vereist om het project op macOS Big Sur te laten werken.
PyQt versie 6.0 is uitgebracht op 4 januari 2021. Dit is de eerste release van de bibliotheek die bindt aan Qt versie 6. Het project in deze tutorial is echter niet getest met PyQt 6.0.
Als u de behoefte voelt om het project met deze nieuwe versie van PyQt uit te voeren, probeer het dan eens. Als hint moet je pip install PyQt6 en werk vervolgens de import bij om PyQt6 te gebruiken in plaats van PyQt5 .
Om de best practices in uw ontwikkelingsproces te volgen, kunt u beginnen met het maken van een virtuele omgeving en vervolgens PyQt installeren met behulp van pip . Zodra je PyQt hebt geïnstalleerd, ben je klaar om te beginnen met coderen!
Stap 1:De Skeleton-app van het Contact Book maken met PyQt
In deze eerste stap maakt u een minimale maar functionele PyQt GUI-toepassing om de basis te leggen waarop u het contactenboek gaat bouwen. Je maakt ook de minimaal vereiste projectstructuur, inclusief het hoofdpakket van het project en een startpuntscript om de applicatie uit te voeren.
Alle code en bestanden die u in deze sectie aan het contactboekproject toevoegt, worden verzameld onder de source_code_step_1/ map. U kunt ze downloaden door op de onderstaande link te klikken:
Verkrijg de broncode: Klik hier voor de broncode die u in deze zelfstudie gaat gebruiken om een contactenboek met Python, PyQt en SQLite samen te stellen.
Aan het einde van dit gedeelte kunt u voor het eerst de skelet-GUI-toepassing voor uw contactenboek gebruiken.
Het contactboekproject structureren
Om de applicatie te coderen, ga je gang en maak je een nieuwe map aan met de naam rpcontacts_project/ . Dit wordt de hoofdmap van het project. Maak nu een nieuwe submap aan met de naam rpcontacts/ binnen rpcontacts_project/ . Deze submap bevat het hoofdpakket van de toepassing. Start ten slotte uw code-editor of IDE in de hoofdmap.
Om van een map een pakket te maken, heeft Python een __init__.py . nodig module om het pakket te initialiseren. Maak dit bestand in rpcontacts/ en voeg er de volgende code aan toe:
# -*- coding: utf-8 -*-

"""This module provides the rpcontacts package."""

__version__ = "0.1.0"
Dit bestand vertelt Python dat rpcontacts is een pakket. De code in het bestand wordt uitgevoerd wanneer u het pakket of enkele van zijn modules importeert.
U hoeft geen code in een __init__.py . te plaatsen bestand om het pakket te initialiseren. Een lege __init__.py bestand zal het werk doen. In dit geval definieert u echter een constante op moduleniveau met de naam __version__ om het versienummer van uw toepassing vast te houden.
Het hoofdvenster van de toepassing maken
Nu is het tijd om het hoofdvenster van uw contactenboek te maken. Maak hiervoor een module met de naam views.py in je rpcontacts pakket. Voeg vervolgens de volgende code toe aan de module en sla deze op:
# -*- coding: utf-8 -*-

"""This module provides views to manage the contacts table."""

from PyQt5.QtWidgets import (
    QHBoxLayout,
    QMainWindow,
    QWidget,
)

class Window(QMainWindow):
    """Main Window."""
    def __init__(self, parent=None):
        """Initializer."""
        super().__init__(parent)
        self.setWindowTitle("RP Contacts")
        self.resize(550, 250)
        self.centralWidget = QWidget()
        self.setCentralWidget(self.centralWidget)
        self.layout = QHBoxLayout()
        self.centralWidget.setLayout(self.layout)
Eerst importeert u de vereiste klassen uit PyQt5.QtWidgets . Vervolgens maak je Window . Deze klasse erft van QMainWindow en levert de code om het hoofdvenster van de toepassing te genereren. In de initialisatiemethode stelt u de titel van het venster in op "RP Contacts" , verklein het venster naar 550 door 250 pixels, definieer en stel de centrale widget in met behulp van QWidget , en definieer ten slotte een lay-out voor de centrale widget met behulp van een horizontale boxlay-out.
De applicatie coderen en uitvoeren
Aangezien je al een hoofdvenster voor het contactenboek hebt, is het tijd om de code te schrijven voor het maken van een functionele PyQt-applicatie met behulp van QApplication . Om dat te doen, maakt u een nieuwe module met de naam main.py in je rpcontacts pakket en voeg er de volgende code aan toe:
# -*- coding: utf-8 -*-
# rpcontacts/main.py

"""This module provides RP Contacts application."""

import sys

from PyQt5.QtWidgets import QApplication

from .views import Window

def main():
    """RP Contacts main function."""
    # Create the application
    app = QApplication(sys.argv)
    # Create the main window
    win = Window()
    win.show()
    # Run the event loop
    sys.exit(app.exec())
In deze module importeert u sys om toegang te krijgen tot exit() , waarmee u de toepassing netjes kunt afsluiten wanneer de gebruiker het hoofdvenster sluit. Vervolgens importeert u QApplication van PyQt5.QtWidgets en Window van views . De laatste stap is het definiëren van main() als de hoofdfunctie van uw applicatie.
Binnen main() , start u QApplication en Window . Dan bel je .show() op Window , en tot slot voer je de hoofdlus van de applicatie uit , of gebeurtenislus , met behulp van .exec() .
Ga nu omhoog naar de hoofdmap van het project rpcontacts_project/ en maak een bestand aan met de naam rpcontacts.py . Dit bestand biedt het toegangspuntscript om de toepassing uit te voeren. Voeg de volgende code toe aan het bestand en sla het op:
#!/usr/bin/env python3
# -*- coding: utf-8 -*-
# rpcontacts_project/rpcontacts.py

"""This module provides RP Contacts entry point script."""

from rpcontacts.main import main

if __name__ == "__main__":
    main()
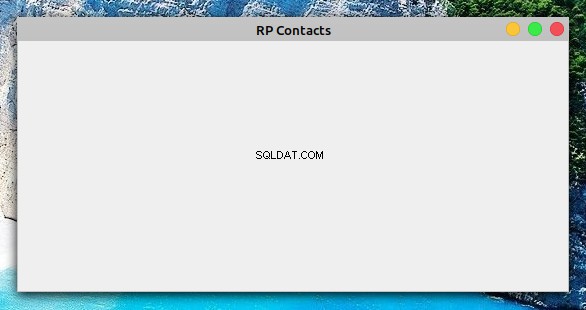
Dit bestand importeert main() van uw main.py module. Vervolgens implementeert u de traditionele voorwaardelijke instructie die main() . aanroept als de gebruiker deze module uitvoert als een Python-script. Start nu de applicatie door het commando python rpcontacts.py . uit te voeren in uw Python-omgeving. U krijgt het volgende venster op uw scherm:
Dat is het! U hebt een minimale maar functionele PyQt GUI-toepassing gemaakt die u kunt gebruiken als startpunt voor het samenstellen van uw contactenboek. Op dit punt zou uw project de volgende structuur moeten hebben:
./rpcontacts_project/
│
├── rpcontacts/
│   ├── __init__.py
│   ├── views.py
│   └── main.py
│
└── rpcontacts.py
In deze sectie hebt u de minimaal vereiste structuur voor uw contactboekproject gemaakt met behulp van Python-modules en -pakketten. U hebt het hoofdvenster van de toepassing gebouwd en de standaardcode samengesteld om een PyQt GUI-toepassing te maken. U hebt de toepassing ook voor de eerste keer uitgevoerd. Vervolgens ga je functies aan je GUI toevoegen.
Stap 2:De GUI van het Contactboek bouwen met Python
Nu u het skelet van uw contactboektoepassing hebt gebouwd, kunt u beginnen met het coderen van de GUI van het hoofdvenster. Aan het einde van dit gedeelte hebt u de vereiste stappen voltooid om de GUI van uw contactenboek te maken met Python en PyQt. De GUI ziet er als volgt uit:
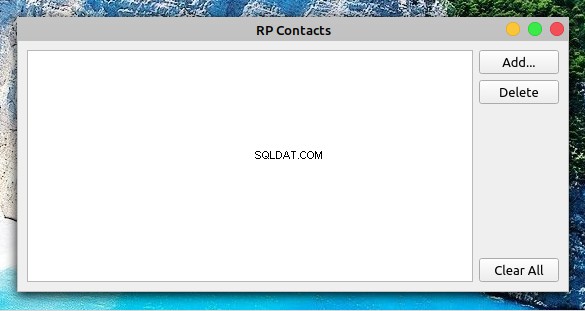
In het midden van het venster heb je een tabelweergave om je contactenlijst weer te geven. Aan de rechterkant van het formulier heb je drie knoppen:
- Toevoegen om een nieuw contact aan de lijst toe te voegen
- Verwijderen om een geselecteerd contact uit de lijst te verwijderen
- Alles wissen om alle contacten uit de lijst te verwijderen
Alle code en bestanden die u in deze sectie toevoegt of wijzigt, worden verzameld onder de source_code_step_2/ map. U kunt ze downloaden door op de onderstaande link te klikken:
Verkrijg de broncode: Klik hier voor de broncode die u in deze zelfstudie gaat gebruiken om een contactenboek met Python, PyQt en SQLite samen te stellen.
Ga terug naar de views.py module en update de code van Window om de bovenstaande GUI te genereren:
 1# -*- coding: utf-8 -*-
 2# rpcontacts/views.py
 3
 4"""This module provides views to manage the contacts table."""
 5
 6from PyQt5.QtWidgets import (
 7    QAbstractItemView,
 8    QHBoxLayout,
 9    QMainWindow,
10    QPushButton,
11    QTableView,
12    QVBoxLayout,
13    QWidget,
14)
15
16class Window(QMainWindow):
17    """Main Window."""
18    def __init__(self, parent=None):
19        """Initializer."""
20        # Snip...
21
22        self.setupUI()
23
24    def setupUI(self):
25        """Setup the main window's GUI."""
26        # Create the table view widget
27        self.table = QTableView()
28        self.table.setSelectionBehavior(QAbstractItemView.SelectRows)
29        self.table.resizeColumnsToContents()
30        # Create buttons
31        self.addButton = QPushButton("Add...")
32        self.deleteButton = QPushButton("Delete")
33        self.clearAllButton = QPushButton("Clear All")
34        # Lay out the GUI
35        layout = QVBoxLayout()
36        layout.addWidget(self.addButton)
37        layout.addWidget(self.deleteButton)
38        layout.addStretch()
39        layout.addWidget(self.clearAllButton)
40        self.layout.addWidget(self.table)
41        self.layout.addLayout(layout)
Je importeert eerst wat extra PyQt-klassen om in de GUI te gebruiken. Hier zijn enkele van de meer relevante:
QPushButtonom de Toevoegen . te maken , Verwijderen , en Alles wissen knoppenQTableViewom de tabelachtige weergave te bieden waarin de lijst met contacten wordt weergegevenQAbstractItemViewom toegang te bieden tot het beleid voor selectiegedrag voor tabelweergave
In deze code, de eerste toevoeging aan Window is een aanroep van .setupUI() aan het einde van __init__() . Deze aanroep genereert de GUI van het hoofdvenster wanneer u de toepassing uitvoert.
Dit is wat de code in .setupUI() doet:
- Lijn 27 maakt een
QTableViewinstantie om de contactenlijst weer te geven. - Lijn 28 stelt het
.selectionBehaviorin eigenschap naarQAbstractItemView.SelectRows. Dit zorgt ervoor dat wanneer een gebruiker op een cel van de tabelweergave klikt, de volledige rij wordt geselecteerd. De rijen in de tabelweergave bevatten alle informatie met betrekking tot een enkel contact in de lijst met contacten. - Lijnen 31 tot 33 voeg de drie knoppen toe aan de GUI:Toevoegen , Verwijderen , en Alles wissen . Deze knoppen voeren nog geen acties uit.
- Lijnen 35 tot 41 creëer en stel een coherente lay-out in voor alle widgets in de GUI.
Met deze toevoegingen aan Window , kunt u de toepassing opnieuw uitvoeren. Het venster op uw scherm ziet eruit als het venster dat u aan het begin van de sectie zag.
Opmerking: De regelnummers in de bovenstaande code en in de rest van de codevoorbeelden in deze tutorial zijn bedoeld om de uitleg te vergemakkelijken. Ze komen niet overeen met de volgorde van de regels in de laatste module of het script.
In dit gedeelte hebt u alle vereiste stappen uitgevoerd om de GUI van het hoofdvenster van uw contactenboek te maken. U bent nu klaar om te gaan werken aan hoe uw applicatie uw contactgegevens zal beheren en opslaan.
Stap 3:De database van het contactenboek instellen
Op dit punt hebt u een PyQt-toepassing en de GUI van het hoofdvenster gemaakt om uw contactboekproject te bouwen. In dit gedeelte schrijft u code om te definiëren hoe de toepassing verbinding maakt met de contactendatabase. Om deze stap te voltooien, gebruikt u SQLite om de database af te handelen en de SQL-ondersteuning van PyQt om de applicatie met de database te verbinden en om met uw contactgegevens te werken.
De broncode en bestanden die u in deze sectie toevoegt of wijzigt, worden opgeslagen onder de source_code_step_3/ map. U kunt ze downloaden door op de onderstaande link te klikken:
Verkrijg de broncode: Klik hier voor de broncode die u in deze zelfstudie gaat gebruiken om een contactenboek met Python, PyQt en SQLite samen te stellen.
Ga eerst terug naar main.py in de rpcontacts/ directory en werk de code bij om de verbinding met de database tot stand te brengen:
# -*- coding: utf-8 -*-
# rpcontacts/main.py

"""This module provides RP Contacts application."""

import sys

from PyQt5.QtWidgets import QApplication

from .database import createConnection
from .views import Window

def main():
    """RP Contacts main function."""
    # Create the application
    app = QApplication(sys.argv)
    # Connect to the database before creating any window
    if not createConnection("contacts.sqlite"):
        sys.exit(1)
    # Create the main window if the connection succeeded
    win = Window()
    win.show()
    # Run the event loop
    sys.exit(app.exec_())
In dit geval importeert u eerst createConnection() van database.py . Deze functie bevat code om een verbinding met de contactendatabase te maken en te openen. U maakt database.py en schrijf createConnection() in het volgende gedeelte.
Binnen main() , is de eerste gemarkeerde regel een poging om een verbinding met de database tot stand te brengen met behulp van createConnection() . Als de applicatie om de een of andere reden geen verbinding kan maken, dan is de oproep naar sys.exit(1) zal de applicatie sluiten zonder een grafisch element aan te maken en zal aangeven dat er een fout is opgetreden.
U moet de verbinding op deze manier afhandelen omdat de toepassing afhankelijk is van de database om correct te werken. Als je geen functionele verbinding hebt, werkt je applicatie helemaal niet.
Met deze oefening kunt u fouten afhandelen en de toepassing netjes sluiten als er een probleem optreedt. U kunt de gebruiker ook relevante informatie geven over de fout die de toepassing tegenkwam bij het proberen verbinding te maken met de database.
Met deze toevoegingen is het tijd om in de code van createConnection() te duiken .
Verbinding maken met de database met PyQt en SQLite
Het verbinden van uw contactboektoepassing met de bijbehorende database is een fundamentele stap bij het ontwikkelen van de toepassing. Om dit te doen, codeert u een functie genaamd createConnection() , waarmee een verbinding met de database wordt gemaakt en geopend. Als de verbinding succesvol is, retourneert de functie True . Anders geeft het informatie over de oorzaak van de verbindingsfout.
Ga terug naar de rpcontacts/ directory en maak een nieuwe module aan met de naam database.py erin. Voeg vervolgens de volgende code toe aan die module:
 1# -*- coding: utf-8 -*-
 2# rpcontacts/database.py
 3
 4"""This module provides a database connection."""
 5
 6from PyQt5.QtWidgets import QMessageBox
 7from PyQt5.QtSql import QSqlDatabase
 8
 9def createConnection(databaseName):
10    """Create and open a database connection."""
11    connection = QSqlDatabase.addDatabase("QSQLITE")
12    connection.setDatabaseName(databaseName)
13
14    if not connection.open():
15        QMessageBox.warning(
16            None,
17            "RP Contact",
18            f"Database Error: {connection.lastError().text()}",
19        )
20        return False
21
22    return True
Hier importeert u eerst enkele vereiste PyQt-klassen. Vervolgens definieert u createConnection() . Deze functie heeft één argument nodig:databaseName bevat de naam of het pad naar het fysieke SQLite-databasebestand in uw bestandssysteem.
Dit is wat de code in createConnection() doet:
- Lijn 11 maakt de databaseverbinding met behulp van de
QSQLITEchauffeur. - Lijn 12 stelt de bestandsnaam of het pad naar de database in.
- Lijn 14 probeert de verbinding te openen. Als er een probleem optreedt tijdens het aanroepen van
.open(), dan deifcodeblok toont een foutmelding en retourneert vervolgensFalseom aan te geven dat de verbindingspoging is mislukt. - Lijn 22 retourneert
Trueals de verbindingspoging succesvol is.
Je hebt createConnection() al gecodeerd . Nu kunt u de code schrijven om de contacts te maken tabellen in de database.
De contacts maken Tabel
Met de functie die de verbinding met de database maakt en opent, kunt u doorgaan met het coderen van een helperfunctie om de contacts te maken tafel. Je gebruikt deze tabel om de informatie over je contacten op te slaan.
Dit is de code die _createContactsTable() implementeert :
# -*- coding: utf-8 -*-
# rpcontacts/database.py

# Snip...
from PyQt5.QtSql import QSqlDatabase, QSqlQuery

def _createContactsTable():
    """Create the contacts table in the database."""
    createTableQuery = QSqlQuery()
    return createTableQuery.exec(
        """
        CREATE TABLE IF NOT EXISTS contacts (
            id INTEGER PRIMARY KEY AUTOINCREMENT UNIQUE NOT NULL,
            name VARCHAR(40) NOT NULL,
            job VARCHAR(50),
            email VARCHAR(40) NOT NULL
        )
        """
    )

def createConnection(databaseName):
    # Snip...
    _createContactsTable()
    return True
Hier voegt u eerst een nieuwe import toe. U importeert QSqlQuery om SQL-instructies uit te voeren en te manipuleren.
Binnen _createContactsTable() , maakt u een QSqlQuery voorbeeld. Vervolgens roept u .exec() . aan op het query-object met een op tekenreeksen gebaseerde SQL CREATE TABLE stelling als argument. Deze instructie maakt een nieuwe tabel aan met de naam contacts in uw databank. De tabel heeft de volgende kolommen:
| Kolom | Inhoud |
|---|---|
id | Een geheel getal met de primaire sleutel van de tabel |
name | Een tekenreeks met de naam van een contact |
job | Een string met de functietitel van een contactpersoon |
email | Een string met het e-mailadres van een contactpersoon |
De contacts tabel in uw database zal relevante informatie over uw contacten opslaan.
De laatste stap om het coderen van database.py te voltooien is om een aanroep toe te voegen aan _createContactsTable() van binnenuit createConnection() , vlak voor de laatste return uitspraak. Dit zorgt ervoor dat de applicatie de contacts . aanmaakt tabel voordat u bewerkingen op de database uitvoert.
Nadat u de contacts heeft gemaakt tabel, kunt u enkele tests uitvoeren op de database en ook enkele voorbeeldgegevens toevoegen voor verdere tests.
De database van het contactboek testen
Tot nu toe bent u klaar met het schrijven van de vereiste code om de verbinding met de database van het contactenboek af te handelen. In deze sectie voert u enkele tests uit om ervoor te zorgen dat deze code en de database zelf correct werken. U zult later in deze zelfstudie ook enkele voorbeeldgegevens aan de database toevoegen om verdere tests uit te voeren.
Open nu een terminal of opdrachtregel en ga naar de hoofdmap van het project, rpcontacts_project/ . Eenmaal daar start u een interactieve Python-sessie en typt u de volgende code:
>>> from rpcontacts.database import createConnection

>>> # Create a connection
>>> createConnection("contacts.sqlite")
True

>>> # Confirm that contacts table exists
>>> from PyQt5.QtSql import QSqlDatabase
>>> db = QSqlDatabase.database()
>>> db.tables()
['contacts', 'sqlite_sequence']
Hier importeert u eerst createConnection() uit de database.py module. Vervolgens roep je deze functie aan om een verbinding met de contactendatabase te maken en te openen. De bestandsnaam van de database is contacts.sqlite . Aangezien dit bestand niet bestaat in de hoofdmap van het project, maakt SQLite het voor u. U kunt dit controleren door in uw huidige directory te kijken.
Vervolgens bevestigt u dat de database een tabel bevat met de naam contacts . Om dat te doen, roept u .database() . aan op QSqlDatabase . Deze klassenmethode retourneert een verwijzing naar de huidige databaseverbinding. Met deze verwijzing naar de verbinding kunt u .tables() . aanroepen om de lijst met tabellen in de database te krijgen. Merk op dat de eerste tabel in de lijst contacts is , dus nu weet je zeker dat alles goed werkt.
Nu kunt u een SQL-query voorbereiden om voorbeeldgegevens in te voegen in de contacts tafel:
>>> # Prepare a query to insert sample data
>>> from PyQt5.QtSql import QSqlQuery

>>> insertDataQuery = QSqlQuery()
>>> insertDataQuery.prepare(
...     """
...     INSERT INTO contacts (
...         name,
...         job,
...         email
...     )
...     VALUES (?, ?, ?)
...     """
... )
True
Met de bovenstaande zoekopdracht kunt u specifieke waarden invoegen in de name , job , en email attributen en om die waarden in de database op te slaan. Hieronder ziet u een voorbeeld van hoe u dit kunt doen:
>>> # Sample data
>>> data = [
...     ("Linda", "Technical Lead", "linda@example.com"),
...     ("Joe", "Senior Web Developer", "joe@example.com"),
...     ("Lara", "Project Manager", "lara@example.com"),
...     ("David", "Data Analyst", "david@example.com"),
...     ("Jane", "Senior Python Developer", "jane@example.com"),
... ]

>>> # Insert sample data
>>> for name, job, email in data:
...     insertDataQuery.addBindValue(name)
...     insertDataQuery.addBindValue(job)
...     insertDataQuery.addBindValue(email)
...     insertDataQuery.exec()
...
True
True
True
True
True
In dit stukje code definieert u eerst data om de contactgegevens van een lijst met mensen vast te houden. Vervolgens gebruik je een for loop om de gegevens in te voegen door .addBindValue() . aan te roepen . Vervolgens roept u .exec() . aan op het query-object om de SQL-query op de database effectief uit te voeren.
Aangezien alle aanroepen naar .exec() retourneer True , kunt u concluderen dat de gegevens met succes in de database zijn ingevoegd. Als je dit wilt bevestigen, voer dan de volgende code uit:
>>> query = QSqlQuery()
>>> query.exec("SELECT name, job, email FROM contacts")
True

>>> while query.next():
...     print(query.value(0), query.value(1), query.value(2))
...
Linda Technical Lead linda@example.com
Joe Senior Web Developer joe@example.com
Lara Project Manager lara@example.com
David Data Analyst david@example.com
Jane Senior Python Developer jane@example.com
Dat is het! Je database werkt prima! Nu heb je wat voorbeeldgegevens om de applicatie mee te testen, en je kunt je concentreren op het laden en weergeven van de contactgegevens in het hoofdvenster van je contactenboek.
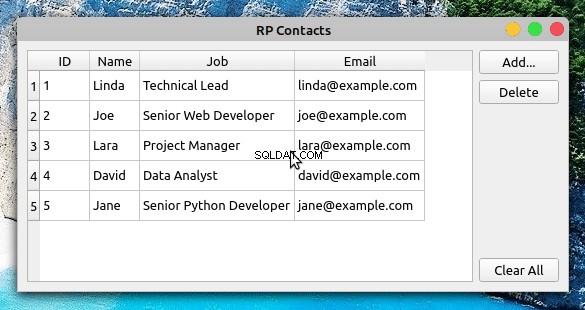
Stap 4:Bestaande contacten weergeven en bijwerken
Om uw contactgegevens in het hoofdvenster van de toepassing weer te geven, kunt u QTableView . gebruiken . Deze klasse maakt deel uit van de Model-View-architectuur van PyQt en biedt een robuuste en efficiënte manier om items van een PyQt-modelobject weer te geven.
De bestanden en de code die u in deze sectie toevoegt of wijzigt, worden opgeslagen onder de source_code_step_4/ map. Klik op de onderstaande link om ze te downloaden:
Verkrijg de broncode: Klik hier voor de broncode die u in deze zelfstudie gaat gebruiken om een contactenboek met Python, PyQt en SQLite samen te stellen.
Zodra u deze stap heeft voltooid, ziet uw contactenboek er als volgt uit:
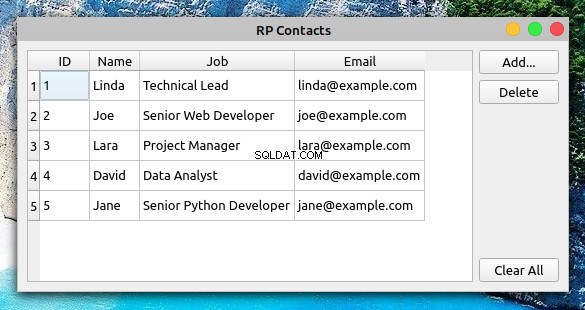
Het tabelweergave-object in het hoofdvenster biedt de vereiste functionaliteit waarmee u de contactgegevens snel kunt wijzigen en bijwerken.
Als u bijvoorbeeld de naam van een contactpersoon wilt bijwerken, dubbelklikt u op de cel met de naam, werkt u de naam bij en drukt u vervolgens op Enter om de wijzigingen automatisch in de database op te slaan. Maar voordat u dit kunt doen, moet u een model maken en dit verbinden met de tabelweergave.
Een model maken om de contactgegevens te verwerken
PyQt biedt een uitgebreide reeks klassen voor het werken met SQL-databases. Voor uw contactboektoepassing gebruikt u QSqlTableModel , dat een bewerkbaar gegevensmodel biedt voor een enkele databasetabel. Het is perfect voor de taak, aangezien uw database een enkele tabel heeft, contacts .
Ga terug naar je code-editor en maak een nieuwe module met de naam model.py binnen de rpcontacts/ map. Voeg de volgende code toe aan het bestand en sla het op:
 1# -*- coding: utf-8 -*-
 2# rpcontacts/model.py
 3
 4"""This module provides a model to manage the contacts table."""
 5
 6from PyQt5.QtCore import Qt
 7from PyQt5.QtSql import QSqlTableModel
 8
 9class ContactsModel:
10    def __init__(self):
11        self.model = self._createModel()
12
13    @staticmethod
14    def _createModel():
15        """Create and set up the model."""
16        tableModel = QSqlTableModel()
17        tableModel.setTable("contacts")
18        tableModel.setEditStrategy(QSqlTableModel.OnFieldChange)
19        tableModel.select()
20        headers = ("ID", "Name", "Job", "Email")
21        for columnIndex, header in enumerate(headers):
22            tableModel.setHeaderData(columnIndex, Qt.Horizontal, header)
23        return tableModel
In deze code voert u eerst enkele vereiste imports uit, daarna maakt u ContactsModel . In the class initializer, you define an instance attribute called .model to hold the data model.
Next, you add a static method to create and set up the model object. Here’s what the code in ._createModel() does:
- Line 16 creates an instance of
QSqlTableModel()calledtableModel. - Line 17 associates the model object with the
contactstable in your database. - Line 18 sets the
.editStrategyproperty of the model toQSqlTableModel.OnFieldChange. With this, you ensure that the changes on the model get saved into the database immediately. - Line 19 loads the table into the model by calling
.select(). - Lines 20 to 22 define and set user-friendly headers for the
contactstable’s columns. - Line 23 returns the newly created model.
At this point, you have your data model ready to use. Now you need to connect the table view widget to the model so you can present your users with the contact information.
Connecting the Model to the View
To display contact data in your contact book’s main window, you need to connect the table view with the data model. To perform this connection, you need to call .setModel() on the table view object and pass the model as an argument:
# -*- coding: utf-8 -*-
# rpcontacts/views.py

# Snip...
from .model import ContactsModel

class Window(QMainWindow):
    """Main Window."""
    def __init__(self, parent=None):
        # Snip...
        self.contactsModel = ContactsModel()
        self.setupUI()

    def setupUI(self):
        """Setup the main window's GUI."""
        # Create the table view widget
        self.table = QTableView()
        self.table.setModel(self.contactsModel.model)
        self.table.setSelectionBehavior(QAbstractItemView.SelectRows)
        # Snip...
In this code, you first import ContactsModel from model.py . This class provides the model that manages the data in your contact database.
In the initializer of Window , you create an instance of ContactsModel . Then inside .setupUI() , you call .setModel() on .table to connect the model with the table view. If you run the application after this update, then you’ll get the window you saw at the beginning of step 4.
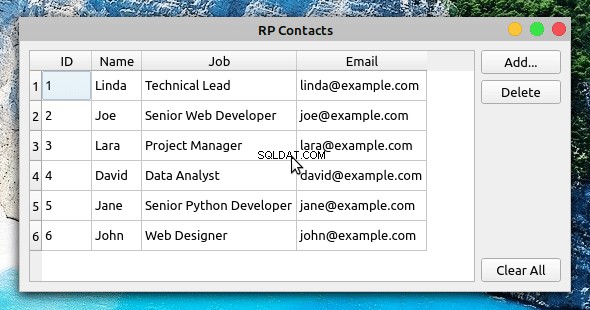
Displaying and Updating Contacts
PyQt’s Model-View architecture provides a robust and user-friendly way to create GUI applications that manage databases. Models communicate with and access the data in the database. Any change in a model updates the database immediately. Views are responsible for displaying the data to the user and also for providing editable widgets to allow the user to modify the data directly in the view.
If the user modifies the data through the view, then the view internally communicates with and updates the model, which saves the changes to the physical database:
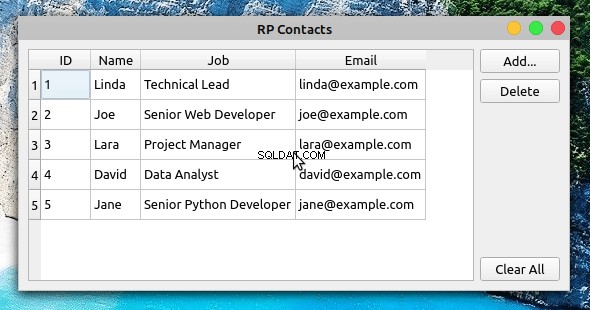
In this example, you double-click Joe’s Job veld. This gives you access to an editable widget that allows you to modify the value in the cell. Then you update the job description from Senior Web Developer to Web Developer . When you hit Enter , the table view communicates the change to the model, and the model saves the change to the database immediately.
To confirm that the changes were successfully saved into the database, you can close the application and run it again. The table view should reflect your updates.
Step 5:Creating New Contacts
At this step, your contact book application provides functionality to load, display, and update the information about your contacts. Even though you’re able to modify and update the contact information, you can neither add nor remove contacts from the list.
All the files and the code you’ll add or modify in this section are collected in the source_code_step_5/ directory. To download them, click the link below:
Get the Source Code: Click here to get the source code you’ll use to build a contact book with Python, PyQt, and SQLite in this tutorial.
In this section, you’ll provide the required functionality to add new contacts to the database, using a pop-up dialog to enter the new information. The first step is to create the Add Contact dialog.
Creating the Add Contact Dialog
Dialogs are small windows that you can use to communicate with your users. In this section, you’ll code the contact book’s Add Contact dialog to allow your users add new contacts to their current list of contacts.
To code the Add Contact dialog, you’ll subclass QDialog . This class provides a blueprint to build dialogs for your GUI applications.
Now open the views.py module and update the import section like this:
# -*- coding: utf-8 -*-
# rpcontacts/views.py

# Snip...
from PyQt5.QtCore import Qt
from PyQt5.QtWidgets import (
    QAbstractItemView,
    QDialog,
    QDialogButtonBox,
    QFormLayout,
    QHBoxLayout,
    QLineEdit,
    QMainWindow,
    QMessageBox,
    QPushButton,
    QTableView,
    QVBoxLayout,
    QWidget,
)
The highlighted lines in the above code import the required classes to build the Add Contact dialog. With these classes in your namespace, add the following class at the end of views.py :
 1# -*- coding: utf-8 -*-
 2# rpcontacts/views.py
 3
 4# Snip...
 5class AddDialog(QDialog):
 6    """Add Contact dialog."""
 7    def __init__(self, parent=None):
 8        """Initializer."""
 9        super().__init__(parent=parent)
10        self.setWindowTitle("Add Contact")
11        self.layout = QVBoxLayout()
12        self.setLayout(self.layout)
13        self.data = None
14
15        self.setupUI()
16
17    def setupUI(self):
18        """Setup the Add Contact dialog's GUI."""
19        # Create line edits for data fields
20        self.nameField = QLineEdit()
21        self.nameField.setObjectName("Name")
22        self.jobField = QLineEdit()
23        self.jobField.setObjectName("Job")
24        self.emailField = QLineEdit()
25        self.emailField.setObjectName("Email")
26        # Lay out the data fields
27        layout = QFormLayout()
28        layout.addRow("Name:", self.nameField)
29        layout.addRow("Job:", self.jobField)
30        layout.addRow("Email:", self.emailField)
31        self.layout.addLayout(layout)
32        # Add standard buttons to the dialog and connect them
33        self.buttonsBox = QDialogButtonBox(self)
34        self.buttonsBox.setOrientation(Qt.Horizontal)
35        self.buttonsBox.setStandardButtons(
36            QDialogButtonBox.Ok | QDialogButtonBox.Cancel
37        )
38        self.buttonsBox.accepted.connect(self.accept)
39        self.buttonsBox.rejected.connect(self.reject)
40        self.layout.addWidget(self.buttonsBox)
There are a lot of things happening in this code. Here’s a summary:
- Line 5 defines a new class that inherits from
QDialog. - Lines 7 to 15 define the class initializer. In this case, the most relevant addition is
.data, which is an instance attribute that you’ll use to hold the data your users provide.
In .setupUI() , you define the dialog’s GUI:
- Lines 20 to 25 add three
QLineEditobjects:name,job, andemail. You’ll use these line edits to take the user’s input for the name, job description, and email of the contact to add. They represent the corresponding fields in the database. - Lines 27 to 30 create a
QFormLayoutinstance that arranges the line edits in a form. This layout manager also provides user-friendly labels for each line edit or field. - Lines 33 to 37 add a
QDialogButtonBoxobject that provides two standard buttons:OK and Cancel . The OK button accepts the user’s input and the Cancel button rejects it. - Lines 38 and 39 connect the dialog’s built-in
.accepted()and.rejected()signals with the.accept()andreject()slots, respectively. In this case, you’ll rely on the dialog’s built-in.reject()slot, which closes the dialog without processing the input. Other than that, you just need to code the.accept()slot.
To code the dialog’s .accept() slot, you need to consider that any user input needs validation to make sure that it’s correct and safe. This is especially true when you’re working with SQL databases because of the risk of an SQL injection attack.
In this example, you’ll add a minimal validation rule just to make sure that the user provides data for each input field in the dialog. However, adding your own, more robust validation rules would be a good exercise.
Without further ado, get back to AddDialog and add the following code for its .accept() slot:
 1# -*- coding: utf-8 -*-
 2# rpcontacts/views.py
 3
 4# Snip...
 5class AddDialog(QDialog):
 6    def __init__(self, parent=None):
 7        # Snip...
 8
 9    def setupUI(self):
10        # Snip...
11
12    def accept(self):
13        """Accept the data provided through the dialog."""
14        self.data = []
15        for field in (self.nameField, self.jobField, self.emailField):
16            if not field.text():
17                QMessageBox.critical(
18                    self,
19                    "Error!",
20                    f"You must provide a contact's {field.objectName()}",
21                )
22                self.data = None  # Reset .data
23                return
24
25            self.data.append(field.text())
26
27        if not self.data:
28            return
29
30        super().accept()
The code within .accept() does the following:
- Line 14 initializes
.datato an empty list ([]). This list will store the user’s input data. - Line 15 defines a
forloop that iterates over the three line edits, or fields, in the dialog. - Lines 16 to 23 define a conditional statement that checks if the user has provided data for each field in the dialog. If not, then the dialog shows an error message that warns the user about the missing data.
- Line 25 adds the user’s input for each field to
.data. - Line 30 calls the superclass’s
.accept()slot to provide the standard behavior that closes the dialog after the user clicks OK .
With this code, you’re ready to add a new slot to the contact book’s main window. This slot will launch the dialog, and if the user provides valid input, then the slot will use the model to save the newly added contact to the database.
Launching the Add Contact Dialog
Now that you’ve coded the Add Contact dialog, it’s time to add a new slot to Window so you can launch the dialog by clicking Add and process the user’s input once they click OK .
Go to the definition of Window and add the following code:
 1# -*- coding: utf-8 -*-
 2# rpcontacts/views.py
 3
 4# Snip...
 5class Window(QMainWindow):
 6    # Snip...
 7
 8    def setupUI(self):
 9        # Snip...
10        self.addButton = QPushButton("Add...")
11        self.addButton.clicked.connect(self.openAddDialog)
12        # Snip...
13
14    def openAddDialog(self):
15        """Open the Add Contact dialog."""
16        dialog = AddDialog(self)
17        if dialog.exec() == QDialog.Accepted:
18            self.contactsModel.addContact(dialog.data)
19            self.table.resizeColumnsToContents()
Here’s a summary of what’s happening in the above code:
- Line 11 connects the
.clicked()signal of the Add button to the newly created slot,.openAddDialog(). This way, a click on the button will automatically call the slot. - Line 14 defines the
.openAddDialog()slot. - Line 16 creates an instance of
AddDialog. - Lines 17 to 19 define a conditional statement to check if the dialog was accepted. If so, then line 14 calls
.addContact()on the data model with the dialog’s.dataattribute as an argument. The final statement in theifcode block resizes the table view to fit the size of its updated content.
Now that you have a way to launch the Add Contact dialog and to process its data, you need to provide the code for .addContact() in your data model. That’s a topic for the next section.
Processing the Add Dialog’s Data in the Model
In this section, you’ll add a method called .addContact() to your data model, ContactsModel . Open model.py in your code editor, go to the definition of ContactsModel , and add the following code:
 1# -*- coding: utf-8 -*-
 2# rpcontacts/model.py
 3
 4# Snip...
 5class ContactsModel:
 6    # Snip...
 7
 8    def addContact(self, data):
 9        """Add a contact to the database."""
10        rows = self.model.rowCount()
11        self.model.insertRows(rows, 1)
12        for column, field in enumerate(data):
13            self.model.setData(self.model.index(rows, column + 1), field)
14        self.model.submitAll()
15        self.model.select()
Inside .addContact() , the code does the following:
- Line 10 gets the current number of rows in the data model.
- Line 11 inserts a new row at the end of the data model.
- Lines 12 and 13 run a
forloop that inserts every item indatainto the corresponding cell in the data model. To do this, line 9 calls.setData()on the model, with the index of the cell and the current datafieldas arguments. - Line 14 submits the changes to the database by calling
.submitAll()on the model. - Line 15 reloads the data from the database into the model.
If you run the application with these new additions, then you’ll get the following behavior:
Now when you click Add , the Add Contact dialog appears on your screen. You can use the dialog to provide the required information for a new contact and to add the contact to the database by clicking OK .
Step 6:Deleting Existing Contacts
The final feature you’ll add to the contact book application is the ability to remove contacts from the database using the GUI.
Again, you’ll find all the files and the code added or modified in this section under the source_code_step_6/ directory. You can download them by clicking the link below:
Get the Source Code: Click here to get the source code you’ll use to build a contact book with Python, PyQt, and SQLite in this tutorial.
In this section, you’ll first add the capability to delete a single contact at a time. Then you’ll add code to remove all the contacts from the database.
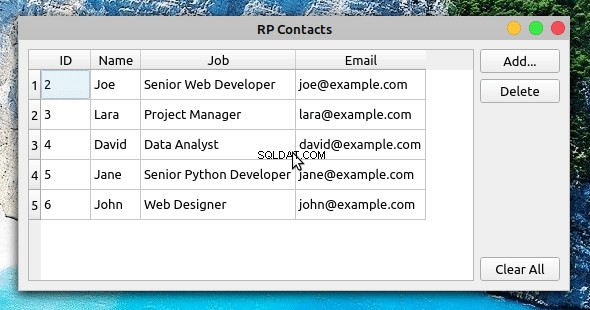
Deleting Selected Contacts
To remove a single contact from the contact database, you need to select the desired contact in the table view on the contact book’s main window. Once you’ve selected the contact, you can click Delete to perform the operation on the database.
Go to the model.py module and add the following code to implement .deleteContact() inside ContactsModel :
# -*- coding: utf-8 -*-
# rpcontacts/model.py

# Snip...
class ContactsModel:
    # Snip...

    def deleteContact(self, row):
        """Remove a contact from the database."""
        self.model.removeRow(row)
        self.model.submitAll()
        self.model.select()
This method has three lines of code. The first line removes the selected row . The second line submits the change to the database. Finally, the third line reloads the data into the model.
Next, get back to the views.py module and add the code behind the Delete button in Window :
# -*- coding: utf-8 -*-
# rpcontacts/views.py

# Snip...
class Window(QMainWindow):
    # Snip...

    def setupUI(self):
        """Setup the main window's GUI."""
        # Snip...
        self.deleteButton = QPushButton("Delete")
        self.deleteButton.clicked.connect(self.deleteContact)
        # Snip...

    def deleteContact(self):
        """Delete the selected contact from the database."""
        row = self.table.currentIndex().row()
        if row < 0:
            return

        messageBox = QMessageBox.warning(
            self,
            "Warning!",
            "Do you want to remove the selected contact?",
            QMessageBox.Ok | QMessageBox.Cancel,
        )

        if messageBox == QMessageBox.Ok:
            self.contactsModel.deleteContact(row)
In the first highlighted line, you connect the .clicked() signal of the Delete button to the .deleteContact() slot. This connection triggers a call to .deleteContact() every time the user clicks the button.
In .deleteContact() , you first get the index of the currently selected row in the table view. The if statement checks if the index is lower than 0 , which would mean that there are no contacts in the table view. If so, then the method returns immediately without performing any further actions.
Then the method shows a warning message confirming that the user wants to delete the selected contact. If the user accepts the operation, then .deleteContact(row) gets called. In this case, row represents the index of the currently selected row in the table.
After these additions, you can run the application again to get the following behavior:
Now when you select a contact from the table view and click Delete , you’re presented with a warning message. If you click the message dialog’s OK button, then the application removes the selected contact from the database, updating the table view accordingly.
Clearing the Contact Database
To remove all the contacts from the database, you’ll start by adding a method called .clearContacts() to ContactsModel . Open your model.py module and add the following method at the end of the class:
 1# -*- coding: utf-8 -*-
 2# rpcontacts/model.py
 3
 4# Snip...
 5class ContactsModel:
 6    # Snip...
 7
 8    def clearContacts(self):
 9        """Remove all contacts in the database."""
10        self.model.setEditStrategy(QSqlTableModel.OnManualSubmit)
11        self.model.removeRows(0, self.model.rowCount())
12        self.model.submitAll()
13        self.model.setEditStrategy(QSqlTableModel.OnFieldChange)
14        self.model.select()
Here’s what each line of code does:
- Line 10 sets the data model’s
.editStrategyproperty toQSqlTableModel.OnManualSubmit. This allows you to cache all the changes until you call.submitAll()later. You need to do this because you’re changing several rows at the same time. - Line 11 removes all the rows from the model.
- Line 12 saves changes to the database.
- Line 13 resets the model’s
.editStrategyproperty to its original value,QSqlTableModel.OnFieldChange. If you don’t reset this property to its original value, then you won’t be able to update the contacts directly in the table view. - Line 14 reloads the data into the model.
Once you’ve coded .clearContacts() , you can get back to the views.py file and update Window with the following code:
# -*- coding: utf-8 -*-
# rpcontacts/views.py

# Snip...
class Window(QMainWindow):
    # Snip...

    def setupUI(self):
        """Setup the main window's GUI."""
        # Snip...
        self.clearAllButton = QPushButton("Clear All")
        self.clearAllButton.clicked.connect(self.clearContacts)
        # Snip...

    def clearContacts(self):
        """Remove all contacts from the database."""
        messageBox = QMessageBox.warning(
            self,
            "Warning!",
            "Do you want to remove all your contacts?",
            QMessageBox.Ok | QMessageBox.Cancel,
        )

        if messageBox == QMessageBox.Ok:
            self.contactsModel.clearContacts()
The first highlighted line in this code connects the .clicked() signal of the Clear All button to the .clearContacts() slot below.
In .clearContacts() , you first create a message dialog, messageBox , to ask the user to confirm the removing operation. If the user confirms the operation by clicking OK , then .clearContacts() gets called on the model to remove all the contacts from the database:
That’s it! With this last piece of code, your contact book application is complete. The application provides features that allow your users to display, add, update, and remove contacts from the database.
Conclusion
Building a contact book GUI application with Python, PyQt, and SQLite is an excellent exercise for you to expand your skills with these tools and as a developer in general. Coding projects like this allows you to apply the knowledge and skills you already have and also pushes you to research and learn about new topics every time you encounter a new programming problem.
In this tutorial, you learned how to:
- Build the GUI for a contact book application using PyQt
- Use PyQt’s SQL support to connect the application to an SQLite database
- Use PyQt’s Model-View architecture to work with the application’s database
You can download the complete source code for the contact book application and also the code to complete each step in this tutorial by clicking the link below:
Get the Source Code: Click here to get the source code you’ll use to build a contact book with Python, PyQt, and SQLite in this tutorial.
Next Steps
At this point, you’ve completed a fully functional contact book project. The application provides minimal functionality, but it’s a good starting point to continue adding features and take your Python and PyQt skills to the next level. Here are some next step ideas that you can implement:
-
Add new data fields: Adding new data fields to store more information about your contacts would be great. For example, you can add the contact’s photo, phone number, web page, Twitter handle, and so on. To do this, you might need to create new tables and set up relations between them. PyQt provides the
QSqlRelationalTableModel, which defines an editable data model for a single table and provides foreign key support. -
Provide search capability: Giving your users a way to search for a contact in the database is arguably a must-have feature in this kind of application. To implement it, you can use PyQt’s
QSqlQueryandQSqlQueryModel. -
Add back-up capability: Providing a way of backing up contact information is another interesting feature. Users might face problems with their computers and lose their data. You can provide options to upload the data to a cloud service or to back it up to an external disk.
These are just a few ideas for how you can continue adding features to your contact book. Take the challenge and build something amazing on top of this!