Alle programma's verwerken gegevens in een of andere vorm, en velen moeten die gegevens van de ene aanroep naar de andere kunnen opslaan en ophalen. Python, SQLite en SQLAlchemy geven uw programma's databasefunctionaliteit, zodat u gegevens in één bestand kunt opslaan zonder dat u een databaseserver nodig heeft.
U kunt vergelijkbare resultaten behalen met platte bestanden in een willekeurig aantal indelingen, waaronder CSV, JSON, XML en zelfs aangepaste indelingen. Platte bestanden zijn vaak door mensen leesbare tekstbestanden, hoewel het ook binaire gegevens kunnen zijn, met een structuur die door een computerprogramma kan worden ontleed. Hieronder onderzoekt u het gebruik van SQL-databases en platte bestanden voor gegevensopslag en -manipulatie en leert u hoe u kunt beslissen welke aanpak geschikt is voor uw programma.
In deze zelfstudie leert u het volgende te gebruiken:
- Platte bestanden voor gegevensopslag
- SQL om de toegang tot permanente gegevens te verbeteren
- SQLite voor gegevensopslag
- SQLAalchemie om met gegevens te werken als Python-objecten
U kunt alle code en gegevens krijgen die u in deze zelfstudie ziet door op de onderstaande link te klikken:
Download de voorbeeldcode: Klik hier voor de code die u in deze zelfstudie gaat gebruiken om meer te weten te komen over gegevensbeheer met SQLite en SQLAlchemy.
Vlakke bestanden gebruiken voor gegevensopslag
Een plat bestand is een bestand dat gegevens bevat zonder interne hiërarchie en meestal zonder verwijzingen naar externe bestanden. Platte bestanden bevatten voor mensen leesbare tekens en zijn erg handig voor het maken en lezen van gegevens. Omdat ze geen vaste veldbreedtes hoeven te gebruiken, gebruiken platte bestanden vaak andere structuren om het voor een programma mogelijk te maken om tekst te ontleden.
Bestanden met door komma's gescheiden waarden (CSV) zijn bijvoorbeeld regels tekst zonder opmaak waarin het kommateken de gegevenselementen scheidt. Elke regel tekst vertegenwoordigt een rij met gegevens en elke door komma's gescheiden waarde is een veld binnen die rij. Het scheidingsteken voor komma's geeft de grens tussen gegevenswaarden aan.
Python blinkt uit in het lezen van en opslaan in bestanden. Door gegevensbestanden met Python te kunnen lezen, kunt u een toepassing in een bruikbare staat herstellen wanneer u deze op een later tijdstip opnieuw uitvoert. Door gegevens in een bestand op te slaan, kunt u informatie uit het programma delen tussen gebruikers en sites waar de applicatie draait.
Voordat een programma een databestand kan lezen, moet het de data kunnen begrijpen. Meestal betekent dit dat het gegevensbestand een bepaalde structuur moet hebben die de toepassing kan gebruiken om de tekst in het bestand te lezen en te ontleden.
Hieronder staat een CSV-bestand met de naam author_book_publisher.csv , gebruikt door het eerste voorbeeldprogramma in deze tutorial:
first_name,last_name,title,publisher
Isaac,Asimov,Foundation,Random House
Pearl,Buck,The Good Earth,Random House
Pearl,Buck,The Good Earth,Simon & Schuster
Tom,Clancy,The Hunt For Red October,Berkley
Tom,Clancy,Patriot Games,Simon & Schuster
Stephen,King,It,Random House
Stephen,King,It,Penguin Random House
Stephen,King,Dead Zone,Random House
Stephen,King,The Shining,Penguin Random House
John,Le Carre,"Tinker, Tailor, Soldier, Spy: A George Smiley Novel",Berkley
Alex,Michaelides,The Silent Patient,Simon & Schuster
Carol,Shaben,Into The Abyss,Simon & Schuster
De eerste regel biedt een door komma's gescheiden lijst met velden, dit zijn de kolomnamen voor de gegevens die in de overige regels volgen. De rest van de regels bevatten de gegevens, waarbij elke regel een enkel record vertegenwoordigt.
Opmerking: Hoewel de auteurs, boeken en uitgevers allemaal echt zijn, zijn de relaties tussen boeken en uitgevers fictief en zijn ze gemaakt voor de doeleinden van deze tutorial.
Vervolgens bekijk je enkele voor- en nadelen van het gebruik van platte bestanden zoals de bovenstaande CSV om met je gegevens te werken.
Voordelen van platte bestanden
Werken met gegevens in platte bestanden is beheersbaar en eenvoudig te implementeren. Het hebben van de gegevens in een voor mensen leesbare indeling is niet alleen handig om het gegevensbestand met een teksteditor te maken, maar ook om de gegevens te onderzoeken en eventuele inconsistenties of problemen op te sporen.
Veel toepassingen kunnen platte versies van de door het bestand gegenereerde gegevens exporteren. Excel kan bijvoorbeeld een CSV-bestand importeren of exporteren van en naar een spreadsheet. Platte bestanden hebben ook het voordeel dat ze op zichzelf staan en overdraagbaar zijn als u de gegevens wilt delen.
Bijna elke programmeertaal heeft tools en bibliotheken die het werken met CSV-bestanden gemakkelijker maken. Python heeft de ingebouwde csv module en de krachtige panda's-module beschikbaar, waardoor het werken met CSV-bestanden een krachtige oplossing is.
Nadelen van platte bestanden
De voordelen van het werken met platte bestanden beginnen af te nemen naarmate de gegevens groter worden. Grote bestanden zijn nog steeds door mensen leesbaar, maar het wordt moeilijker om ze te bewerken om gegevens te creëren of om problemen op te sporen. Als uw toepassing de gegevens in het bestand wijzigt, zou een oplossing zijn om het hele bestand in het geheugen te lezen, de wijzigingen aan te brengen en de gegevens naar een ander bestand te schrijven.
Een ander probleem met het gebruik van platte bestanden is dat u expliciet relaties tussen delen van uw gegevens en het toepassingsprogramma moet maken en onderhouden binnen de bestandssyntaxis. Bovendien moet u code in uw toepassing genereren om die relaties te gebruiken.
Een laatste complicatie is dat mensen met wie u uw gegevensbestand wilt delen, ook de structuren en relaties die u in de gegevens hebt gecreëerd, moeten kennen en ernaar moeten handelen. Om toegang te krijgen tot de informatie, moeten die gebruikers niet alleen de structuur van de gegevens begrijpen, maar ook de programmeertools die nodig zijn om er toegang toe te krijgen.
Voorbeeld van plat bestand
Het voorbeeldprogramma examples/example_1/main.py gebruikt de author_book_publisher.csv bestand om de gegevens en relaties erin te krijgen. Dit CSV-bestand bevat een lijst van auteurs, de boeken die ze hebben gepubliceerd en de uitgevers voor elk van de boeken.
Opmerking: De gegevensbestanden die in de voorbeelden worden gebruikt, zijn beschikbaar in het project/data map. Er is ook een programmabestand in het project/build_data directory die de gegevens genereert. Die applicatie is handig als u de gegevens wijzigt en terug wilt naar een bekende staat.
Om toegang te krijgen tot de gegevensbestanden die in dit gedeelte en in de hele tutorial worden gebruikt, klikt u op de onderstaande link:
Download de voorbeeldcode: Klik hier voor de code die u in deze zelfstudie gaat gebruiken om meer te weten te komen over gegevensbeheer met SQLite en SQLAlchemy.
Het hierboven gepresenteerde CSV-bestand is een vrij klein gegevensbestand dat slechts een paar auteurs, boeken en uitgevers bevat. U moet ook enkele dingen opmerken over de gegevens:
-
De auteurs Stephen King en Tom Clancy verschijnen meer dan eens omdat meerdere boeken die ze hebben gepubliceerd in de gegevens zijn vertegenwoordigd.
-
De auteurs Stephen King en Pearl Buck hebben hetzelfde boek uitgegeven door meer dan één uitgever.
Deze gedupliceerde gegevensvelden creëren relaties tussen andere delen van de gegevens. Eén auteur kan veel boeken schrijven en één uitgever kan met meerdere auteurs samenwerken. Auteurs en uitgevers delen relaties met individuele boeken.
De relaties in de author_book_publisher.csv worden weergegeven door velden die meerdere keren in verschillende rijen van het gegevensbestand voorkomen. Vanwege deze gegevensredundantie vertegenwoordigen de gegevens meer dan een enkele tweedimensionale tabel. U zult hier meer van zien wanneer u het bestand gebruikt om een SQLite-databasebestand te maken.
Het voorbeeldprogramma examples/example_1/main.py gebruikt de relaties die zijn ingebed in de author_book_publisher.csv bestand om enkele gegevens te genereren. Het geeft eerst een lijst van de auteurs en het aantal boeken die elk heeft geschreven. Vervolgens wordt een lijst met uitgevers weergegeven en het aantal auteurs waarvoor elk een boek heeft gepubliceerd.
Het gebruikt ook de treelib module om een boomstructuur van de auteurs, boeken en uitgevers weer te geven.
Ten slotte voegt het een nieuw boek toe aan de gegevens en geeft het de boomhiërarchie opnieuw weer met het nieuwe boek op zijn plaats. Hier is de main() ingangspuntfunctie voor dit programma:
 1def main():
 2    """The main entry point of the program"""
 3    # Get the resources for the program
 4    with resources.path(
 5        "project.data", "author_book_publisher.csv"
 6    ) as filepath:
 7        data = get_data(filepath)
 8
 9    # Get the number of books printed by each publisher
10    books_by_publisher = get_books_by_publisher(data, ascending=False)
11    for publisher, total_books in books_by_publisher.items():
12        print(f"Publisher: {publisher}, total books: {total_books}")
13    print()
14
15    # Get the number of authors each publisher publishes
16    authors_by_publisher = get_authors_by_publisher(data, ascending=False)
17    for publisher, total_authors in authors_by_publisher.items():
18        print(f"Publisher: {publisher}, total authors: {total_authors}")
19    print()
20
21    # Output hierarchical authors data
22    output_author_hierarchy(data)
23
24    # Add a new book to the data structure
25    data = add_new_book(
26        data,
27        author_name="Stephen King",
28        book_title="The Stand",
29        publisher_name="Random House",
30    )
31
32    # Output the updated hierarchical authors data
33    output_author_hierarchy(data)
De bovenstaande Python-code voert de volgende stappen uit:
- Lijnen 4 tot 7 lees de
author_book_publisher.csvbestand in een pandas DataFrame. - Lijnen 10 tot 13 druk het aantal boeken af dat door elke uitgever is gepubliceerd.
- Lijnen 16 t/m 19 druk het aantal auteurs af dat aan elke uitgever is gekoppeld.
- Lijn 22 voert de boekgegevens uit als een hiërarchie gesorteerd op auteurs.
- Lijnen 25 tot 30 voeg een nieuw boek toe aan de in-memory structuur.
- Lijn 33 voert de boekgegevens uit als een hiërarchie gesorteerd op auteurs, inclusief het nieuw toegevoegde boek.
Het uitvoeren van dit programma genereert de volgende uitvoer:
$ python main.py
Publisher: Simon & Schuster, total books: 4
Publisher: Random House, total books: 4
Publisher: Penguin Random House, total books: 2
Publisher: Berkley, total books: 2

Publisher: Simon & Schuster, total authors: 4
Publisher: Random House, total authors: 3
Publisher: Berkley, total authors: 2
Publisher: Penguin Random House, total authors: 1

Authors
├── Alex Michaelides
│   └── The Silent Patient
│       └── Simon & Schuster
├── Carol Shaben
│   └── Into The Abyss
│       └── Simon & Schuster
├── Isaac Asimov
│   └── Foundation
│       └── Random House
├── John Le Carre
│   └── Tinker, Tailor, Soldier, Spy: A George Smiley Novel
│       └── Berkley
├── Pearl Buck
│   └── The Good Earth
│       ├── Random House
│       └── Simon & Schuster
├── Stephen King
│   ├── Dead Zone
│   │   └── Random House
│   ├── It
│   │   ├── Penguin Random House
│   │   └── Random House
│   └── The Shining
│       └── Penguin Random House
└── Tom Clancy
    ├── Patriot Games
    │   └── Simon & Schuster
    └── The Hunt For Red October
        └── Berkley
De auteurshiërarchie hierboven wordt twee keer weergegeven in de uitvoer, met de toevoeging van Stephen King's The Stand , uitgegeven door Random House. De feitelijke uitvoer hierboven is bewerkt en toont alleen de eerste hiërarchie-uitvoer om ruimte te besparen.
main() roept andere functies op om het grootste deel van het werk uit te voeren. De eerste functie die het aanroept is get_data() :
def get_data(filepath):
    """Get book data from the csv file"""
    return pd.read_csv(filepath)
Deze functie neemt het bestandspad naar het CSV-bestand over en gebruikt panda's om het in een pandas DataFrame te lezen, dat het vervolgens teruggeeft aan de beller. De retourwaarde van deze functie wordt de gegevensstructuur die wordt doorgegeven aan de andere functies waaruit het programma bestaat.
get_books_by_publisher() berekent het aantal boeken dat door elke uitgever is gepubliceerd. De resulterende panda-serie gebruikt de panda's GroupBy-functionaliteit om te groeperen op uitgever en vervolgens te sorteren op basis van de ascending vlag:
def get_books_by_publisher(data, ascending=True):
    """Return the number of books by each publisher as a pandas series"""
    return data.groupby("publisher").size().sort_values(ascending=ascending)
get_authors_by_publisher() doet in wezen hetzelfde als de vorige functie, maar voor auteurs:
def get_authors_by_publisher(data, ascending=True):
    """Returns the number of authors by each publisher as a pandas series"""
    return (
        data.assign(name=data.first_name.str.cat(data.last_name, sep=" "))
        .groupby("publisher")
        .nunique()
        .loc[:, "name"]
        .sort_values(ascending=ascending)
    )
add_new_book() maakt een nieuw boek aan in het panda's DataFrame. De code controleert of de auteur, het boek of de uitgever al bestaat. Zo niet, dan maakt het een nieuw boek en voegt het toe aan het panda's DataFrame:
def add_new_book(data, author_name, book_title, publisher_name):
    """Adds a new book to the system"""
    # Does the book exist?
    first_name, _, last_name = author_name.partition(" ")
    if any(
        (data.first_name == first_name)
        & (data.last_name == last_name)
        & (data.title == book_title)
        & (data.publisher == publisher_name)
    ):
        return data
    # Add the new book
    return data.append(
        {
            "first_name": first_name,
            "last_name": last_name,
            "title": book_title,
            "publisher": publisher_name,
        },
        ignore_index=True,
    )
output_author_hierarchy() gebruikt geneste for loops om door de niveaus van de gegevensstructuur te lopen. Het gebruikt dan de treelib module om een hiërarchische lijst weer te geven van de auteurs, de boeken die ze hebben gepubliceerd en de uitgevers die die boeken hebben gepubliceerd:
def output_author_hierarchy(data):
    """Output the data as a hierarchy list of authors"""
    authors = data.assign(
        name=data.first_name.str.cat(data.last_name, sep=" ")
    )
    authors_tree = Tree()
    authors_tree.create_node("Authors", "authors")
    for author, books in authors.groupby("name"):
        authors_tree.create_node(author, author, parent="authors")
        for book, publishers in books.groupby("title")["publisher"]:
            book_id = f"{author}:{book}"
            authors_tree.create_node(book, book_id, parent=author)
            for publisher in publishers:
                authors_tree.create_node(publisher, parent=book_id)

    # Output the hierarchical authors data
    authors_tree.show()
Deze applicatie werkt goed en illustreert het vermogen dat voor u beschikbaar is met de panda-module. De module biedt uitstekende functionaliteit voor het lezen van een CSV-bestand en interactie met de gegevens.
Laten we doorgaan en een identiek werkend programma maken met Python, een SQLite-databaseversie van de auteur en publicatiegegevens, en SQLAlchemy om met die gegevens te communiceren.
SQLite gebruiken om gegevens te behouden
Zoals je eerder zag, zijn er overbodige gegevens in de author_book_publisher.csv het dossier. Bijvoorbeeld alle informatie over Pearl Buck's The Good Earth wordt twee keer vermeld omdat twee verschillende uitgevers het boek hebben gepubliceerd.
Stel je voor dat dit gegevensbestand meer gerelateerde gegevens bevat, zoals het adres en telefoonnummer van de auteur, publicatiedatums en ISBN's voor boeken, of adressen, telefoonnummers en misschien jaarlijkse inkomsten voor uitgevers. Deze gegevens worden gedupliceerd voor elk basisgegevensitem, zoals auteur, boek of uitgever.
Het is mogelijk om op deze manier gegevens te creëren, maar het zou buitengewoon onpraktisch zijn. Denk aan de problemen om dit gegevensbestand actueel te houden. Wat als Stephen King zijn naam wilde veranderen? Je zou meerdere records met zijn naam moeten bijwerken en ervoor zorgen dat er geen typefouten waren.
Erger dan de gegevensduplicatie zou de complexiteit zijn van het toevoegen van andere relaties aan de gegevens. Wat als je zou besluiten om telefoonnummers voor de auteurs toe te voegen, en ze hadden telefoonnummers voor thuis, werk, mobiel en misschien meer? Elke nieuwe relatie die u voor een root-item zou willen toevoegen, zou het aantal records vermenigvuldigen met het aantal items in die nieuwe relatie.
Dit probleem is een van de redenen dat er relaties bestaan in databasesystemen. Een belangrijk onderwerp in database-engineering is databasenormalisatie , of het proces van het opsplitsen van gegevens om redundantie te verminderen en de integriteit te vergroten. Wanneer een databasestructuur wordt uitgebreid met nieuwe soorten gegevens, worden wijzigingen in de bestaande structuur tot een minimum beperkt door deze vooraf te normaliseren.
De SQLite-database is beschikbaar in Python en wordt volgens de startpagina van SQLite meer gebruikt dan alle andere databasesystemen samen. Het biedt een volledig functioneel databasebeheersysteem (RDBMS) dat met één bestand werkt om alle databasefunctionaliteit te behouden.
Het heeft ook het voordeel dat er geen aparte databaseserver nodig is om te functioneren. De bestandsindeling van de database is platformonafhankelijk en toegankelijk voor elke programmeertaal die SQLite ondersteunt.
Dit is allemaal interessante informatie, maar hoe is het relevant voor het gebruik van platte bestanden voor gegevensopslag? Je komt er hieronder achter!
Een databasestructuur maken
De brute force-benadering voor het verkrijgen van de author_book_publisher.csv gegevens in een SQLite-database zou zijn om een enkele tabel te maken die overeenkomt met de structuur van het CSV-bestand. Dit zou een groot deel van de kracht van SQLite negeren.
Relationele databases bieden een manier om gestructureerde gegevens in tabellen op te slaan en relaties tussen die tabellen tot stand te brengen. Ze gebruiken meestal Structured Query Language (SQL) als de primaire manier om met de gegevens om te gaan. Dit is een te grote vereenvoudiging van wat RDBMS'en bieden, maar het is voldoende voor de doeleinden van deze zelfstudie.
Een SQLite-database biedt ondersteuning voor interactie met de gegevenstabel met behulp van SQL. Een SQLite-databasebestand bevat niet alleen de gegevens, maar heeft ook een gestandaardiseerde manier om met de gegevens te communiceren. Deze ondersteuning is ingebed in het bestand, wat betekent dat elke programmeertaal die een SQLite-bestand kan gebruiken, ook SQL kan gebruiken om ermee te werken.
Interactie met een database met SQL
SQL is een declaratieve taal gebruikt voor het maken, beheren en opvragen van de gegevens in een database. Een declaratieve taal beschrijft wat moet worden bereikt in plaats van hoe het moet worden bereikt. U zult later voorbeelden van SQL-instructies zien wanneer u databasetabellen gaat maken.
Een database structureren met SQL
Om te profiteren van de kracht van SQL, moet u enige databasenormalisatie toepassen op de gegevens in de author_book_publisher.csv het dossier. Om dit te doen, scheidt u de auteurs, boeken en uitgevers in afzonderlijke databasetabellen.
Conceptueel worden gegevens in de database opgeslagen in tweedimensionale tabelstructuren. Elke tabel bestaat uit rijen met records , en elke record bestaat uit kolommen, of velden , met gegevens.
De gegevens in de velden zijn van vooraf gedefinieerde typen, inclusief tekst, gehele getallen, floats en meer. CSV-bestanden zijn anders omdat alle velden tekst zijn en door een programma moeten worden geparseerd om er een gegevenstype aan toe te kennen.
Elk record in de tabel heeft een primaire sleutel gedefinieerd om een record een unieke identificatie te geven. De primaire sleutel is vergelijkbaar met de sleutel in een Python-woordenboek. De database-engine zelf genereert vaak de primaire sleutel als een oplopende integerwaarde voor elk record dat in de databasetabel wordt ingevoegd.
Hoewel de primaire sleutel vaak automatisch wordt gegenereerd door de database-engine, hoeft dit niet zo te zijn. Als de gegevens die in een veld zijn opgeslagen uniek zijn voor alle andere gegevens in de tabel in dat veld, kan dit de primaire sleutel zijn. Een tabel met gegevens over boeken kan bijvoorbeeld het ISBN van het boek als primaire sleutel gebruiken.
Tabellen maken met SQL
U kunt als volgt de drie tabellen maken die de auteurs, boeken en uitgevers in het CSV-bestand vertegenwoordigen met behulp van SQL-instructies:
CREATE TABLE author (
    author_id INTEGER NOT NULL PRIMARY KEY,
    first_name VARCHAR,
    last_name VARCHAR
);

CREATE TABLE book (
    book_id INTEGER NOT NULL PRIMARY KEY,
    author_id INTEGER REFERENCES author,
    title VARCHAR
);

CREATE TABLE publisher (
    publisher_id INTEGER NOT NULL PRIMARY KEY,
    name VARCHAR
);
Merk op dat er geen bestandsbewerkingen zijn, geen variabelen gemaakt en geen structuren om ze vast te houden. De statements beschrijven alleen het gewenste resultaat:het maken van een tabel met bepaalde attributen. De database-engine bepaalt hoe dit moet.
Nadat u deze tabel heeft gemaakt en gevuld met auteursgegevens uit de author_book_publisher.csv bestand, kunt u het openen met behulp van SQL-instructies. De volgende verklaring (ook wel een query genoemd) ) gebruikt het jokerteken (* ) om alle gegevens in de author . te krijgen tabel en voer het uit:
SELECT * FROM author;
U kunt de sqlite3 . gebruiken opdrachtregelprogramma voor interactie met de author_book_publisher.db databasebestand in het project/data map:
$ sqlite3 author_book_publisher.db
Zodra het SQLite-opdrachtregelprogramma wordt uitgevoerd terwijl de database is geopend, kunt u SQL-opdrachten invoeren. Hier is de bovenstaande SQL-opdracht en de uitvoer, gevolgd door de .q commando om het programma te verlaten:
sqlite> SELECT * FROM author;
1|Isaac|Asimov
2|Pearl|Buck
3|Tom|Clancy
4|Stephen|King
5|John|Le Carre
6|Alex|Michaelides
7|Carol|Shaben

sqlite> .q
Merk op dat elke auteur slechts één keer in de tabel voorkomt. In tegenstelling tot het CSV-bestand, dat voor sommige auteurs meerdere items bevatte, is hier slechts één uniek record per auteur nodig.
Een database onderhouden met SQL
SQL biedt manieren om met bestaande databases en tabellen te werken door nieuwe gegevens in te voegen en bestaande gegevens bij te werken of te verwijderen. Hier is een voorbeeld van een SQL-instructie voor het invoegen van een nieuwe auteur in de author tafel:
INSERT INTO author
    (first_name, last_name)
VALUES ('Paul', 'Mendez');
Deze SQL-instructie voegt de waarden 'Paul . in ' en 'Mendez ' in de respectievelijke kolommen first_name en last_name van de author tafel.
Merk op dat de author_id kolom is niet gespecificeerd. Omdat die kolom de primaire sleutel is, genereert de database-engine de waarde en voegt deze in als onderdeel van de uitvoering van de instructie.
Het bijwerken van records in een databasetabel is een ongecompliceerd proces. Stel bijvoorbeeld dat Stephen King bekend wilde worden onder zijn pseudoniem, Richard Bachman. Hier is een SQL-instructie om het databaserecord bij te werken:
UPDATE author
SET first_name = 'Richard', last_name = 'Bachman'
WHERE first_name = 'Stephen' AND last_name = 'King';
De SQL-instructie lokaliseert het enkele record voor 'Stephen King' met behulp van de voorwaardelijke instructie WHERE first_name = 'Stephen' AND last_name = 'King' en werkt vervolgens de first_name . bij en last_name velden met de nieuwe waarden. SQL gebruikt het isgelijkteken (= ) als zowel de vergelijkingsoperator als de toewijzingsoperator.
U kunt ook records uit een database verwijderen. Hier is een voorbeeld van een SQL-instructie om een record van de author te verwijderen tafel:
DELETE FROM author
WHERE first_name = 'Paul'
AND last_name = 'Mendez';
Deze SQL-instructie verwijdert een enkele rij van de author tabel waar de first_name is gelijk aan 'Paul' en de last_name is gelijk aan 'Mendez' .
Wees voorzichtig bij het verwijderen van records! De voorwaarden die je stelt moeten zo specifiek mogelijk zijn. Een voorwaarde die te breed is, kan ertoe leiden dat meer records worden verwijderd dan u van plan bent. Als de voorwaarde bijvoorbeeld alleen gebaseerd zou zijn op de regel first_name = 'Paul' , dan worden alle auteurs met een voornaam van Paul uit de database verwijderd.
Opmerking: Om te voorkomen dat records per ongeluk worden verwijderd, staan veel toepassingen verwijderingen helemaal niet toe. In plaats daarvan heeft de record een andere kolom om aan te geven of deze in gebruik is of niet. Deze kolom heeft mogelijk de naam active en bevatten een waarde die evalueert naar True of False, waarmee wordt aangegeven of het record moet worden opgenomen bij het opvragen van de database.
De onderstaande SQL-query zou bijvoorbeeld alle kolommen krijgen voor alle actieve records in some_table :
SELECT
  *
FROM some_table
WHERE active = 1;
SQLite heeft geen Booleaans datatype, dus de active kolom wordt weergegeven door een geheel getal met een waarde van 0 of 1 om de staat van het record aan te geven. Andere databasesystemen kunnen al dan niet native Booleaanse datatypes hebben.
Het is heel goed mogelijk om database-applicaties in Python te bouwen met behulp van SQL-instructies direct in de code. Als u dit doet, worden gegevens naar de toepassing geretourneerd als een lijst met lijsten of een lijst met woordenboeken.
Het gebruik van onbewerkte SQL is een perfect acceptabele manier om te werken met de gegevens die door query's aan de database worden geretourneerd. In plaats van dat te doen, gaat u echter direct SQLAlchemy gebruiken om met databases te werken.
Relaties opbouwen
Een ander kenmerk van databasesystemen dat u misschien zelfs nog krachtiger en nuttiger vindt dan het vasthouden en ophalen van gegevens, zijn relaties . Met databases die relaties ondersteunen, kunt u gegevens opsplitsen in meerdere tabellen en verbindingen tussen deze tabellen tot stand brengen.
De gegevens in de author_book_publisher.csv bestand vertegenwoordigt de gegevens en relaties door gegevens te dupliceren. Een database handelt dit af door de gegevens op te splitsen in drie tabellen—author , book , en publisher —en relaties tussen hen aan te gaan.
Nadat u alle gewenste gegevens op één plaats in het CSV-bestand hebt verzameld, waarom zou u deze dan in meerdere tabellen willen opsplitsen? Zou het niet meer werk zijn om te creëren en weer in elkaar te zetten? Dat is tot op zekere hoogte waar, maar de voordelen van het opsplitsen van de gegevens en het weer in elkaar zetten met behulp van SQL kunnen u overtuigen!
Een-op-veel-relaties
Een een-op-veel relatie is als die van een klant die artikelen online bestelt. Eén klant kan veel bestellingen hebben, maar elke bestelling is van één klant. De author_book_publisher.db database heeft een één-op-veel relatie in de vorm van auteurs en boeken. Elke auteur kan veel boeken schrijven, maar elk boek is geschreven door één auteur.
Zoals je hebt gezien bij het maken van tabellen hierboven, is de implementatie van deze afzonderlijke entiteiten om ze elk in een databasetabel te plaatsen, één voor auteurs en één voor boeken. Maar hoe wordt de een-op-veel-relatie tussen deze twee tabellen geïmplementeerd?
Onthoud dat elke tabel in een database een veld heeft dat is aangewezen als de primaire sleutel voor die tabel. Elke tabel hierboven heeft een primair sleutelveld met de naam volgens dit patroon:<table name>_id .
Het book bovenstaande tabel bevat een veld, author_id , die verwijst naar de author tafel. De author_id veld brengt een een-op-veel-relatie tot stand tussen auteurs en boeken die er als volgt uitziet:
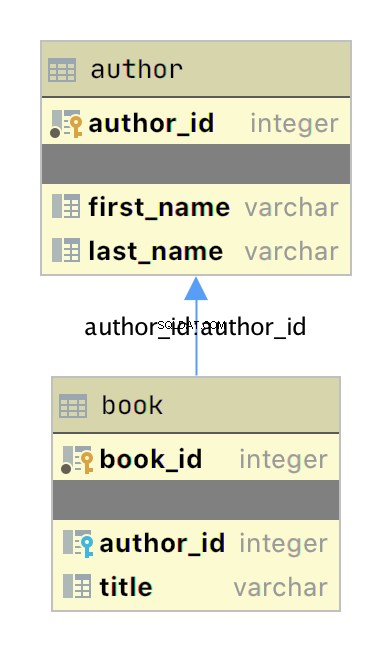
Het bovenstaande diagram is een eenvoudig entiteit-relatiediagram (ERD) gemaakt met de JetBrains DataGrip-toepassing met de tabellen author en book als vakken met hun respectievelijke primaire sleutel en gegevensvelden. Twee grafische items voegen informatie over de relatie toe:
-
De kleine gele en blauwe sleutelpictogrammen geef respectievelijk de primaire en externe sleutels voor de tabel aan.
-
De pijl die
bookverbindt totauthorgeeft de relatie tussen de tabellen aan op basis van deauthor_idbuitenlandse sleutel in hetbooktafel.
Wanneer je een nieuw boek toevoegt aan het book tabel, bevatten de gegevens een author_id waarde voor een bestaande auteur in de author tafel. Op deze manier hebben alle boeken die door een auteur zijn geschreven een opzoekrelatie terug naar die unieke auteur.
Nu je aparte tabellen hebt voor auteurs en boeken, hoe gebruik je de relatie daartussen? SQL ondersteunt een zogenaamde JOIN bewerking, die u kunt gebruiken om de database te vertellen hoe twee of meer tabellen moeten worden verbonden.
De onderstaande SQL-query voegt zich bij de author en book tabel samen met behulp van de SQLite-opdrachtregeltoepassing:
sqlite> SELECT
   ...> a.first_name || ' ' || a.last_name AS author_name,
   ...> b.title AS book_title
   ...> FROM author a
   ...> JOIN book b ON b.author_id = a.author_id
   ...> ORDER BY a.last_name ASC;
Isaac Asimov|Foundation
Pearl Buck|The Good Earth
Tom Clancy|The Hunt For Red October
Tom Clancy|Patriot Games
Stephen King|It
Stephen King|Dead Zone
Stephen King|The Shining
John Le Carre|Tinker, Tailor, Soldier, Spy: A George Smiley Novel
Alex Michaelides|The Silent Patient
Carol Shaben|Into The Abyss
De bovenstaande SQL-query verzamelt informatie van zowel de auteurs- als de boektabel door de tabellen samen te voegen met behulp van de relatie die tussen de twee tot stand is gebracht. Aaneenschakeling van SQL-tekenreeksen wijst de volledige naam van de auteur toe aan de alias author_name . De gegevens die door de zoekopdracht worden verzameld, worden in oplopende volgorde gesorteerd op last_name veld.
Er zijn een paar dingen die opvallen in de SQL-instructie. Eerst worden auteurs op hun volledige naam in een enkele kolom weergegeven en gesorteerd op hun achternaam. Auteurs verschijnen ook meerdere keren in de uitvoer vanwege de een-op-veel-relatie. De naam van een auteur wordt gedupliceerd voor elk boek dat ze in de database hebben geschreven.
Door aparte tabellen voor auteurs en boeken te maken en de relatie daartussen te leggen, heb je de redundantie in de gegevens verminderd. Nu hoef je de gegevens van een auteur nog maar op één plek te bewerken, en die wijziging verschijnt in elke SQL-query die toegang tot de gegevens heeft.
Veel-op-veel-relaties
Veel-op-veel relaties bestaan in de author_book_publisher.db database tussen auteurs en uitgevers en tussen boeken en uitgevers. Eén auteur kan met veel uitgevers samenwerken en één uitgever kan met veel auteurs samenwerken. Evenzo kan één boek door veel uitgevers worden gepubliceerd en kan één uitgever veel boeken publiceren.
Handling this situation in the database is more involved than a one-to-many relationship because the relationship goes both ways. Many-to-many relationships are created by an association table acting as a bridge between the two related tables.
The association table contains at least two foreign key fields, which are the primary keys of each of the two associated tables. This SQL statement creates the association table relating the author and publisher tables:
CREATE TABLE author_publisher (
    author_id INTEGER REFERENCES author,
    publisher_id INTEGER REFERENCES publisher
);
The SQL statements create a new author_publisher table referencing the primary keys of the existing author and publisher tables. The author_publisher table is an association table establishing relationships between an author and a publisher.
Because the relationship is between two primary keys, there’s no need to create a primary key for the association table itself. The combination of the two related keys creates a unique identifier for a row of data.
As before, you use the JOIN keyword to connect two tables together. Connecting the author table to the publisher table is a two-step process:
JOINtheauthortable with theauthor_publishertable.JOINtheauthor_publishertable with thepublishertable.
The author_publisher association table provides the bridge through which the JOIN connects the two tables. Here’s an example SQL query returning a list of authors and the publishers publishing their books:
 1sqlite> SELECT
 2   ...> a.first_name || ' ' || a.last_name AS author_name,
 3   ...> p.name AS publisher_name
 4   ...> FROM author a
 5   ...> JOIN author_publisher ap ON ap.author_id = a.author_id
 6   ...> JOIN publisher p ON p.publisher_id = ap.publisher_id
 7   ...> ORDER BY a.last_name ASC;
 8Isaac Asimov|Random House
 9Pearl Buck|Random House
10Pearl Buck|Simon & Schuster
11Tom Clancy|Berkley
12Tom Clancy|Simon & Schuster
13Stephen King|Random House
14Stephen King|Penguin Random House
15John Le Carre|Berkley
16Alex Michaelides|Simon & Schuster
17Carol Shaben|Simon & Schuster
The statements above perform the following actions:
-
Line 1 starts a
SELECTstatement to get data from the database. -
Line 2 selects the first and last name from the
authortable using theaalias for theauthortable and concatenates them together with a space character. -
Line 3 selects the publisher’s name aliased to
publisher_name. -
Line 4 uses the
authortable as the first source from which to retrieve data and assigns it to the aliasa. -
Line 5 is the first step of the process outlined above for connecting the
authortable to thepublishertable. It uses the aliasapfor theauthor_publisherassociation table and performs aJOINoperation to connect theap.author_idforeign key reference to thea.author_idprimary key in theauthortable. -
Line 6 is the second step in the two-step process mentioned above. It uses the alias
pfor thepublishertable and performs aJOINoperation to relate theap.publisher_idforeign key reference to thep.publisher_idprimary key in thepublishertable. -
Line 7 sorts the data by the author’s last name in ascending alphabetical order and ends the SQL query.
-
Lines 8 to 17 are the output of the SQL query.
Note that the data in the source author and publisher tables are normalized, with no data duplication. Yet the returned results have duplicated data where necessary to answer the SQL query.
The SQL query above demonstrates how to make use of a relationship using the SQL JOIN keyword, but the resulting data is a partial re-creation of the author_book_publisher.csv CSV data. What’s the win for having done the work of creating a database to separate the data?
Here’s another SQL query to show a little bit of the power of SQL and the database engine:
 1sqlite> SELECT
 2   ...> a.first_name || ' ' || a.last_name AS author_name,
 3   ...> COUNT(b.title) AS total_books
 4   ...> FROM author a
 5   ...> JOIN book b ON b.author_id = a.author_id
 6   ...> GROUP BY author_name
 7   ...> ORDER BY total_books DESC, a.last_name ASC;
 8Stephen King|3
 9Tom Clancy|2
10Isaac Asimov|1
11Pearl Buck|1
12John Le Carre|1
13Alex Michaelides|1
14Carol Shaben|1
The SQL query above returns the list of authors and the number of books they’ve written. The list is sorted first by the number of books in descending order, then by the author’s name in alphabetical order:
-
Line 1 begins the SQL query with the
SELECTkeyword. -
Line 2 selects the author’s first and last names, separated by a space character, and creates the alias
author_name. -
Line 3 counts the number of books written by each author, which will be used later by the
ORDER BYclause to sort the list. -
Line 4 selects the
authortable to get data from and creates theaalias. -
Line 5 connects to the related
booktable through aJOINto theauthor_idand creates thebalias for thebooktable. -
Line 6 generates the aggregated author and total number of books data by using the
GROUP BYkeyword.GROUP BYis what groups eachauthor_nameand controls what books are tallied byCOUNT()for that author. -
Line 7 sorts the output first by number of books in descending order, then by the author’s last name in ascending alphabetical order.
-
Lines 8 to 14 are the output of the SQL query.
In the above example, you take advantage of SQL to perform aggregation calculations and sort the results into a useful order. Having the database perform calculations based on its built-in data organization ability is usually faster than performing the same kinds of calculations on raw data sets in Python. SQL offers the advantages of using set theory embedded in RDBMS databases.
Entity Relationship Diagrams
An entity-relationship diagram (ERD) is a visual depiction of an entity-relationship model for a database or part of a database. The author_book_publisher.db SQLite database is small enough that the entire database can be visualized by the diagram shown below:
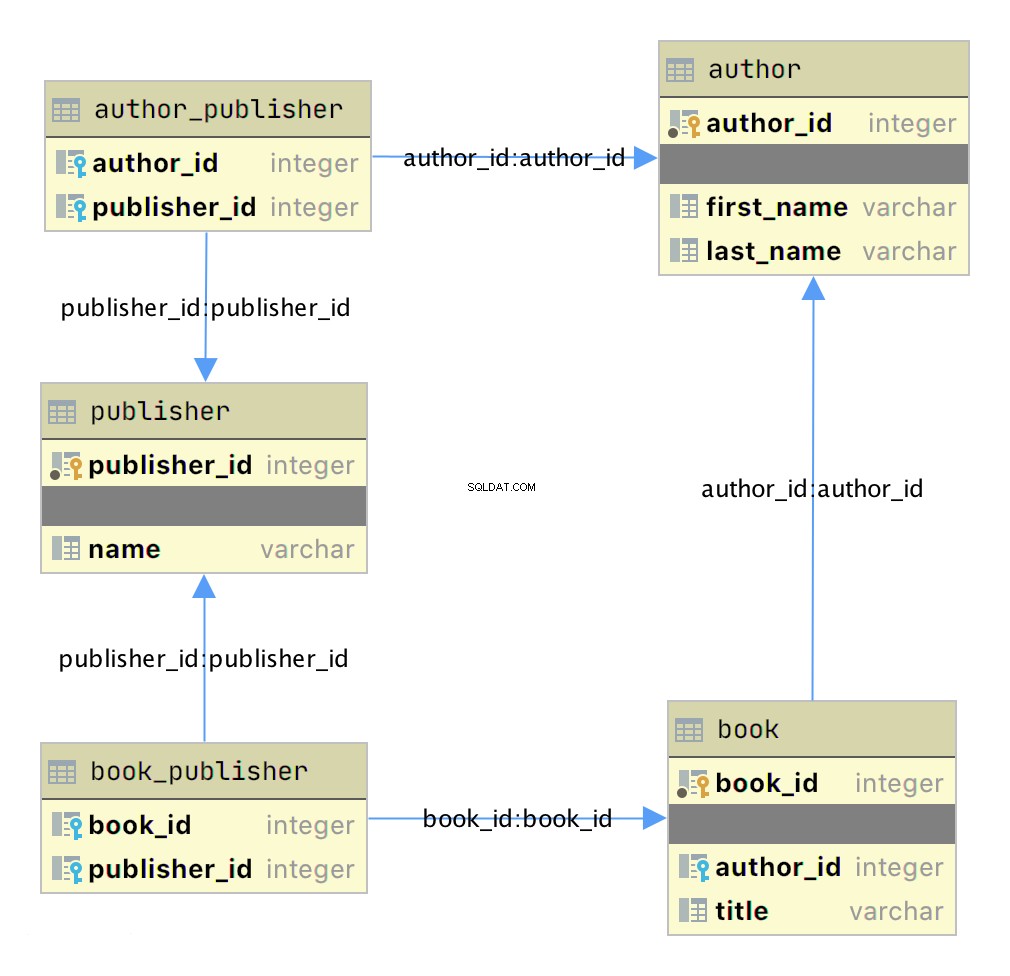
This diagram presents the table structures in the database and the relationships between them. Each box represents a table and contains the fields defined in the table, with the primary key indicated first if it exists.
The arrows show the relationships between the tables connecting a foreign key field in one table to a field, often the primary key, in another table. The table book_publisher has two arrows, one connecting it to the book table and another connecting it to the publisher table. The arrow indicates the many-to-many relationship between the book and publisher tables. The author_publisher table provides the same relationship between author and publisher .
Working With SQLAlchemy and Python Objects
SQLAlchemy is a powerful database access tool kit for Python, with its object-relational mapper (ORM) being one of its most famous components, and the one discussed and used here.
When you’re working in an object-oriented language like Python, it’s often useful to think in terms of objects. It’s possible to map the results returned by SQL queries to objects, but doing so works against the grain of how the database works. Sticking with the scalar results provided by SQL works against the grain of how Python developers work. This problem is known as object-relational impedance mismatch.
The ORM provided by SQLAlchemy sits between the SQLite database and your Python program and transforms the data flow between the database engine and Python objects. SQLAlchemy allows you to think in terms of objects and still retain the powerful features of a database engine.
The Model
One of the fundamental elements to enable connecting SQLAlchemy to a database is creating a model . The model is a Python class defining the data mapping between the Python objects returned as a result of a database query and the underlying database tables.
The entity-relationship diagram displayed earlier shows boxes connected with arrows. The boxes are the tables built with the SQL commands and are what the Python classes will model. The arrows are the relationships between the tables.
The models are Python classes inheriting from an SQLAlchemy Base class. The Base class provides the interface operations between instances of the model and the database table.
Below is the models.py file that creates the models to represent the author_book_publisher.db database:
 1from sqlalchemy import Column, Integer, String, ForeignKey, Table
 2from sqlalchemy.orm import relationship, backref
 3from sqlalchemy.ext.declarative import declarative_base
 4
 5Base = declarative_base()
 6
 7author_publisher = Table(
 8    "author_publisher",
 9    Base.metadata,
10    Column("author_id", Integer, ForeignKey("author.author_id")),
11    Column("publisher_id", Integer, ForeignKey("publisher.publisher_id")),
12)
13
14book_publisher = Table(
15    "book_publisher",
16    Base.metadata,
17    Column("book_id", Integer, ForeignKey("book.book_id")),
18    Column("publisher_id", Integer, ForeignKey("publisher.publisher_id")),
19)
20
21class Author(Base):
22    __tablename__ = "author"
23    author_id = Column(Integer, primary_key=True)
24    first_name = Column(String)
25    last_name = Column(String)
26    books = relationship("Book", backref=backref("author"))
27    publishers = relationship(
28        "Publisher", secondary=author_publisher, back_populates="authors"
29    )
30
31class Book(Base):
32    __tablename__ = "book"
33    book_id = Column(Integer, primary_key=True)
34    author_id = Column(Integer, ForeignKey("author.author_id"))
35    title = Column(String)
36    publishers = relationship(
37        "Publisher", secondary=book_publisher, back_populates="books"
38    )
39
40class Publisher(Base):
41    __tablename__ = "publisher"
42    publisher_id = Column(Integer, primary_key=True)
43    name = Column(String)
44    authors = relationship(
45        "Author", secondary=author_publisher, back_populates="publishers"
46    )
47    books = relationship(
48        "Book", secondary=book_publisher, back_populates="publishers"
49    )
Here’s what’s going on in this module:
-
Line 1 imports the
Column,Integer,String,ForeignKey, andTableclasses from SQLAlchemy, which are used to help define the model attributes. -
Line 2 imports the
relationship()andbackrefobjects, which are used to create the relationships between objects. -
Line 3 imports the
declarative_baseobject, which connects the database engine to the SQLAlchemy functionality of the models. -
Line 5 creates the
Baseclass, which is what all models inherit from and how they get SQLAlchemy ORM functionality. -
Lines 7 to 12 create the
author_publisherassociation table model. -
Lines 14 to 19 create the
book_publisherassociation table model. -
Lines 21 to 29 define the
Authorclass model to theauthordatabase table. -
Lines 31 to 38 define the
Bookclass model to thebookdatabase table. -
Lines 40 to 49 define the
Publisherclass model to thepublisherdatabase table.
The description above shows the mapping of the five tables in the author_book_publisher.db databank. But it glosses over some SQLAlchemy ORM features, including Table , ForeignKey , relationship() , and backref . Let’s get into those now.
Table Creates Associations
author_publisher and book_publisher are both instances of the Table class that create the many-to-many association tables used between the author and publisher tables and the book and publisher tables, respectively.
The SQLAlchemy Table class creates a unique instance of an ORM mapped table within the database. The first parameter is the table name as defined in the database, and the second is Base.metadata , which provides the connection between the SQLAlchemy functionality and the database engine.
The rest of the parameters are instances of the Column class defining the table fields by name, their type, and in the example above, an instance of a ForeignKey .
ForeignKey Creates a Connection
The SQLAlchemy ForeignKey class defines a dependency between two Column fields in different tables. A ForeignKey is how you make SQLAlchemy aware of the relationships between tables. For example, this line from the author_publisher instance creation establishes a foreign key relationship:
Column("author_id", Integer, ForeignKey("author.author_id"))
The statement above tells SQLAlchemy that there’s a column in the author_publisher table named author_id . The type of that column is Integer , and author_id is a foreign key related to the primary key in the author table.
Having both author_id and publisher_id defined in the author_publisher Table instance creates the connection from the author table to the publisher table and vice versa, establishing a many-to-many relationship.
relationship() Establishes a Collection
Having a ForeignKey defines the existence of the relationship between tables but not the collection of books an author can have. Take a look at this line in the Author class definition:
books = relationship("Book", backref=backref("author"))
The code above defines a parent-child collection. The books attribute being plural (which is not a requirement, just a convention) is an indication that it’s a collection.
The first parameter to relationship() , the class name Book (which is not the table name book ), is the class to which the books attribute is related. The relationship informs SQLAlchemy that there’s a relationship between the Author and Book classes. SQLAlchemy will find the relationship in the Book class definition:
author_id = Column(Integer, ForeignKey("author.author_id"))
SQLAlchemy recognizes that this is the ForeignKey connection point between the two classes. You’ll get to the backref parameter in relationship() in a moment.
The other relationship in Author is to the Publisher class. This is created with the following statement in the Author class definition:
publishers = relationship(
    "Publisher", secondary=author_publisher, back_populates="authors"
)
Like books , the attribute publishers indicates a collection of publishers associated with an author. The first parameter, "Publisher" , informs SQLAlchemy what the related class is. The second and third parameters are secondary=author_publisher and back_populates="authors" :
-
secondarytells SQLAlchemy that the relationship to thePublisherclass is through a secondary table, which is theauthor_publisherassociation table created earlier inmodels.py. Thesecondaryparameter makes SQLAlchemy find thepublisher_idForeignKeydefined in theauthor_publisherassociation table. -
back_populatesis a convenience configuration telling SQLAlchemy that there’s a complementary collection in thePublisherclass calledauthors.
backref Mirrors Attributes
The backref parameter of the books collection relationship() creates an author attribute for each Book instance. This attribute refers to the parent Author that the Book instance is related to.
For example, if you executed the following Python code, then a Book instance would be returned from the SQLAlchemy query. The Book instance has attributes that can be used to print out information about the book:
book = session.query(Book).filter_by(Book.title == "The Stand").one_or_none()
print(f"Authors name: {book.author.first_name} {book.author.last_name}")
The existence of the author attribute in the Book above is because of the backref definition. A backref can be very handy to have when you need to refer to the parent and all you have is a child instance.
Queries Answer Questions
You can make a basic query like SELECT * FROM author; in SQLAlchemy like this:
results = session.query(Author).all()
The session is an SQLAlchemy object used to communicate with SQLite in the Python example programs. Here, you tell the session you want to execute a query against the Author model and return all records.
At this point, the advantages of using SQLAlchemy instead of plain SQL might not be obvious, especially considering the setup required to create the models representing the database. The results returned by the query is where the magic happens. Instead of getting back a list of lists of scalar data, you’ll get back a list of instances of Author objects with attributes matching the column names you defined.
The books and publishers collections maintained by SQLAlchemy create a hierarchical list of authors and the books they’ve written as well as the publishers who’ve published them.
Behind the scenes, SQLAlchemy turns the object and method calls into SQL statements to execute against the SQLite database engine. SQLAlchemy transforms the data returned by SQL queries into Python objects.
With SQLAlchemy, you can perform the more complex aggregation query shown earlier for the list of authors and the number of books they’ve written like this:
author_book_totals = (
    session.query(
        Author.first_name,
        Author.last_name,
        func.count(Book.title).label("book_total")
    )
    .join(Book)
    .group_by(Author.last_name)
    .order_by(desc("book_total"))
    .all()
)
The query above gets the author’s first and last name, along with a count of the number of books that the author has written. The aggregating count used by the group_by clause is based on the author’s last name. Finally, the results are sorted in descending order based on the aggregated and aliased book_total .
Example Program
The example program examples/example_2/main.py has the same functionality as examples/example_1/main.py but uses SQLAlchemy exclusively to interface with the author_book_publisher.db SQLite database. The program is broken up into the main() function and the functions it calls:
 1def main():
 2    """Main entry point of program"""
 3    # Connect to the database using SQLAlchemy
 4    with resources.path(
 5        "project.data", "author_book_publisher.db"
 6    ) as sqlite_filepath:
 7        engine = create_engine(f"sqlite:///{sqlite_filepath}")
 8    Session = sessionmaker()
 9    Session.configure(bind=engine)
10    session = Session()
11
12    # Get the number of books printed by each publisher
13    books_by_publisher = get_books_by_publishers(session, ascending=False)
14    for row in books_by_publisher:
15        print(f"Publisher: {row.name}, total books: {row.total_books}")
16    print()
17
18    # Get the number of authors each publisher publishes
19    authors_by_publisher = get_authors_by_publishers(session)
20    for row in authors_by_publisher:
21        print(f"Publisher: {row.name}, total authors: {row.total_authors}")
22    print()
23
24    # Output hierarchical author data
25    authors = get_authors(session)
26    output_author_hierarchy(authors)
27
28    # Add a new book
29    add_new_book(
30        session,
31        author_name="Stephen King",
32        book_title="The Stand",
33        publisher_name="Random House",
34    )
35    # Output the updated hierarchical author data
36    authors = get_authors(session)
37    output_author_hierarchy(authors)
This program is a modified version of examples/example_1/main.py . Let’s go over the differences:
-
Lines 4 to 7 first initialize the
sqlite_filepathvariable to the database file path. Then they create theenginevariable to communicate with SQLite and theauthor_book_publisher.dbdatabase file, which is SQLAlchemy’s access point to the database. -
Line 8 creates the
Sessionclass from the SQLAlchemy’ssessionmaker(). -
Line 9 binds the
Sessionto the engine created in line 8. -
Line 10 creates the
sessioninstance, which is used by the program to communicate with SQLAlchemy.
The rest of the function is similar, except for the replacement of data with session as the first parameter to all the functions called by main() .
get_books_by_publisher() has been refactored to use SQLAlchemy and the models you defined earlier to get the data requested:
 1def get_books_by_publishers(session, ascending=True):
 2    """Get a list of publishers and the number of books they've published"""
 3    if not isinstance(ascending, bool):
 4        raise ValueError(f"Sorting value invalid: {ascending}")
 5
 6    direction = asc if ascending else desc
 7
 8    return (
 9        session.query(
10            Publisher.name, func.count(Book.title).label("total_books")
11        )
12        .join(Publisher.books)
13        .group_by(Publisher.name)
14        .order_by(direction("total_books"))
15    )
Here’s what the new function, get_books_by_publishers() , is doing:
-
Line 6 creates the
directionvariable and sets it equal to the SQLAlchemydescorascfunction depending on the value of theascendingparameter. -
Lines 9 to 11 query the
Publishertable for data to return, which in this case arePublisher.nameand the aggregate total ofBookobjects associated with an author, aliased tototal_books. -
Line 12 joins to the
Publisher.bookscollectie. -
Line 13 aggregates the book counts by the
Publisher.nameattribute. -
Line 14 sorts the output by the book counts according to the operator defined by
direction. -
Line 15 closes the object, executes the query, and returns the results to the caller.
All the above code expresses what is wanted rather than how it’s to be retrieved. Now instead of using SQL to describe what’s wanted, you’re using Python objects and methods. What’s returned is a list of Python objects instead of a list of tuples of data.
get_authors_by_publisher() has also been modified to work exclusively with SQLAlchemy. Its functionality is very similar to the previous function, so a function description is omitted:
def get_authors_by_publishers(session, ascending=True):
    """Get a list of publishers and the number of authors they've published"""
    if not isinstance(ascending, bool):
        raise ValueError(f"Sorting value invalid: {ascending}")

    direction = asc if ascending else desc

    return (
        session.query(
            Publisher.name,
            func.count(Author.first_name).label("total_authors"),
        )
        .join(Publisher.authors)
        .group_by(Publisher.name)
        .order_by(direction("total_authors"))
    )
get_authors() has been added to get a list of authors sorted by their last names. The result of this query is a list of Author objects containing a collection of books. The Author objects already contain hierarchical data, so the results don’t have to be reformatted:
def get_authors(session):
    """Get a list of author objects sorted by last name"""
    return session.query(Author).order_by(Author.last_name).all()
Like its previous version, add_new_book() is relatively complex but straightforward to understand. It determines if a book with the same title, author, and publisher exists in the database already.
If the search query finds an exact match, then the function returns. If no book matches the exact search criteria, then it searches to see if the author has written a book using the passed in title. This code exists to prevent duplicate books from being created in the database.
If no matching book exists, and the author hasn’t written one with the same title, then a new book is created. The function then retrieves or creates an author and publisher. Once instances of the Book , Author and Publisher exist, the relationships between them are created, and the resulting information is saved to the database:
 1def add_new_book(session, author_name, book_title, publisher_name):
 2    """Adds a new book to the system"""
 3    # Get the author's first and last names
 4    first_name, _, last_name = author_name.partition(" ")
 5
 6    # Check if book exists
 7    book = (
 8        session.query(Book)
 9        .join(Author)
10        .filter(Book.title == book_title)
11        .filter(
12            and_(
13                Author.first_name == first_name, Author.last_name == last_name
14            )
15        )
16        .filter(Book.publishers.any(Publisher.name == publisher_name))
17        .one_or_none()
18    )
19    # Does the book by the author and publisher already exist?
20    if book is not None:
21        return
22
23    # Get the book by the author
24    book = (
25        session.query(Book)
26        .join(Author)
27        .filter(Book.title == book_title)
28        .filter(
29            and_(
30                Author.first_name == first_name, Author.last_name == last_name
31            )
32        )
33        .one_or_none()
34    )
35    # Create the new book if needed
36    if book is None:
37        book = Book(title=book_title)
38
39    # Get the author
40    author = (
41        session.query(Author)
42        .filter(
43            and_(
44                Author.first_name == first_name, Author.last_name == last_name
45            )
46        )
47        .one_or_none()
48    )
49    # Do we need to create the author?
50    if author is None:
51        author = Author(first_name=first_name, last_name=last_name)
52        session.add(author)
53
54    # Get the publisher
55    publisher = (
56        session.query(Publisher)
57        .filter(Publisher.name == publisher_name)
58        .one_or_none()
59    )
60    # Do we need to create the publisher?
61    if publisher is None:
62        publisher = Publisher(name=publisher_name)
63        session.add(publisher)
64
65    # Initialize the book relationships
66    book.author = author
67    book.publishers.append(publisher)
68    session.add(book)
69
70    # Commit to the database
71    session.commit()
The code above is relatively long. Let’s break the functionality down to manageable sections:
-
Lines 7 to 18 set the
bookvariable to an instance of aBookif a book with the same title, author, and publisher is found. Otherwise, they setbooktoNone. -
Lines 20 and 21 determine if the book already exists and return if it does.
-
Lines 24 to 37 set the
bookvariable to an instance of aBookif a book with the same title and author is found. Otherwise, they create a newBookinstance. -
Lines 40 to 52 set the
authorvariable to an existing author, if found, or create a newAuthorinstance based on the passed-in author name. -
Lines 55 to 63 set the
publishervariable to an existing publisher, if found, or create a newPublisherinstance based on the passed-in publisher name. -
Line 66 sets the
book.authorinstance to theauthorinstance. This creates the relationship between the author and the book, which SQLAlchemy will create in the database when the session is committed. -
Line 67 adds the
publisherinstance to thebook.publishersverzameling. This creates the many-to-many relationship between thebookandpublishertables. SQLAlchemy will create references in the tables as well as in thebook_publisherassociation table that connects the two. -
Line 68 adds the
Bookinstance to the session, making it part of the session’s unit of work. -
Line 71 commits all the creations and updates to the database.
There are a few things to take note of here. First, there’s is no mention of the author_publisher or book_publisher association tables in either the queries or the creations and updates. Because of the work you did in models.py setting up the relationships, SQLAlchemy can handle connecting objects together and keeping those tables in sync during creations and updates.
Second, all the creations and updates happen within the context of the session voorwerp. None of that activity is touching the database. Only when the session.commit() statement executes does the session then go through its unit of work and commit that work to the database.
For example, if a new Book instance is created (as in line 37 above), then the book has its attributes initialized except for the book_id primary key and author_id foreign key. Because no database activity has happened yet, the book_id is unknown, and nothing was done in the instantiation of book to give it an author_id .
When session.commit() is executed, one of the things it will do is insert book into the database, at which point the database will create the book_id primary key. The session will then initialize the book.book_id value with the primary key value created by the database engine.
session.commit() is also aware of the insertion of the Book instance in the author.books verzameling. The author object’s author_id primary key will be added to the Book instance appended to the author.books collection as the author_id foreign key.
Providing Access to Multiple Users
To this point, you’ve seen how to use pandas, SQLite, and SQLAlchemy to access the same data in different ways. For the relatively straightforward use case of the author, book, and publisher data, it could still be a toss-up whether you should use a database.
One deciding factor when choosing between using a flat file or a database is data and relationship complexity. If the data for each entity is complicated and contains many relationships between the entities, then creating and maintaining it in a flat file might become more difficult.
Another factor to consider is whether you want to share the data between multiple users. The solution to this problem might be as simple as using a sneakernet to physically move data between users. Moving data files around this way has the advantage of ease of use, but the data can quickly get out of sync when changes are made.
The problem of keeping the data consistent for all users becomes even more difficult if the users are remote and want to access the data across networks. Even when you’re limited to a single language like Python and using pandas to access the data, network file locking isn’t sufficient to ensure the data doesn’t get corrupted.
Providing the data through a server application and a user interface alleviates this problem. The server is the only application that needs file-level access to the database. By using a database, the server can take advantage of SQL to access the data using a consistent interface no matter what programming language the server uses.
The last example program demonstrates this by providing a web application and user interface to the Chinook sample SQLite database. Peter Stark generously maintains the Chinook database as part of the SQLite Tutorial site. If you’d like to learn more about SQLite and SQL in general, then the site is a great resource.
The Chinook database provides artist, music, and playlist information along the lines of a simplified Spotify. The database is part of the example code project in the project/data folder.
Using Flask With Python, SQLite, and SQLAlchemy
The examples/example_3/chinook_server.py program creates a Flask application that you can interact with using a browser. The application makes use of the following technologies:
-
Flask Blueprint is part of Flask and provides a good way to follow the separation of concerns design principle and create distinct modules to contain functionality.
-
Flask SQLAlchemy is an extension for Flask that adds support for SQLAlchemy in your web applications.
-
Flask_Bootstrap4 packages the Bootstrap front-end tool kit, integrating it with your Flask web applications.
-
Flask_WTF extends Flask with WTForms, giving your web applications a useful way to generate and validate web forms.
-
python_dotenv is a Python module that an application uses to read environment variables from a file and keep sensitive information out of program code.
Though not necessary for this example, a .env file holds the environment variables for the application. The .env file exists to contain sensitive information like passwords, which you should keep out of your code files. However, the content of the project .env file is shown below since it doesn’t contain any sensitive data:
SECRET_KEY = "you-will-never-guess"
SQLALCHEMY_TRACK_MODIFICATIONS = False
SQLAlCHEMY_ECHO = False
DEBUG = True
The example application is fairly large, and only some of it is relevant to this tutorial. For this reason, examining and learning from the code is left as an exercise for the reader. That said, you can take a look at an animated screen capture of the application below, followed by the HTML that renders the home page and the Python Flask route that provides the dynamic data.
Here’s the application in action, navigating through various menus and features:
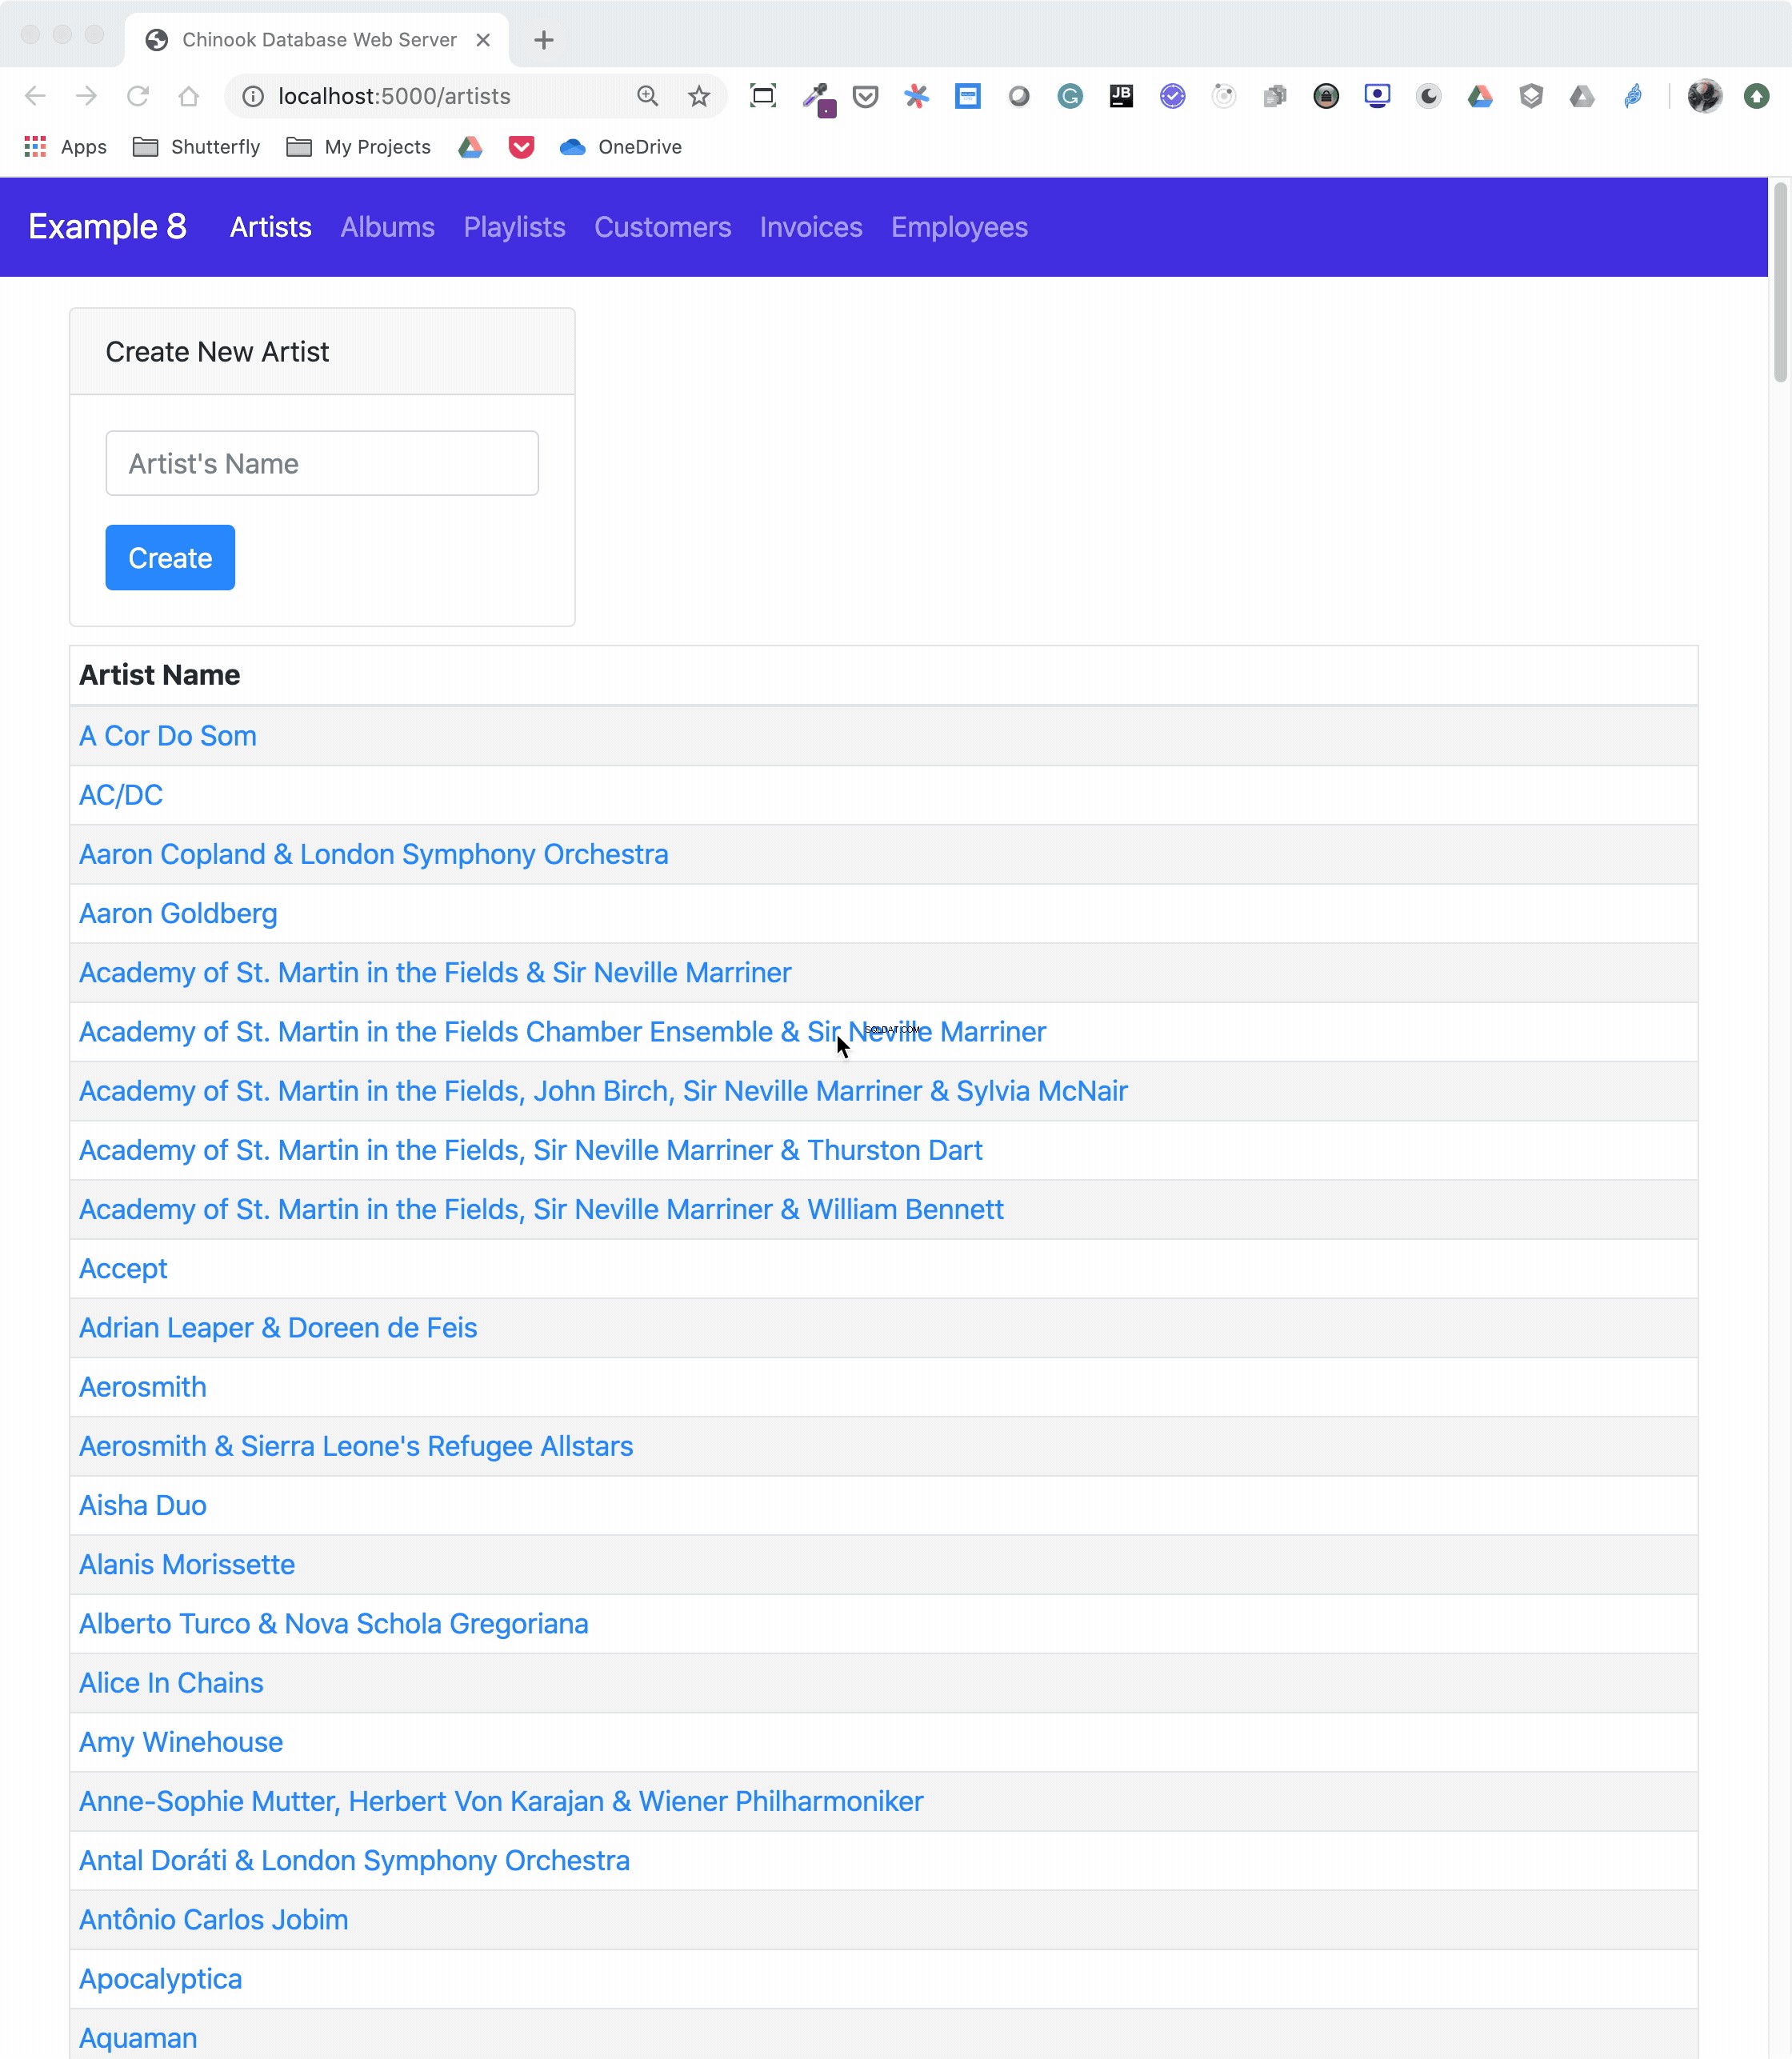
The animated screen capture starts on the application home page, styled using Bootstrap 4. The page displays the artists in the database, sorted in ascending order. The remainder of the screen capture presents the results of clicking on the displayed links or navigating around the application from the top-level menu.
Here’s the Jinja2 HTML template that generates the home page of the application:
 1{% extends "base.html" %}
 2
 3{% block content %}
 4<div class="container-fluid">
 5  <div class="m-4">
 6    <div class="card" style="width: 18rem;">
 7      <div class="card-header">Create New Artist</div>
 8      <div class="card-body">
 9        <form method="POST" action="{{url_for('artists_bp.artists')}}">
10          {{ form.csrf_token }}
11          {{ render_field(form.name, placeholder=form.name.label.text) }}
12          <button type="submit" class="btn btn-primary">Create</button>
13        </form>
14      </div>
15    </div>
16    <table class="table table-striped table-bordered table-hover table-sm">
17      <caption>List of Artists</caption>
18      <thead>
19        <tr>
20          <th>Artist Name</th>
21        </tr>
22      </thead>
23      <tbody>
24        {% for artist in artists %}
25        <tr>
26          <td>
27            <a href="{{url_for('albums_bp.albums', artist_id=artist.artist_id)}}">
28              {{ artist.name }}
29            </a>
30          </td>
31        </tr>
32        {% endfor %}
33      </tbody>
34    </table>
35  </div>
36</div>
37{% endblock %}
Here’s what’s going on in this Jinja2 template code:
-
Line 1 uses Jinja2 template inheritance to build this template from the
base.htmltemplate. Thebase.htmltemplate contains all the HTML5 boilerplate code as well as the Bootstrap navigation bar consistent across all pages of the site. -
Lines 3 to 37 contain the block content of the page, which is incorporated into the Jinja2 macro of the same name in the
base.htmlbase template. -
Lines 9 to 13 render the form to create a new artist. This uses the features of Flask-WTF to generate the form.
-
Lines 24 to 32 create a
forloop that renders the table of artist names. -
Lines 27 to 29 render the artist name as a link to the artist’s album page showing the songs associated with a particular artist.
Here’s the Python route that renders the page:
 1from flask import Blueprint, render_template, redirect, url_for
 2from flask_wtf import FlaskForm
 3from wtforms import StringField
 4from wtforms.validators import InputRequired, ValidationError
 5from app import db
 6from app.models import Artist
 7
 8# Set up the blueprint
 9artists_bp = Blueprint(
10    "artists_bp", __name__, template_folder="templates", static_folder="static"
11)
12
13def does_artist_exist(form, field):
14    artist = (
15        db.session.query(Artist)
16        .filter(Artist.name == field.data)
17        .one_or_none()
18    )
19    if artist is not None:
20        raise ValidationError("Artist already exists", field.data)
21
22class CreateArtistForm(FlaskForm):
23    name = StringField(
24        label="Artist's Name", validators=[InputRequired(), does_artist_exist]
25    )
26
27@artists_bp.route("/")
28@artists_bp.route("/artists", methods=["GET", "POST"])
29def artists():
30    form = CreateArtistForm()
31
32    # Is the form valid?
33    if form.validate_on_submit():
34        # Create new artist
35        artist = Artist(name=form.name.data)
36        db.session.add(artist)
37        db.session.commit()
38        return redirect(url_for("artists_bp.artists"))
39
40    artists = db.session.query(Artist).order_by(Artist.name).all()
41    return render_template("artists.html", artists=artists, form=form,)
Let’s go over what the above code is doing:
-
Lines 1 to 6 import all the modules necessary to render the page and initialize forms with data from the database.
-
Lines 9 to 11 create the blueprint for the artists page.
-
Lines 13 to 20 create a custom validator function for the Flask-WTF forms to make sure a request to create a new artist doesn’t conflict with an already existing artist.
-
Lines 22 to 25 create the form class to handle the artist form rendered in the browser and provide validation of the form field inputs.
-
Lines 27 to 28 connect two routes to the
artists()function they decorate. -
Line 30 creates an instance of the
CreateArtistForm()class. -
Line 33 determines if the page was requested through the HTTP methods GET or POST (submit). If it was a POST, then it also validates the fields of the form and informs the user if the fields are invalid.
-
Lines 35 to 37 create a new artist object, add it to the SQLAlchemy session, and commit the artist object to the database, persisting it.
-
Line 38 redirects back to the artists page, which will be rerendered with the newly created artist.
-
Line 40 runs an SQLAlchemy query to get all the artists in the database and sort them by
Artist.name. -
Line 41 renders the artists page if the HTTP request method was a GET.
You can see that a great deal of functionality is created by a reasonably small amount of code.
Creating a REST API Server
You can also create a web server providing a REST API. This kind of server offers URL endpoints responding with data, often in JSON format. A server providing REST API endpoints can be used by JavaScript single-page web applications through the use of AJAX HTTP requests.
Flask is an excellent tool for creating REST applications. For a multi-part series of tutorials about using Flask, Connexion, and SQLAlchemy to create REST applications, check out Python REST APIs With Flask, Connexion, and SQLAlchemy.
If you’re a fan of Django and are interested in creating REST APIs, then check out Django Rest Framework – An Introduction and Create a Super Basic REST API with Django Tastypie.
Note: It’s reasonable to ask if SQLite is the right choice as the database backend to a web application. The SQLite website states that SQLite is a good choice for sites that serve around 100,000 hits per day. If your site gets more daily hits, the first thing to say is congratulations!
Beyond that, if you’ve implemented your website with SQLAlchemy, then it’s possible to move the data from SQLite to another database such as MySQL or PostgreSQL. For a comparison of SQLite, MySQL, and PostgreSQL that will help you make decisions about which one will serve your application best, check out Introduction to Python SQL Libraries.
It’s well worth considering SQLite for your Python application, no matter what it is. Using a database gives your application versatility, and it might create surprising opportunities to add additional features.
Conclusion
You’ve covered a lot of ground in this tutorial about databases, SQLite, SQL, and SQLAlchemy! You’ve used these tools to move data contained in flat files to an SQLite database, access the data with SQL and SQLAlchemy, and provide that data through a web server.
In this tutorial, you’ve learned:
- Why an SQLite database can be a compelling alternative to flat-file data storage
- How to normalize data to reduce data redundancy and increase data integrity
- How to use SQLAlchemy to work with databases in an object-oriented manner
- How to build a web application to serve a database to multiple users
Working with databases is a powerful abstraction for working with data that adds significant functionality to your Python programs and allows you to ask interesting questions of your data.
You can get all of the code and data you saw in this tutorial at the link below:
Download the sample code: Click here to get the code you’ll use to learn about data management with SQLite and SQLAlchemy in this tutorial.
Further Reading
This tutorial is an introduction to using databases, SQL, and SQLAlchemy, but there’s much more to learn about these subjects. These are powerful, sophisticated tools that no single tutorial can cover adequately. Here are some resources for additional information to expand your skills:
-
If your application will expose the database to users, then avoiding SQL injection attacks is an important skill. For more information, check out Preventing SQL Injection Attacks With Python.
-
Providing web access to a database is common in web-based single-page applications. To learn how, check out Python REST APIs With Flask, Connexion, and SQLAlchemy – Part 2.
-
Preparing for data engineering job interviews gives you a leg up in your career. To get started, check out Data Engineer Interview Questions With Python.
-
Migrating data and being able to roll back using Flask with Postgres and SQLAlchemy is an integral part of the Software Development Life Cycle (SDLC). You can learn more about it by checking out Flask by Example – Setting up Postgres, SQLAlchemy, and Alembic.