We moeten overwegen om ProxySQL op clientknooppunten te installeren voor efficiënt beheer van de werkbelasting in het hele cluster zonder wijzigingen in de toepassingen die query's genereren. Dit is de aanbevolen high-availability-oplossing voor Percona XtraDB Cluster.
Enkele van de populaire functies van ProxySQL zijn:
- Hoge prestaties
- Efficiënt werklastbeheer
- Query cachen
- Doorsturen van zoekopdrachten
- Ondersteunt failover
- Geavanceerde configuratie met 0 uitvaltijd
- Toepassingslaagproxy
- Cross-platform
- Geavanceerde ondersteuning voor topologie
- Firewall
Omgevingsspecificatie:
192.168.56.115
centen
Vereisten:
We moeten onderstaande poorten op alle servers openen
firewall-cmd --zone=public --add-service=mysql --permanent

firewall-cmd --zone=public --add-port=3306/tcp --permanent
firewall-cmd --zone=public --add-port=4567/tcp --permanent
firewall-cmd --zone=public --add-port=4568/tcp --permanent
firewall-cmd --zone=public --add-port=4444/tcp --permanent
firewall-cmd --zone=public --add-port=4567/udp --permanent
Sta ProxySQL-servicepoort 6033/tcp toe (het is het omgekeerde van MySQL-standaardpoort 3306) in Linux Firewall.
firewall-cmd --permanent --add-port=6033/tcp

firewall-cmd --reload
ProxySQL Load Balancer installeren voor Percona XtraDB Cluster op CentOS 7
ProxySQL v2 ondersteunt native Percona XtraDB Cluster. Om ProxySql te installeren, installeert u het vanuit de percona-repository
sudo yum install proxysql2
Om verbinding te maken met de ProxySQL-beheerdersinterface, hebt u een MySQL-client nodig.
yum install Percona-XtraDB-Cluster-client-57
Start nu de proxysql-service
[example@sqldat.com ~]# systemctl start proxysql.service
Gebruik de onderstaande query om de poort op het clusterknooppunt te controleren.
mysql -uroot -p -e "SHOW GLOBAL VARIABLES LIKE 'PORT'";
Maak nu verbinding met het ProxySQL-beheerderspaneel en configureer de load balancer.
mysql -u admin -p123 -h 127.0.0.1 -P6032 --prompt='ProxySQL> '

INSERT INTO mysql_servers(hostgroup_id, hostname, port) VALUES (0,'192.168.56.110',3306);
INSERT INTO mysql_servers(hostgroup_id, hostname, port) VALUES (0,'192.168.56.113',3306);
INSERT INTO mysql_servers(hostgroup_id, hostname, port) VALUES (0,'192.168.56.114',3306);

ProxySQL> SELECT * FROM mysql_servers;
+--------------+----------------+------+-----------+--------+--------+-------------+-----------------+---------------------+---------+----------------+---------+
| hostgroup_id | hostname | port | gtid_port | status | weight | compression | max_connections | max_replication_lag | use_ssl | max_latency_ms | comment |
+--------------+----------------+------+-----------+--------+--------+-------------+-----------------+---------------------+---------+----------------+---------+
| 0 | 192.168.56.110 | 3306 | 0 | ONLINE | 1 | 0 | 1000 | 0 | 0 | 0 | |
| 0 | 192.168.56.113 | 3306 | 0 | ONLINE | 1 | 0 | 1000 | 0 | 0 | 0 | |
| 0 | 192.168.56.114 | 3306 | 0 | ONLINE | 1 | 0 | 1000 | 0 | 0 | 0 | |
+--------------+----------------+------+-----------+--------+--------+-------------+-----------------+---------------------+---------+----------------+---------+
3 rows in set (0.00 sec)
ProxySQL Nodes Monitoring configureren:
Log in op de MySQL-database-instantie en voer de volgende opdrachten uit om de bewakingsgebruiker te maken met het recht USAGE
op elke percona NODE:
CREATE USER 'proxysql'@'%' IDENTIFIED BY 'ProxySQL';
GRANT USAGE ON *.* TO 'proxysql'@'%';

mysql> CREATE USER 'proxysql'@'%' IDENTIFIED BY 'ProxySQL';
Query OK, 0 rows affected (0.01 sec)

mysql> GRANT USAGE ON *.* TO 'proxysql'@'%';
Query OK, 0 rows affected (0.02 sec)

UPDATE global_variables SET variable_value='proxysql' WHERE variable_name='mysql-monitor_username';

UPDATE global_variables SET variable_value='ProxySQL' WHERE variable_name='mysql-monitor_password';

LOAD MYSQL VARIABLES TO RUNTIME;

SAVE MYSQL VARIABLES TO DISK;

ProxySQL> UPDATE global_variables SET variable_value='proxysql' WHERE variable_name='mysql-monitor_username';
Query OK, 1 row affected (0.01 sec)

ProxySQL> UPDATE global_variables SET variable_value='ProxySQL' WHERE variable_name='mysql-monitor_password';
Query OK, 1 row affected (0.00 sec)

ProxySQL> LOAD MYSQL VARIABLES TO RUNTIME;
Query OK, 0 rows affected (0.00 sec)

ProxySQL> SAVE MYSQL VARIABLES TO DISK;
Query OK, 136 rows affected (0.01 sec)

ProxySQL> LOAD MYSQL SERVERS TO RUNTIME;
Query OK, 0 rows affected (0.01 sec)
ProxySQL-clientgebruiker maken
Provide read/write access to the cluster for ProxySQL, add this user on one of the Percona XtraDB Cluster nodes:

CREATE USER 'lbuser'@'192.168.56.115' IDENTIFIED BY 'lbpass';

GRANT ALL ON *.* TO 'lbuser'@'192.168.56.115';
ProxySQL-clientgebruiker maken:
ProxySQL> INSERT INTO mysql_users (username,password) VALUES ('lbuser','lbpass');
Query OK, 1 row affected (0.00 sec)
ProxySQL> LOAD MYSQL USERS TO RUNTIME;
Query OK, 0 rows affected (0.00 sec)
ProxySQL> SAVE MYSQL USERS TO DISK;
Query OK, 0 rows affected (0.02 sec)
bevestig dat de gebruiker correct is ingesteld, u kunt proberen in te loggen:
[example@sqldat.com ~]# mysql -u lbuser -plbpass -h 127.0.0.1 -P 6033
mysql: [Warning] Using a password on the command line interface can be insecure.
Welcome to the MySQL monitor. Commands end with ; or \g.
Your MySQL connection id is 4
Server version: 5.5.30 (ProxySQL)

Copyright (c) 2009-2019 Percona LLC and/or its affiliates
Copyright (c) 2000, 2019, Oracle and/or its affiliates. All rights reserved.

Oracle is a registered trademark of Oracle Corporation and/or its
affiliates. Other names may be trademarks of their respective
owners.
Type 'help;' or '\h' for help. Type '\c' to clear the current input statement.
mysql>
Laten we eens kijken met welk knooppunt onze client verbinding gaat maken van het cluster.
[example@sqldat.com ~]# mysql -u lbuser -plbpass -h 127.0.0.1 -P 6033 -e "select @@hostname;";
mysql: [Warning] Using a password on the command line interface can be insecure.
+----------------------+
| @@hostname |
+----------------------+
| percona3.localdomain |
+----------------------+
u kunt zien dat de proxyserver is verbonden met percona3
Ik heb het geprobeerd vanuit een andere putty-sessie en vervolgens wordt het verbonden met percona2:
[example@sqldat.com ~]# mysql -u lbuser -plbpass -h 127.0.0.1 -P 6033 -e "select @@hostname;";
mysql: [Warning] Using a password on the command line interface can be insecure.
+----------------------+
| @@hostname |
+----------------------+
| percona2.localdomain |
+----------------------+
Na een paar meervoudige sessies wordt het verbonden met percona1:
[example@sqldat.com ~]# mysql -u lbuser -plbpass -h 127.0.0.1 -P 6033 -e "select @@hostname;";
mysql: [Warning] Using a password on the command line interface can be insecure.
+----------------------+
| @@hostname |
+----------------------+
| percona1.localdomain |
+----------------------+
Verbinding maken vanaf MySQL Workbench:
Hieronder staan de configuratie van mijn sessie in MySQL workbench:
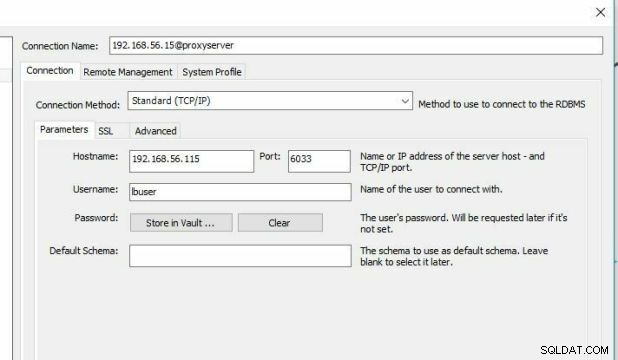
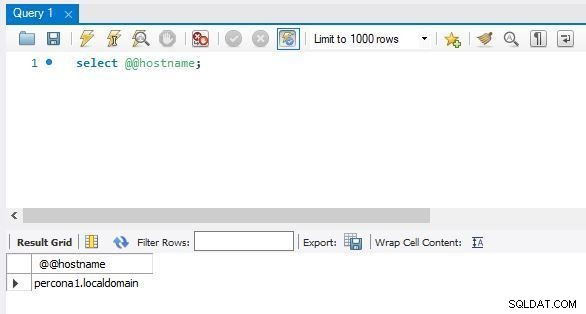
Ik heb geprobeerd te zien welke Node verbinding zal maken vanuit MySQL Workbench
Failover:
Nu gaan we kijken hoe dit de failover zal uitvoeren
[example@sqldat.com mysql]# service mysql stop
Redirecting to /bin/systemctl stop mysql.service

ProxySQL> select hostgroup_id,hostname,port,status from runtime_mysql_servers;
+--------------+----------------+------+---------+
| hostgroup_id | hostname | port | status |
+--------------+----------------+------+---------+
| 0 | 192.168.56.110 | 3306 | ONLINE |
| 0 | 192.168.56.114 | 3306 | SHUNNED |
| 0 | 192.168.56.113 | 3306 | ONLINE |
+--------------+----------------+------+---------+
3 rows in set (0.01 sec)
Start nu de mysql opnieuw op node 3 en controleer de clusterstatus opnieuw vanaf de proxyserver
[example@sqldat.com mysql]#systemctl start mysql.service

ProxySQL> SELECT hostgroup_id hg,count(status) cnt from main.runtime_mysql_servers WHERE status = "ONLINE" GROUP BY hg having cnt ;
+----+-----+
| hg | cnt |
+----+-----+
| 0 | 3 |
+----+-----+
1 row in set (0.00 sec)

ProxySQL> select hostgroup_id,hostname,port,status from runtime_mysql_servers;
+--------------+----------------+------+--------+
| hostgroup_id | hostname | port | status |
+--------------+----------------+------+--------+
| 0 | 192.168.56.110 | 3306 | ONLINE |
| 0 | 192.168.56.114 | 3306 | ONLINE |
| 0 | 192.168.56.113 | 3306 | ONLINE |
+--------------+----------------+------+--------+
3 rows in set (0.00 sec)
OPMERKING: Als je de node-status ziet als GESCHILDERD probeer vervolgens meerdere keren verbinding te maken, zodat de client de nieuwste status van het cluster krijgt, aangezien runtime_mysql_servers de laatste status van het knooppunt opslaan toen het de vorige keer werd geprobeerd verbinding te maken.
Cluster testen met sysbench:
yum install sysbench
sysbench vereist ProxySQL-clientgebruikersreferenties die u hebt gemaakt (lbuser/lbpass) in ProxySQL-clientgebruiker maken.
sysbench /usr/share/sysbench/oltp_read_only.lua --threads=4 --mysql-host=127.0.0.1
--mysql-user=lbuser --mysql-password=lbpass --mysql-port=6033 --tables=10 --table-size=10000 prepare

sysbench /usr/share/sysbench/oltp_read_only.lua --threads=4 --events=0 --time=300 --mysql-host=27.0.0.1
--mysql-user=lbuser --mysql-password=lbpass --mysql-port=6033 --tables=10
--table-size=10000 --range_selects=off --db-ps-mode=disable --report-interval=1 run
Om het aantal opdrachten te zien dat op het cluster wordt uitgevoerd:
proxysql> SELECT * FROM stats_mysql_commands_counters;