We hebben al enige theorie behandeld over het configureren van Always ON-beschikbaarheidsgroepen voor op Linux gebaseerde SQL-servers. Het huidige artikel zal zich richten op de praktijk.
We gaan het stapsgewijze proces presenteren voor het configureren van de SQL Server Always ON-beschikbaarheidsgroepen tussen twee synchrone replica's. We zullen ook het gebruik van de replica met alleen configuratie benadrukken om automatische failover uit te voeren.
Voordat we beginnen, raad ik je aan om naar dat vorige artikel te verwijzen en je kennis op te frissen.
Het onderstaande ontwerpdiagram toont de synchrone replica met twee knooppunten en een replica met alleen configuratie die ons helpen automatische failover en gegevensbescherming te garanderen.
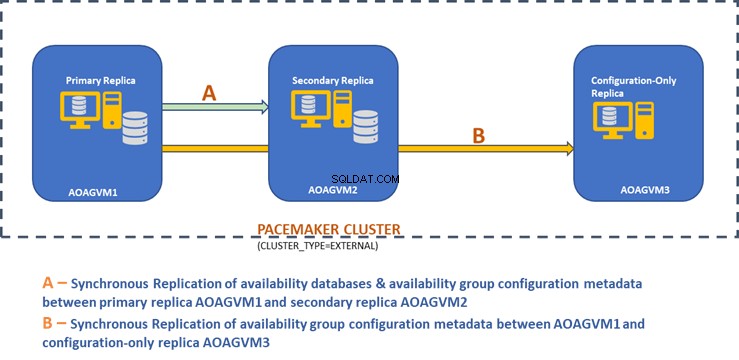
We hebben dit ontwerp onderzocht in het eerder genoemde artikel, dus raadpleeg het voor informatie voordat we verder gaan met praktische taken.
SQL Server installeren op Ubuntu-systemen
Het bovenstaande ontwerpdiagram vermeldt 3 Ubuntu-systemen - aoagvm1 , aoagvm2 , en aoagvm3 met de SQL Server-instanties geïnstalleerd. Raadpleeg de instructie over het installeren van SQL Server op Ubuntu – het voorbeeld heeft betrekking op SQL Server 2019 op het Ubuntu 18.04-systeem. U kunt doorgaan en SQL Server 2019 op alle 3 knooppunten installeren (zorg ervoor dat u dezelfde buildversie installeert).
Om licentiekosten te besparen, kunt u de SQL Server Express-editie voor de derde node-replica installeren. Deze zal werken als een configuratie-only replica zonder enige beschikbaarheidsdatabases te hosten.
Zodra SQL Server op alle 3 de nodes is geïnstalleerd, kunnen we de beschikbaarheidsgroep ertussen configureren.
Beschikbaarheidsgroepen configureren tussen drie knooppunten
Valideer uw omgeving voordat u doorgaat:
- Zorg ervoor dat er communicatie is tussen alle 3 knooppunten.
- Controleer en update de computernaam voor elke host door het commando sudo vi /etc/hostname uit te voeren
- Werk het hostbestand bij met het IP-adres en de knooppuntnamen voor elk knooppunt. U kunt het commando sudo vi /etc/hosts . gebruiken om dit voor elkaar te krijgen
- Zorg ervoor dat alle instanties na SQL Server 2017 CU1 draaien als u SQL Server 2019 niet gebruikt
Laten we nu beginnen met het configureren van de SQL Server Always ON-beschikbaarheidsgroep tussen 3-knooppunten. We moeten de functie Beschikbaarheidsgroep inschakelen op alle 3 knooppunten.
Voer de onderstaande opdracht uit (houd er rekening mee dat u de SQL Server-service na die actie opnieuw moet starten):
--Enable Availability Group feature
sudo /opt/mssql/bin/mssql-conf set hadr.hadrenabled  1

--Restart SQL Server service
sudo systemctl restart mssql-server
Ik heb het bovenstaande commando uitgevoerd op het primaire knooppunt. Het moet worden herhaald voor de resterende twee knooppunten.
De uitvoer is hieronder - voer de gebruikersnaam en het wachtwoord in wanneer daarom wordt gevraagd.
example@sqldat.com:~$ sudo /opt/mssql/bin/mssql-conf set hadr.hadrenabled  1
SQL Server needs to be restarted to apply this setting. Please run
'systemctl restart mssql-server.service'.

example@sqldat.com:~$ systemctl restart mssql-server
==== AUTHENTICATING FOR org.freedesktop.systemd1.manage-units ===
Authentication is required to restart 'mssql-server.service'.
Authenticating as: Ubuntu (aoagvm1)
Password:
De volgende stap is het inschakelen van de Always ON uitgebreide evenementen voor elk exemplaar van SQL Server. Hoewel dit een optionele stap is, moet u deze inschakelen om eventuele problemen op te lossen die later kunnen optreden. Maak verbinding met de SQL Server-instantie met behulp van SQLCMD en voer het onderstaande commando uit:
--Connect to the local SQL Server instance using sqlcmd
sqlcmd -S localhost -U SA -P 'C0de!n$!ght$'
Go
ALTER EVENT SESSION  AlwaysOn_health ON SERVER WITH (STARTUP_STATE=ON);
Go
De uitvoer is hieronder:
example@sqldat.com:~$ sqlcmd -S localhost -U SA -P 'C0de!n$!ght$'
1>ALTER EVENT SESSION  AlwaysOn_health ON SERVER WITH (STARTUP_STATE=ON);
2>GO
1>
Zodra u deze optie op het primaire replicaknooppunt heeft ingeschakeld, doet u hetzelfde voor de overige aoagvm2- en aoagvm3-knooppunten.
De SQL Server-instanties die op Linux worden uitgevoerd, gebruiken certificaten om de communicatie tussen de mirroring-eindpunten te verifiëren. De volgende optie is dus om het certificaat te maken op de primaire replica aoagvm1 .
Eerst maken we een hoofdsleutel en een certificaat aan. Vervolgens maken we een back-up van dit certificaat in een bestand en beveiligen we het bestand met een private key. Voer het onderstaande T-SQL-script uit op het primaire replicaknooppunt:
--Connect to the local SQL Server instance using sqlcmd
sqlcmd -S localhost -U SA -P 'C0de!n$!ght$'

--Configure Certificates
CREATE MASTER KEY ENCRYPTION BY PASSWORD = 'example@sqldat.com$terKEY';
CREATE CERTIFICATE dbm_certificate WITH SUBJECT = 'dbm';
BACKUP CERTIFICATE dbm_certificate TO FILE = '/var/opt/mssql/data/dbm_certificate.cer'
WITH PRIVATE KEY (FILE = '/var/opt/mssql/data/dbm_certificate.pvk',ENCRYPTION BY PASSWORD = 'example@sqldat.com');
De uitvoer:
example@sqldat.com:~$ sqlcmd -S localhost -U SA -P 'C0de!n$!ght$'
1>CREATE MASTER KEY ENCRYPTION BY PASSWORD = 'example@sqldat.com$terKEY';
2>CREATE CERTIFICATE dbm_certificate WITH SUBJECT = 'dbm';
3>GO
1>BACKUP CERTIFICATE dbm_certificate TO FILE = '/var/opt/mssql/data/dbm_certificate.cer'
2>WITH PRIVATE KEY (FILE = '/var/opt/mssql/data/dbm_certificate.pvk',ENCRYPTION BY PASSWORD = 'example@sqldat.com');
3>GO
1>
Het primaire replicaknooppunt heeft nu twee nieuwe bestanden. Een daarvan is het certificaatbestand dbm_certificate.cer en het privésleutelbestand dbm_certificate.pvk op de /var/opt/mssql/data/ locatie.
Kopieer de bovenstaande twee bestanden naar dezelfde locatie op de resterende twee knooppunten (AOAGVM2 en AOAGVM3) die zullen deelnemen aan de configuratie van de beschikbaarheidsgroep. U kunt de SCP-opdracht of een hulpprogramma van derden gebruiken om deze twee bestanden naar de doelserver te kopiëren.
Zodra de bestanden zijn gekopieerd naar de resterende twee knooppunten, zullen we machtigingen toewijzen aan de mssql gebruiker om toegang te krijgen tot deze bestanden op alle 3 knooppunten. Voer daarvoor de onderstaande opdracht uit en voer deze vervolgens uit voor het 3e knooppunt aoagvm3 ook:
--Copy files to aoagvm2 node
cd /var/opt/mssql/data
scp dbm_certificate.* example@sqldat.com:var/opt/mssql/data/

--Grant permission to user mssql to access both newly created files
cd /var/opt/mssql/data
chown mssql:mssql dbm_certificate.*
We zullen de hoofdsleutel- en certificaatbestanden maken met behulp van de bovenstaande twee gekopieerde bestanden op de resterende twee knooppunten aoagvm2 en aoagvm3 . Voer de onderstaande opdracht uit op die twee knooppunten om de hoofdsleutel . te maken :
--Create master key and certificate on remaining two nodes
CREATE MASTER KEY ENCRYPTION BY PASSWORD = 'example@sqldat.com$terKEY';
CREATE CERTIFICATE dbm_certificate
    FROM FILE = '/var/opt/mssql/data/dbm_certificate.cer'
    WITH PRIVATE KEY (FILE = '/var/opt/mssql/data/dbm_certificate.pvk', DECRYPTION BY PASSWORD = 'example@sqldat.com');
Ik heb het bovenstaande commando uitgevoerd op het tweede knooppunt aoagvm2 om de hoofdsleutel te maken en certificaat . Bekijk de uitvoer van de uitvoering. Zorg ervoor dat u dezelfde wachtwoorden gebruikt als bij het maken en back-uppen van het certificaat en de hoofdsleutel.
example@sqldat.com:~$ sqlcmd -S localhost -U SA -P 'C0de!n$!ght$'
1>CREATE MASTER KEY ENCRYPTION BY PASSWORD = 'example@sqldat.com$terKEY';
2>CREATE CERTIFICATE dbm_certificate
3>FROM FILE = '/var/opt/mssql/data/dbm_certificate.cer'
4>WITH PRIVATE KEY (FILE = '/var/opt/mssql/data/dbm_certificate.pvk', DECRYPTION BY PASSWORD = 'example@sqldat.com');
5>GO
1>
Voer de bovenstaande opdracht uit op de AOAGVM3 knooppunt ook.
Nu configureren we database-mirroring-eindpunten - eerder hebben we er certificaten voor gemaakt. Het mirroring-eindpunt genaamd hadr_endpoint zou op alle 3 de nodes moeten zijn volgens hun respectievelijke roltype.
Omdat beschikbaarheidsdatabases op slechts 2 knooppunten worden gehost aoagvm1 en aoagvm2, we zullen het onderstaande statement alleen op die knooppunten uitvoeren. Het derde knooppunt zal fungeren als een getuige - dus we zullen gewoon veranderen ROLE om getuige te zijn in het onderstaande script en voer vervolgens de T-SQL uit naar het derde knooppunt aoagvm3 . Het script is:
--Configure database mirroring endpoint Hadr_endpoint on nodes aoagvm1 and aoagvm2
CREATE ENDPOINT [Hadr_endpoint]
    AS TCP (LISTENER_PORT = 5022)
    FOR DATABASE_MIRRORING (ROLE = ALL,
	    AUTHENTICATION = CERTIFICATE dbm_certificate,
		ENCRYPTION = REQUIRED ALGORITHM AES);

--Start the newly created endpoint
ALTER ENDPOINT [Hadr_endpoint] STATE = STARTED;
Hier is de uitvoer van de bovenstaande opdracht op het primaire replicaknooppunt. Ik heb verbinding gemaakt met sqlcmd en voerde het uit. Zorg ervoor dat u hetzelfde doet op het 2e replicaknooppunt aoagvm2 ook.
example@sqldat.com:~$ sqlcmd -S localhost -U SA -P 'C0de!n$!ght$'
1>CREATE ENDPOINT [Hadr_endpoint]
2>AS TCP (LISTENER_PORT = 5022)
3>FOR DATABASE_MIRRORING (ROLE = ALL, AUTHENTICATION = CERTIFICATE dbm_certificate, ENCRYPTION = REQUIRED ALGORITHM AES);
4>Go
1>ALTER ENDPOINT [Hadr_endpoint] STATE = STARTED;
2>Go
1>
Nadat u het bovenstaande T-SQL-script op de eerste 2 knooppunten heeft uitgevoerd, moeten we het voor het derde knooppunt wijzigen - verander de ROL in GETUIGE.
Voer het onderstaande script uit om het database-mirroring-eindpunt te maken op hetwitnessknooppunt AOAGVM3 . Als u daar beschikbaarheidsdatabases wilt hosten, voert u de bovenstaande opdracht ook uit op het 3 replicaknooppunt. Maar zorg ervoor dat u de juiste editie van SQL Server hebt geïnstalleerd om deze mogelijkheid te bereiken.
Als u de SQL Server Express-editie op de 3 node hebt geïnstalleerd om alleen configuratie te implementeren replica , u kunt alleen ROLE . configureren als een getuige voor dit knooppunt:
--Connect to the local SQL Server instance using sqlcmd
sqlcmd -S localhost -U SA -P 'C0de!n$!ght$'

----Configure database mirroring endpoint Hadr_endpoint on 3rd node aoagvm3
CREATE ENDPOINT [Hadr_endpoint]
    AS TCP (LISTENER_PORT = 5022)
    FOR DATABASE_MIRRORING (ROLE = WITNESS, AUTHENTICATION = CERTIFICATE dbm_certificate, ENCRYPTION = REQUIRED ALGORITHM AES);

--Start the newly created endpoint on aoagvm3
ALTER ENDPOINT [Hadr_endpoint] STATE = STARTED;
Nu moeten we de Beschikbaarheidsgroep maken met de naam ag1 .
Maak verbinding met de SQL Server-instantie met behulp van de sqlcmd hulpprogramma en voer het onderstaande commando uit op het primaire replicaknooppunt aoagvm1 :
--Connect to the local SQL Server instance using sqlcmd hosted on primary replica node aoagvm1
sqlcmd -S localhost -U SA -P 'C0de!n$!ght$'

--Create availability group ag1
CREATE AVAILABILITY GROUP [ag1]
    WITH (CLUSTER_TYPE = EXTERNAL)
    FOR REPLICA ON
     N'aoagvm1’ WITH (ENDPOINT_URL = N'tcp://aoagvm1:5022',
        AVAILABILITY_MODE = SYNCHRONOUS_COMMIT,
        FAILOVER_MODE = EXTERNAL,
        SEEDING_MODE = AUTOMATIC),
     N'aoagvm2' WITH (ENDPOINT_URL = N'tcp://aoagvm2:5022',
        AVAILABILITY_MODE = SYNCHRONOUS_COMMIT,
        FAILOVER_MODE = EXTERNAL,
        SEEDING_MODE = AUTOMATIC),
     N'aoagvm3' WITH (ENDPOINT_URL = N'tcp://aoagvm3:5022',
        AVAILABILITY_MODE = CONFIGURATION_ONLY);

--Assign required permission
ALTER AVAILABILITY GROUP [ag1] GRANT CREATE ANY DATABASE;
Het bovenstaande script configureert de beschikbaarheidsgroepreplica's met de onderstaande configuratieparameters (we hebben ze zojuist gebruikt in het T-SQL-script):
- CLUSTER_TYPE =EXTERN omdat we de beschikbaarheidsgroep configureren op Linux-gebaseerde SQL Server-installaties
- SEEDING_MODE =AUTOMATISCH zorgt ervoor dat SQL Server automatisch een database maakt op elke secundaire replica. Beschikbaarheidsdatabases worden niet gemaakt op replica's met alleen configuratie
- FAILOVER_MODE =EXTERN voor zowel primaire als secundaire replica's. het betekent dat de replica samenwerkt met een externe clusterresourcemanager, zoals Pacemaker
- AVAILABILITY_MODE =SYNCHRONOUS_COMMIT voor primaire en secundaire replica's voor automatische failover
- AVAILABILITY_MODE =ALLEEN CONFIGURATION_ voor 3e replica die werkt als een replica met alleen configuratie
We moeten ook een Pacemaker-login maken op alle SQL Server-instanties. Aan deze gebruiker moet de ALTER . worden toegewezen , CONTROLE , en VIEW DEFINITIE machtigingen voor de beschikbaarheidsgroep op alle replica's. Als u machtigingen wilt verlenen, voert u het onderstaande T-SQL-script onmiddellijk uit op alle drie de replicaknooppunten. Eerst maken we een Pacemaker-login. Vervolgens zullen we de bovenstaande rechten aan die login toewijzen.
--Create pacemaker login on each SQL Server instance. Run below commands on all 3 SQL Server instances
CREATE LOGIN pacemaker WITH PASSWORD = 'example@sqldat.com@12'

--Grant permission to pacemaker login on newly created availability group. Run it on all 3 SQL Server instances
GRANT ALTER, CONTROL, VIEW DEFINITION ON AVAILABILITY GROUP::ag1 TO pacemaker
GRANT VIEW SERVER STATE TO pacemaker
Nadat we de juiste machtigingen hebben toegewezen aan de Pacemaker-login op alle 3 replica's, voeren we de onderstaande T-SQL-scripts uit om deel te nemen aan de secundaire replica's aoagvm2 en aoagvm3 naar de nieuw gemaakte beschikbaarheidsgroep ag1 . Voer de onderstaande opdrachten uit op de secundaire replica's aoagvm2 en aoagvm3 .
--Execute below commands on aoagvm2 and aoagvm3 to join availability group ag1
ALTER AVAILABILITY GROUP [ag1] JOIN WITH (CLUSTER_TYPE = EXTERNAL);
ALTER AVAILABILITY GROUP [ag1] GRANT CREATE ANY DATABASE;
Hieronder vindt u de uitvoer van de bovenstaande uitvoeringen op knooppunt aoagvm2 . Zorg ervoor dat u het uitvoert op de aoagvm3 knooppunt ook.
example@sqldat.com:~$ sqlcmd -S localhost -U SA -P 'C0de!n$!ght$'
1>ALTER AVAILABILITY GROUP [ag1] JOIN WITH (CLUSTER_TYPE = EXTERNAL);
2>Go
1>ALTER AVAILABILITY GROUP [ag1] GRANT CREATE ANY DATABASE;
2>Go
1>
Daarom hebben we de Beschikbaarheidsgroep geconfigureerd. Nu moeten we een gebruiker of een testdatabase toevoegen aan deze beschikbaarheidsgroep. Als u al een gebruikersdatabase op de replica van het primaire knooppunt hebt gemaakt, voert u gewoon een volledige back-up uit en laat u deze automatisch herstellen op het secundaire knooppunt.
Voer dus het onderstaande commando uit:
--Run a full backup of test database or user database hosted on primary replica aoagvm1
BACKUP DATABASE [Test] TO DISK = N'/var/opt/mssql/data/Test_15June.bak';
Laten we deze database toevoegen Test naar de Beschikbaarheidsgroep ag1 . Voer de onderstaande T-SQL-instructie uit op het primaire knooppunt aoagvm1 . U kunt de sqlcmd . gebruiken hulpprogramma om T-SQL-instructies uit te voeren.
--Add user database or test database to the availability group ag1
ALTER AVAILABILITY GROUP [ag1] ADD DATABASE [Test];
U kunt de gebruikersdatabase of een testdatabase die u aan de beschikbaarheidsgroep hebt toegevoegd, controleren door naar het secundaire SQL Server-exemplaar te kijken, ongeacht of het op secundaire replica's is gemaakt of niet. U kunt SQL Server Management Studio gebruiken of een eenvoudige T-SQL-instructie uitvoeren om de details over deze database op te halen.
--Verify test database is created on a secondary replica or not. Run it on secondary replica aoagvm2.
SELECT * FROM sys.databases WHERE name = 'Test';
GO
U krijgt de Test database gemaakt op de secundaire replica.
Met de bovenstaande stap is de AlwaysOn-beschikbaarheidsgroep geconfigureerd tussen alle drie de knoop punten. Deze knooppunten zijn echter nog niet geclusterd. Onze volgende stap is het installeren van de Pacemaker op hen clusteren. Dan voegen we de Beschikbaarheidsgroep ag1 . toe als hulpbron voor dat cluster.
PACEMAKER-clusterconfiguratie tussen drie knooppunten
We gebruiken dus een externe clusterbronmanager PACEMAKER tussen alle 3 knooppunten voor clusterondersteuning. Laten we beginnen met het inschakelen van de firewallpoorten tussen alle 3 knooppunten.
Open firewall-poorten met behulp van de onderstaande opdracht:
--Run the below commands on all 3 nodes to open Firewall Ports
sudo ufw allow 2224/tcp
sudo ufw allow 3121/tcp
sudo ufw allow 21064/tcp
sudo ufw allow 5405/udp
sudo ufw allow 1433/tcp
sudo ufw allow 5022/tcp
sudo ufw reload

--If you don't want to open specific firewall ports then alternatively you can disable the firewall on all 3 nodes by running the below command (THIS IS ALTERNATE & OPTIONAL APPROACH)
sudo ufw disable
Zie de uitvoer - deze is van de primaire replica AOAGVM1 . U moet de bovenstaande opdrachten één voor één op alle drie de knooppunten uitvoeren. De uitvoer zou vergelijkbaar moeten zijn.
example@sqldat.com:~$ sudo ufw allow 2224/tcp
Rules updated
Rules updated (v6)

example@sqldat.com:~$ sudo ufw allow 3121/tcp
Rules updated
Rules updated (v6)

example@sqldat.com:~$ sudo ufw allow 21064/tcp
Rules updated
Rules updated (v6)

example@sqldat.com:~$ sudo ufw allow 5405/udp
Rules updated
Rules updated (v6)

example@sqldat.com:~$ sudo ufw allow 1433/tcp
Rules updated
Rules updated (v6)

example@sqldat.com:~$ sudo ufw allow 5022/tcp
Rules updated
Rules updated (v6)

example@sqldat.com:~$ sudo ufw reload
Firewall not enabled (skipping reload)
Installeer Pacemaker en corosync pakketten op alle 3 knooppunten. Voer de onderstaande opdracht uit op elk knooppunt - het zal Pacemaker configureren , corosync , en schermagent .
--Install Pacemaker packages on all 3 nodes aoagvm1, aoagvm2 and aoagvm3 by running the below command
sudo apt-get install pacemaker pcs fence-agents resource-agents
De output is enorm – bijna 20 pagina's. Ik heb de eerste en laatste paar regels gekopieerd om het te illustreren (je kunt alle geïnstalleerde pakketten zien):
example@sqldat.com:~$ sudo apt-get install pacemaker pcs fence-agents resource-agents
Reading package lists... Done
Building dependency tree
Reading state information... Done
The following additional packages will be installed:
  cluster-glue corosync fonts-dejavu-core fonts-lato fonts-liberation ibverbs-providers javascript-common libcfg6 libcib4 libcmap4 libcorosync-common4 libcpg4
  libcrmcluster4 libcrmcommon3 libcrmservice3 libdbus-glib-1-2 libesmtp6 libibverbs1 libjs-jquery liblrm2 liblrmd1 libnet-telnet-perl libnet1 libnl-3-200
  libnl-route-3-200 libnspr4 libnss3 libopenhpi3 libopenipmi0 libpe-rules2 libpe-status10 libpengine10 libpils2 libplumb2 libplumbgpl2 libqb0 libquorum5 librdmacm1
  libruby2.5 libsensors4 libsgutils2-2 libsnmp-base libsnmp30 libstatgrab10 libstonith1 libstonithd2 libtimedate-perl libtotem-pg5 libtransitioner2 libvotequorum8
  libxml2-utils openhpid pacemaker-cli-utils pacemaker-common pacemaker-resource-agents python-pexpect python-ptyprocess python-pycurl python3-bs4 python3-html5lib
  python3-lxml python3-pycurl python3-webencodings rake ruby ruby-activesupport ruby-atomic ruby-backports ruby-did-you-mean ruby-ethon ruby-ffi ruby-highline
  ruby-i18n ruby-json ruby-mime-types ruby-mime-types-data ruby-minitest ruby-multi-json ruby-net-telnet ruby-oj ruby-open4 ruby-power-assert ruby-rack
  ruby-rack-protection ruby-rack-test ruby-rpam-ruby19 ruby-sinatra ruby-sinatra-contrib ruby-test-unit ruby-thread-safe ruby-tilt ruby-tzinfo ruby2.5
  rubygems-integration sg3-utils snmp unzip xsltproc zip
Suggested packages:
  ipmitool python-requests python-suds apache2 | lighttpd | httpd lm-sensors snmp-mibs-downloader python-pexpect-doc libcurl4-gnutls-dev python-pycurl-dbg
  python-pycurl-doc python3-genshi python3-lxml-dbg python-lxml-doc python3-pycurl-dbg ri ruby-dev bundler
The following NEW packages will be installed:
  cluster-glue corosync fence-agents fonts-dejavu-core fonts-lato fonts-liberation ibverbs-providers javascript-common libcfg6 libcib4 libcmap4 libcorosync-common4
  libcpg4 libcrmcluster4 libcrmcommon3 libcrmservice3 libdbus-glib-1-2 libesmtp6 libibverbs1 libjs-jquery liblrm2 liblrmd1 libnet-telnet-perl libnet1 libnl-3-200
  libnl-route-3-200 libnspr4 libnss3 libopenhpi3 libopenipmi0 libpe-rules2 libpe-status10 libpengine10 libpils2 libplumb2 libplumbgpl2 libqb0 libquorum5 librdmacm1
  libruby2.5 libsensors4 libsgutils2-2 libsnmp-base libsnmp30 libstatgrab10 libstonith1 libstonithd2 libtimedate-perl libtotem-pg5 libtransitioner2 libvotequorum8
  libxml2-utils openhpid pacemaker pacemaker-cli-utils pacemaker-common pacemaker-resource-agents pcs python-pexpect python-ptyprocess python-pycurl python3-bs4
  python3-html5lib python3-lxml python3-pycurl python3-webencodings rake resource-agents ruby ruby-activesupport ruby-atomic ruby-backports ruby-did-you-mean
  ruby-ethon ruby-ffi ruby-highline ruby-i18n ruby-json ruby-mime-types ruby-mime-types-data ruby-minitest ruby-multi-json ruby-net-telnet ruby-oj ruby-open4
  ruby-power-assert ruby-rack ruby-rack-protection ruby-rack-test ruby-rpam-ruby19 ruby-sinatra ruby-sinatra-contrib ruby-test-unit ruby-thread-safe ruby-tilt
  ruby-tzinfo ruby2.5 rubygems-integration sg3-utils snmp unzip xsltproc zip
0 upgraded, 103 newly installed, 0 to remove and 2 not upgraded.
Need to get 19.6 MB of archives.
After this operation, 86.0 MB of additional disk space will be used.
Do you want to continue? [Y/n] Y
Get:1 https://azure.archive.ubuntu.com/ubuntu bionic/main amd64 fonts-lato all 2.0-2 [2698 kB]
Get:2 https://azure.archive.ubuntu.com/ubuntu bionic/main amd64 libdbus-glib-1-2 amd64 0.110-2 [58.3 kB]
…………
--------
Zodra de Pacemaker clusterinstallatie is voltooid, de hacluster gebruiker wordt automatisch ingevuld tijdens het uitvoeren van de onderstaande opdracht:
example@sqldat.com:~$ cat /etc/passwd|grep hacluster
hacluster:x:111:115::/var/lib/pacemaker:/usr/sbin/nologin
Nu kunnen we het wachtwoord instellen voor de standaardgebruiker die is gemaakt tijdens de installatie van Pacemaker en de Corosync pakketjes. Zorg ervoor dat u op alle 3 de nodes hetzelfde wachtwoord gebruikt. Gebruik het onderstaande commando:
--Set default user password on all 3 nodes
sudo passwd hacluster
Voer het wachtwoord in wanneer daarom wordt gevraagd:
example@sqldat.com:~$ sudo passwd hacluster
Enter new UNIX password:
Retype new UNIX password:
passwd: password updated successfully
De volgende stap is het inschakelen en starten van de pcsd service en Pacemaker op alle 3 knooppunten. Hiermee kunnen alle 3 knooppunten zich bij het cluster aansluiten na opnieuw opstarten. Voer de onderstaande opdracht uit op alle 3 de knooppunten om deze stap uit te voeren:
--Enable and start pcsd service and pacemaker
sudo systemctl enable pcsd
sudo systemctl start pcsd
sudo systemctl enable pacemaker
Bekijk de uitvoering op de primaire replica aoagvm1 . Zorg ervoor dat u het ook op de resterende twee knooppunten uitvoert.
--Enable pcsd service
example@sqldat.com:~$ sudo systemctl enable pcsd
Synchronizing state of pcsd.service with SysV service script with /lib/systemd/systemd-sysv-install.
Executing: /lib/systemd/systemd-sysv-install enable pcsd

--Start pcsd service
example@sqldat.com:~$ sudo systemctl start pcsd

--Enable Pacemaker
example@sqldat.com:~$ sudo systemctl enable pacemaker
Synchronizing state of pacemaker.service with SysV service script with /lib/systemd/systemd-sysv-install.
Executing: /lib/systemd/systemd-sysv-install enable pacemaker
We hebben de Pacemaker . geconfigureerd pakketjes. Nu maken we een cluster.
Zorg er eerst voor dat u geen eerder geconfigureerde clusters op die systemen hebt. U kunt bestaande clusterconfiguraties van alle knooppunten vernietigen door de onderstaande opdrachten uit te voeren. Houd er rekening mee dat het verwijderen van een clusterconfiguratie alle clusterservices stopt en de Pacemaker . uitschakelt service - deze moet opnieuw worden ingeschakeld.
--Destroy previously configured clusters to clean the systems
sudo pcs cluster destroy

--Reenable Pacemaker
sudo systemctl enable pacemaker
Hieronder staat de uitvoer van het primaire replicaknooppunt aoagvm1 .
--Destroy previously configured clusters to clean the systems
example@sqldat.com:~$ sudo pcs cluster destroy
Shutting down pacemaker/corosync services...
Killing any remaining services...
Removing all cluster configuration files...

--Reenable Pacemaker
example@sqldat.com:~$ sudo systemctl enable pacemaker
Synchronizing state of pacemaker.service with SysV service script with /lib/systemd/systemd-sysv-install.
Executing: /lib/systemd/systemd-sysv-install enable pacemaker
Vervolgens maken we het cluster met 3 knooppunten tussen alle 3 knooppunten van de primaire replica aoagvm1 . Belangrijk :Voer onderstaande opdrachten uit alleen vanaf uw primaire knooppunt !
--Create cluster. Modify below command with your node names, hacluster password and clustername
sudo pcs cluster auth <node1> <node2> <node3> -u hacluster -p <password for hacluster>
sudo pcs cluster setup --name <clusterName> <node1> <node2...> <node3>
sudo pcs cluster start --all
sudo pcs cluster enable --all
Bekijk de uitvoer op het primaire replicaknooppunt:
example@sqldat.com:~$ sudo pcs cluster auth aoagvm1 aoagvm2 aoagvm3 -u hacluster -p hacluster
aoagvm1: Authorized
aoagvm2: Authorized
aoagvm3: Authorized

example@sqldat.com:~$ sudo pcs cluster setup --name aoagvmcluster aoagvm1 aoagvm2 aoagvm3
Destroying cluster on nodes: aoagvm1, aoagvm2, aoagvm3...
aoagvm1: Stopping Cluster (pacemaker)...
aoagvm2: Stopping Cluster (pacemaker)...
aoagvm3: Stopping Cluster (pacemaker)...
aoagvm1: Successfully destroyed cluster
aoagvm2: Successfully destroyed cluster
aoagvm3: Successfully destroyed cluster
Sending 'pacemaker_remote authkey' to 'aoagvm1', 'aoagvm2', 'aoagvm3'
aoagvm1: successful distribution of the file 'pacemaker_remote authkey'
aoagvm2: successful distribution of the file 'pacemaker_remote authkey'
aoagvm3: successful distribution of the file 'pacemaker_remote authkey'
Sending cluster config files to the nodes...
aoagvm1: Succeeded
aoagvm2: Succeeded
aoagvm3: Succeeded
Synchronizing pcsd certificates on nodes aoagvm1, aoagvm2, aoagvm3...
aoagvm1: Success
aoagvm2: Success
aoagvm3: Success
Restarting pcsd on the nodes to reload the certificates...
aoagvm1: Success
aoagvm2: Success
aoagvm3: Success


example@sqldat.com:~$ sudo pcs cluster start --all
aoagvm1: Starting Cluster...
aoagvm2: Starting Cluster...
aoagvm3: Starting Cluster...

example@sqldat.com:~$ sudo pcs cluster enable --all
aoagvm1: Cluster Enabled
aoagvm2: Cluster Enabled
aoagvm3: Cluster Enabled
Omheining is een van de essentiële configuraties bij het gebruik van het PACEMAKER-cluster in productie. U moet hekken configureren voor uw cluster om ervoor te zorgen dat er geen gegevenscorruptie is in geval van uitval .
Er zijn twee soorten hekwerkimplementaties:
- Bronniveau – zorgt ervoor dat een node een of meer bronnen niet kan gebruiken.
- Knooppuntniveau – zorgt ervoor dat een knooppunt helemaal geen bronnen uitvoert.
Over het algemeen gebruiken we STONITH als omheiningsconfiguratie – de omheining op knooppuntniveau voor PACEMAKER .
Wanneer PACEMAKER de status van een knooppunt of een resource op een knooppunt niet kan bepalen, brengt hekwerk het cluster weer in een bekende staat. Om dit te bereiken, vereist PACEMAKER dat we STONITH . inschakelen , wat staat voor Shoot The Other Node In The Head .
We zullen ons in dit artikel niet concentreren op de configuratie van het hekwerk, omdat de configuratie van het hekwerk op knooppuntniveau sterk afhankelijk is van de individuele omgeving. Voor ons scenario zullen we het uitschakelen door de onderstaande opdracht uit te voeren:
--Disable fencing (STONITH)
sudo pcs property set stonith-enabled=false
Als u echter van plan bent Pacemaker te gebruiken, in een productieomgeving moet u de STONITH-implementatie plannen afhankelijk van uw omgeving en deze ingeschakeld houden.
Vervolgens zullen we enkele essentiële clustereigenschappen instellen:cluster-recheck-interval, start-failure-is-fatal, en fout-time-out .
Volgens MSDN, als failure-timeout is ingesteld op 60 seconden, en cluster-recheck-interval is ingesteld op 120 seconden, wordt de herstart geprobeerd met een interval dat groter is dan 60 seconden maar minder dan 120 seconden. Microsoft raadt aan een waarde in te stellen voor cluster-recheck-interval groter dan de waarde van failure-timeout . Een andere instelling start-failure-is-fatal moet worden ingesteld als true . Anders zal het cluster de failover van de primaire replica naar hun respectieve secundaire replica niet initiëren, mochten er permanente storingen optreden.
Voer de onderstaande opdrachten uit om alle 3 belangrijke clustereigenschappen te configureren:
--Set cluster property cluster-recheck-interval to 2 minutes
sudo pcs property set cluster-recheck-interval=2min

--Set start-failure-is-fatal to True
sudo pcs property set start-failure-is-fatal=true

--Set failure-timeout to 60 seconds. Ag1 is the name of the availability group. Change this name with your availability group name.
pcs resource update ag1 meta failure-timeout=60s
Beschikbaarheidsgroep integreren in pacemakerclustergroep
Hier is ons doel om het proces te beschrijven van het integreren van de nieuw gecreëerde Beschikbaarheidsgroep ag1 naar de nieuw gemaakte Pacemaker clustergroep.
Eerst zullen we de SQL Server-bronagent installeren voor integratie met Pacemaker op alle 3 knooppunten:
--Install SQL Server Resource Agent on all 3 nodes
sudo apt-get install mssql-server-ha
Ik heb de bovenstaande opdracht op alle 3 knooppunten uitgevoerd. Zie de output hieronder (overgenomen van aoagvm1 ):
--Install SQL Server resource agent for integration with Pacemaker
example@sqldat.com:~$ sudo apt-get install mssql-server-ha
Reading package lists... Done
Building dependency tree
Reading state information... Done
The following NEW packages will be installed:
  mssql-server-ha
0 upgraded, 1 newly installed, 0 to remove, and 2 not upgraded.
Need to get 1486 kB of archives.
After this operation, 9151 kB of additional disk space will be used.
Get:1 https://packages.microsoft.com/ubuntu/16.04/mssql-server-preview xenial/main amd64 mssql-server-ha amd64 15.0.1600.8-1 [1486 kB]
Fetched 1486 kB in 0s (4187 kB/s)
Selecting previously unselected package mssql-server-ha.
(Reading database ... 90430 files and directories currently installed.)
Preparing to unpack .../mssql-server-ha_15.0.1600.8-1_amd64.deb ...
Unpacking mssql-server-ha (15.0.1600.8-1) ...
Setting up mssql-server-ha (15.0.1600.8-1) ...
Herhaal de bovenstaande stappen op de resterende 2 knooppunten.
We hebben al de Pacemaker . gemaakt log in op alle SQL Server-instanties die worden gehost op 3 knooppunten wanneer we de beschikbaarheidsgroep ag1 hebben geconfigureerd . Nu wijzen we de sysadmin-rol toe aan alle 3 SQL Server-instanties. U kunt verbinding maken met sqlcmd voor het uitvoeren van deze T-SQL-opdracht. If you have not created the Pacemaker login, you can run the below command to do it.
--Create a pacemaker login if you missed creating it in the above section.
USE master
Go
CREATE LOGIN pacemaker WITH PASSWORD = 'example@sqldat.com@12'
Go

--Assign sysadmin role to pacemaker login on all 3 nodes. Run this T-SQL on all 3 SQL Server instances.
ALTER SERVER ROLE [sysadmin] ADD MEMBER [pacemaker]
We must save the above SQL Server Pacemaker login and its credentials on all 3 nodes. Run the below command there:
--Save pacemaker login credentials on all 3 nodes by executing below commands on each node
echo 'pacemaker' >> ~/pacemaker-passwd
echo 'example@sqldat.com@12' >> ~/pacemaker-passwd
sudo mv ~/pacemaker-passwd /var/opt/mssql/secrets/passwd
sudo chown root:root /var/opt/mssql/secrets/passwd
sudo chmod 400 /var/opt/mssql/secrets/passwd
We will create the Availability Group Resource as master/subordinate .
We are using the pcs resource create command to create the Availability Group resource and set its properties. The following command will create the ocf:mssql:ag resource for the Availability Group ag1 .
The Pacemaker resource agent automatically sets the value of REQUIRED_SYNCHRONIZED_SECONDARIES_TO_COMMIT on the Availability Group based on the Availability Group’s configuration during the creation of the Availability Group resource.
Execute the below command:
--Create availability group resource ocf:mssql:ag
sudo pcs resource create ag_cluster ocf:mssql:ag ag_name=ag1 meta failure-timeout=30s --master meta notify=true
Next, we create a virtual IP resource in Pacemaker . Ensure you have the unused private IP address from your network . Replace the IP value with your virtual IP address. This IP will point to the primary replica and you can use it to make databases connections with active nodes.
The command is below:
--Configure virtual IP resource
sudo pcs resource create virtualip ocf:heartbeat:IPaddr2 ip=10.50.0.7
We are adding the colocation constraint and ordering constraint to the Pacemaker cluster configuration . These constraints help the virtual IP resource to make decisions on resources, e.g., where they should run.
Constraints have some scores, and Pacemaker uses these scores to make decisions. Scores are calculated per resource. The cluster resource manager chooses the node with the highest score for a particular resource.
The colocation constraint has an implicit ordering constraint . We need to add an ordering constraint to prevent the IP address from temporarily pointing to the node with the pre-failover secondary . Ordering constraint ensures the cluster comes online in a particular sequential manner.
Run the below commands to add colocation constraint and ordering constraint to the cluster.
--Add colocation constraint
sudo pcs constraint colocation add virtualip ag_cluster-master INFINITY with-rsc-role=Master

--Add ordering constraint
sudo pcs constraint order promote ag_cluster-master then start virtualip
Hence, Two-Node Synchronous Replicas (aoagvm1 &aoagvm2) and a Configuration-Only Replica (aoagvm3) on PACEMAKER Cluster between 3-Node Ubuntu Systems has been completed.
We can test the configuration to validate the automatic failover. Run the below command to check the status of the Pacemaker cluster. The command also initiates the Availability Group failover.
Remember, once you couple your Availability Group with the PACEMAKER cluster, you cannot use T-SQL statements to initiate the Availability Group failovers. You can also shut down the primary replica to initiate the automatic failover.
The command is the following:
--Validate the PACEMAKER cluster configuration
sudo pcs status

--Initiate availability group failover to verify AOAG configuration
sudo pcs resource move ag_cluster-master aoagvm2 –master
Conclusie
This article was meant to help you understand the configuration of the Two-Node Synchronous Replicas and a Configuration-Only Replica on PACEMAKER Cluster. We hope that you got useful information that will help you in your workflow.
Always plan all steps carefully and do proper testing in a lower life cycle before deploying to your production environment.
We’ll be glad to hear your thoughts about this topic. Feel free to leave your feedback in a comment section.