Inleiding
Vroeg of laat krijgt elk informatiesysteem een database, vaak - meer dan één. Na verloop van tijd verzamelt die database heel veel gegevens, van enkele GB's tot tientallen TB's. Om te begrijpen hoe de functionaliteiten zullen presteren als de datavolumes toenemen, moeten we de data genereren om die database te vullen.

Alle gepresenteerde en geïmplementeerde scripts worden uitgevoerd op de JobEmplDB database van een wervingsdienst. De database realisatie is hier beschikbaar.
Benaderingen voor het invullen van gegevens in databases voor testen en ontwikkelen
Het ontwikkelen en testen van de database omvat twee primaire benaderingen voor het invullen van gegevens:
- Om de volledige database uit de productieomgeving te kopiëren met gewijzigde persoonlijke en andere gevoelige gegevens. Op deze manier zorgt u voor de gegevens en wist u vertrouwelijke gegevens.
- Om synthetische gegevens te genereren. Het betekent het genereren van testgegevens die vergelijkbaar zijn met de echte gegevens in uiterlijk, eigenschappen en onderlinge verbindingen.
Het voordeel van benadering 1 is dat het de gegevens en hun distributie benadert volgens verschillende criteria naar de productiedatabase. Het stelt ons in staat om alles nauwkeurig te analyseren en daarom conclusies te trekken en dienovereenkomstig prognoses te maken.
Met deze aanpak kunt u de database zelf echter niet vele malen vergroten. Het wordt problematisch om in de toekomst veranderingen in de functionaliteit van het gehele informatiesysteem te voorspellen.
Aan de andere kant kunt u onpersoonlijke opgeschoonde gegevens uit de productiedatabase analyseren. Op basis daarvan kunt u definiëren hoe u de testgegevens genereert die qua uiterlijk, eigenschappen en onderlinge relaties op de echte gegevens lijken. Op deze manier levert Benadering 1 Benadering 2 op.
Laten we nu beide benaderingen voor het invullen van gegevens in databases voor testen en ontwikkelen in detail bekijken.
Gegevens kopiëren en wijzigen in een productiedatabase
Laten we eerst het algemene algoritme definiëren voor het kopiëren en wijzigen van de gegevens uit de productieomgeving.
Het algemene algoritme
Het algemene algoritme is als volgt:
- Maak een nieuwe lege database.
- Maak een schema in die nieuw aangemaakte database - hetzelfde systeem als dat van de productiedatabase.
- Kopieer de benodigde gegevens uit de productiedatabase naar de nieuw aangemaakte database.
- Ontsmet en wijzig de geheime gegevens in de nieuwe database.
- Maak een back-up van de nieuw aangemaakte database.
- Lever en herstel de back-up in de benodigde omgeving.
Na stap 5 wordt het algoritme echter ingewikkelder. Zo vereist stap 6 een specifieke, afgeschermde omgeving voor het voorbereidend testen. Die fase moet ervoor zorgen dat alle gegevens onpersoonlijk zijn en dat de geheime gegevens worden gewijzigd.
Na dat stadium kunt u weer terugkeren naar stap 5 voor de geteste database in de beschermde niet-productieomgeving. Vervolgens stuurt u de geteste back-up door naar de benodigde omgevingen om deze te herstellen en gebruikt u deze voor ontwikkeling en testen.
We hebben het algemene algoritme gepresenteerd van het kopiëren en wijzigen van gegevens van de productiedatabase. Laten we beschrijven hoe we het kunnen implementeren.
Realisatie van het algemene algoritme
Een nieuwe lege database-creatie
U kunt een lege database maken met behulp van de CREATE DATABASE constructie zoals hier.
De database heet JobEmplDB_Test . Het heeft drie bestandsgroepen:
- PRIMAIR – het is standaard de primaire bestandsgroep. Het definieert twee bestanden:JobEmplDB_Test1(pad D:\DBData\JobEmplDB_Test1.mdf) , en JobEmplDB_Test2 (pad D:\DBData\JobEmplDB_Test2.ndf) . De initiële grootte van elk bestand is 64 Mb en de groeistap is 8 Mb voor elk bestand.
- DBTableGroup – een aangepaste bestandsgroep die twee bestanden bepaalt:JobEmplDB_TestTableGroup1 (pad D:\DBData\JobEmplDB_TestTableGroup1.ndf) en JobEmplDB_TestTableGroup2 (pad D:\DBData\JobEmplDB_TestTableGroup2.ndf) . De initiële grootte van elk bestand is 8 Gb en de groeistap is 1 Gb voor elk bestand.
- DBIndexGroup – een aangepaste bestandsgroep die twee bestanden bepaalt:JobEmplDB_TestIndexGroup1 (pad D:\DBData\JobEmplDB_TestIndexGroup1.ndf) , en JobEmplDB_TestIndexGroup2 (pad D:\DBData\JobEmplDB_TestIndexGroup2.ndf) . De initiële grootte is 16 Gb voor elk bestand en de groeistap is 1 Gb voor elk bestand.
Deze database bevat ook één transactiejournaal:JobEmplDB_Testlog , pad E:\DBLog\JobEmplDB_Testlog.ldf . De initiële grootte van het bestand is 8 Gb en de groeistap is 1 Gb.
Kopiëren van het schema en de benodigde gegevens uit de productiedatabase naar een nieuw aangemaakte database
Om het schema en de benodigde gegevens uit de productiedatabase naar de nieuwe te kopiëren, kunt u verschillende tools gebruiken. Ten eerste is het de Visual Studio (SSDT). Of u kunt hulpprogramma's van derden gebruiken, zoals:
- DbForge Schema Vergelijk en DbForge Gegevens Vergelijk
- ApexSQL Diff en Apex Data Diff
- SQL Compare Tool en SQL Data Compare Tool
Scripts maken voor gegevenswijzigingen
Essentiële vereisten voor de scripts voor gegevenswijzigingen
1. Het moet onmogelijk zijn om de echte gegevens te herstellen met dat script.
bijv. De inversie van de lijnen past niet, omdat het ons in staat stelt de echte gegevens te herstellen. Gewoonlijk is de methode om elk teken of elke byte te vervangen door een pseudowillekeurig teken of byte. Hetzelfde geldt voor de datum en tijd.
2. Het wijzigen van de gegevens mag de selectiviteit van hun waarden niet veranderen.
Het zal niet werken om NULL toe te wijzen aan het veld van de tabel. In plaats daarvan moet u ervoor zorgen dat dezelfde waarden in de echte gegevens hetzelfde blijven in de gewijzigde gegevens. In echte gegevens heb je bijvoorbeeld een waarde van 103785 die 12 keer in de tabel wordt gevonden. Wanneer u deze waarde in de gewijzigde gegevens wijzigt, moet de nieuwe waarde 12 keer in dezelfde velden van de tabel blijven staan.
3. De grootte en lengte van de waarden mogen niet significant verschillen in de gewijzigde gegevens. U vervangt bijvoorbeeld elke byte of elk teken door een pseudowillekeurige byte of elk teken. De initiële string blijft hetzelfde in grootte en lengte.
4. De onderlinge relaties in de gegevens mogen na de wijzigingen niet worden verbroken. Het heeft betrekking op de externe sleutels en alle andere gevallen waarin u verwijst naar de gewijzigde gegevens. Gewijzigde gegevens moeten in dezelfde relaties blijven als de echte gegevens waren.
Implementatie van scripts voor gegevenswijzigingen
Laten we nu eens kijken naar het specifieke geval van de gegevens die worden gewijzigd om de geheime informatie te depersonaliseren en te verbergen. Het voorbeeld is de wervingsdatabase.
De voorbeelddatabase bevat de volgende persoonlijke gegevens die u moet depersonaliseren:
- Achter- en voornaam;
- Geboortedatum;
- De uitgiftedatum van de ID-kaart;
- Het RAS-certificaat als de bytesreeks;
- De servicekosten voor cv-promotie.
Eerst bekijken we eenvoudige voorbeelden voor elk type gewijzigde gegevens:
- Datum en tijd wijzigen;
- Numerieke waarde verandering;
- De bytereeksen wijzigen;
- Tekengegevens wijzigen.
Datum en tijd wijzigen
U kunt een willekeurige datum en tijd krijgen met behulp van het volgende script:
DECLARE @dt DATETIME;

SET @dt = CAST(CAST(@StartDate AS FLOAT) + (CAST(@FinishDate AS FLOAT) - CAST(@StartDate AS FLOAT)) * RAND(CHECKSUM(NEWID())) AS DATETIME);
Hier, @StartDate en @FinishDate zijn de begin- en eindwaarden van het bereik. Ze correleren respectievelijk voor de pseudo-willekeurige generatie van datum en tijd.
Om deze gegevens te genereren, gebruikt u de systeemfuncties RAND, CHECKSUM en NEWID.
UPDATE [dbo].[Employee]
SET [DocDate] = CAST(CAST(CAST(CAST([BirthDate] AS DATETIME) AS FLOAT) + (CAST(GETDATE() AS FLOAT) - CAST(CAST([BirthDate] AS DATETIME) AS FLOAT)) * RAND(CHECKSUM(NEWID())) AS DATETIME) AS DATE);
Het veld [DocDate] staat voor de uitgiftedatum van het document. We vervangen deze door een pseudo-willekeurige datum, rekening houdend met het datumbereik en hun beperkingen.
De "onderste" limiet is de geboortedatum van de kandidaat. De "bovenste" rand is de huidige datum. We hebben de tijd hier niet nodig, dus de transformatie van het tijd- en datumformaat naar de benodigde datum komt uiteindelijk. U kunt op dezelfde manier pseudo-willekeurige waarden krijgen voor elk deel van de datum en tijd.
Numerieke waardeverandering
Je kunt een willekeurig geheel getal krijgen met behulp van het volgende script:
DECLARE @Int INT;

SET @Int = CAST(((@MaxVal + 1) - @MinVal) *
    RAND(CHECKSUM(NEWID())) + @MinVal AS INT);
@MinVal и @MaxVal zijn de waarden van het begin- en eindbereik voor het genereren van pseudowillekeurige getallen. We genereren het met behulp van de systeemfuncties RAND, CHECKSUM en NEWID.
UPDATE [dbo].[Employee]
SET [CountRequest] = CAST(((@MaxVal + 1) - @MinVal) *
    RAND(CHECKSUM(NEWID())) + @MinVal AS INT);
Het veld [CountRequest] staat voor het aantal verzoeken dat bedrijven doen voor het cv van deze kandidaat.
Op dezelfde manier kunt u pseudowillekeurige waarden krijgen voor elke numerieke waarde. Kijk bijvoorbeeld eens naar het willekeurige getal van de generatie van het decimale type (18,2):
DECLARE @Dec DECIMAL(18,2);

SET @Dec=CAST(((@MaxVal + 1) - @MinVal) *
    RAND(CHECKSUM(NEWID())) + @MinVal AS DECIMAL(18,2));
U kunt de servicekosten voor de promotie van cv's dus op de volgende manier bijwerken:
UPDATE [dbo].[Employee]
SET [PaymentAmount] = CAST(((@MaxVal + 1) - @MinVal) *
    RAND(CHECKSUM(NEWID())) + @MinVal AS DECIMAL(18,2));
De bytereeksen wijzigen
U kunt een willekeurige bytereeks krijgen met het volgende script:
DECLARE @res VARBINARY(MAX);

SET @res = CRYPT_GEN_RANDOM(@Length, CAST(NEWID() AS VARBINARY(16)));
@Lengte staat voor de lengte van de reeks. Het definieert het aantal geretourneerde bytes. Hier mag @Length niet groter zijn dan 16.
Het genereren gebeurt met behulp van de systeemfuncties CRYPT_GEN_RANDOM en NEWID.
U kunt bijvoorbeeld het RAS-certificaat voor elke kandidaat op de volgende manier bijwerken:
UPDATE [dbo].[Employee]
SET [RemoteAccessCertificate] = CRYPT_GEN_RANDOM(CAST(LEN([RemoteAccessCertificate]) AS INT), CAST(NEWID() AS VARBINARY(16)));
We genereren een pseudowillekeurige bytereeks van dezelfde lengte die aanwezig is in het veld [RemoteAccessCertificate] op het moment van de wijziging. We veronderstellen dat de lengte van de bytereeks niet groter is dan 16.
Op dezelfde manier kunnen we onze functie maken die pseudowillekeurige bytereeksen van elke lengte retourneert. Het zal de resultaten van de systeemfunctie CRYPT_GEN_RANDOM laten samenwerken met behulp van de eenvoudige "+" opteloperator. Maar in de praktijk is 16 bytes meestal voldoende.
Laten we een voorbeeldfunctie maken die de pseudo-willekeurige bytereeks van de definitieve lengte retourneert, waarbij het mogelijk zal zijn om de lengte van meer dan 16 bytes in te stellen. Maak hiervoor de volgende presentatie:
CREATE VIEW [test].[GetNewID]
AS
SELECT NEWID() AS [NewID];
GO
We hebben het nodig om de beperking te omzeilen die ons verbiedt om NEWID binnen de functie te gebruiken.
Maak op dezelfde manier de volgende presentatie voor hetzelfde doel:
CREATE VIEW [test].[GetRand]
AS
SELECT RAND(CHECKSUM((SELECT TOP(1) [NewID] FROM [test].[GetNewID]))) AS [Value];
GO
Maak nog een presentatie:
CREATE VIEW [test].[GetRandVarbinary16]
AS
SELECT CRYPT_GEN_RANDOM(16, CAST((SELECT TOP(1) [NewID] FROM [test].[GetNewID]) AS VARBINARY(16))) AS [Value];
GO
De definities van alle drie de functies zijn hier. En hier is de implementatie van de functie die een pseudowillekeurige bytereeks van de bepaalde lengte retourneert.
Eerst definiëren we of de noodzakelijke functie aanwezig is. Zo niet, dan maken we eerst een stud. In ieder geval houdt de code in dat de definitie van de functie op de juiste manier wordt gewijzigd. Uiteindelijk voegen we de functiebeschrijving toe via de uitgebreide eigenschappen. Meer details over de documentatie van de database vindt u in dit artikel.
Om het RAS-certificaat voor elke kandidaat bij te werken, kunt u het volgende doen:
UPDATE [dbo].[Employee]
SET [RemoteAccessCertificate] = [test].[GetRandVarbinary](CAST(LEN([RemoteAccessCertificate]) AS INT));
Zoals je ziet, zijn er hier geen beperkingen aan de lengte van de bytereeks.
Gegevens wijzigen – Tekengegevens wijzigen
Hier nemen we een voorbeeld voor het Engelse en Russische alfabet, maar je kunt het voor elk ander alfabet doen. De enige voorwaarde is dat de karakters aanwezig moeten zijn in de NCHAR-types.
We moeten een functie maken die de regel accepteert, elk teken vervangt door een pseudowillekeurig teken, en dan het resultaat samenvoegt en teruggeeft.
We moeten echter eerst begrijpen welke karakters we nodig hebben. Daarvoor kunnen we het volgende script uitvoeren:
DECLARE @tbl TABLE ([ValueInt] INT, [ValueNChar] NCHAR(1), [ValueChar] CHAR(1));

DECLARE @ind int=0;
DECLARE @count INT=65535;

WHILE(@count>=0)
BEGIN
	INSERT INTO @tbl ([ValueInt], [ValueNChar], [ValueChar])
	SELECT @ind, NCHAR(@ind), CHAR(@ind)

	SET @ind+=1;
	SET @count-=1;
END

SELECT *
INTO [test].[TblCharactersCode]
FROM @tbl;
We maken de [test].[TblCharacterCode]-tabel die de volgende velden bevat:
- ValueInt – de numerieke waarde van het teken;
- ValueNchar – het teken van het NCHAR-type;
- ValueChar – het karakter van het CHAR-type.
Laten we de inhoud van deze tabel eens bekijken. We hebben het volgende verzoek nodig:
SELECT [ValueInt]
      ,[ValueNChar]
      ,[ValueChar]
  FROM [test].[TblCharactersCode];
De getallen liggen tussen 48 en 57:
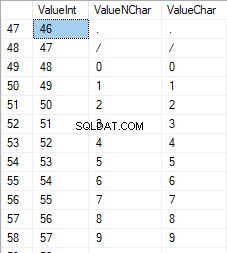
De Latijnse karakters in hoofdletters liggen tussen 65 en 90:

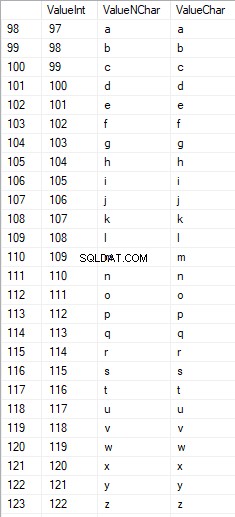
Latijnse karakters in de lagere zorg zijn in het bereik van 97 tot 122:
Russische tekens in hoofdletters liggen tussen 1040 en 1071:

Russische tekens in kleine letters liggen tussen 1072 en 1103:


En tekens in het bereik van 58 tot 64:

We selecteren de benodigde tekens en plaatsen ze op de volgende manier in de [test].[SelectCharactersCode]-tabel:
SELECT
	[ValueInt]
   ,[ValueNChar]
   ,[ValueChar]
   ,CASE
		WHEN ([ValueInt] BETWEEN 48 AND 57) THEN 1
		ELSE 0
	END AS [IsNumeral]
   ,CASE
		WHEN (([ValueInt] BETWEEN 65 AND 90) OR
			([ValueInt] BETWEEN 1040 AND 1071)) THEN 1
		ELSE 0
	END AS [IsUpperCase]
   ,CASE
		WHEN (([ValueInt] BETWEEN 65 AND 90) OR
			([ValueInt] BETWEEN 97 AND 122)) THEN 1
		ELSE 0
	END AS [IsLatin]
   ,CASE
		WHEN (([ValueInt] BETWEEN 1040 AND 1071) OR
			([ValueInt] BETWEEN 1072 AND 1103)) THEN 1
		ELSE 0
	END AS [IsRus]
   ,CASE
		WHEN (([ValueInt] BETWEEN 33 AND 47) OR
			([ValueInt] BETWEEN 58 AND 64)) THEN 1
		ELSE 0
	END AS [IsExtra]
INTO [test].[SelectCharactersCode]
FROM [test].[TblCharactersCode]
WHERE ([ValueInt] BETWEEN 48 AND 57)
OR ([ValueInt] BETWEEN 65 AND 90)
OR ([ValueInt] BETWEEN 97 AND 122)
OR ([ValueInt] BETWEEN 1040 AND 1071)
OR ([ValueInt] BETWEEN 1072 AND 1103)
OR ([ValueInt] BETWEEN 33 AND 47)
OR ([ValueInt] BETWEEN 58 AND 64);
Laten we nu de inhoud van deze tabel eens bekijken met behulp van het volgende script:
SELECT [ValueInt]
      ,[ValueNChar]
      ,[ValueChar]
      ,[IsNumeral]
      ,[IsUpperCase]
      ,[IsLatin]
      ,[IsRus]
      ,[IsExtra]
  FROM [test].[SelectCharactersCode];
We krijgen het volgende resultaat:

Op deze manier hebben we de [test].[SelectCharactersCode] tafel, waar:
- ValueInt – de numerieke waarde van het teken
- ValueNChar – het NCHAR-type karakter
- ValueChar – het karakter van het CHAR-type
- IsNumeral – het criterium dat een teken een cijfer is
- IsUpperCase – het criterium van een karakter in hoofdletters
- IsLatijn – het criterium dat een karakter een Latijns karakter is;
- IsRus – het criterium dat een personage een Russisch personage is
- IsExtra – het criterium dat een karakter een extra karakter is
Nu kunnen we de code krijgen voor het invoegen van de benodigde tekens. Zo doet u het bijvoorbeeld voor de Latijnse karakters in kleine letters:
SELECT 'SELECT '+CAST([ValueInt] AS NVARCHAR(255))+' AS [ValueInt], '+''''+[ValueNChar]+''''+' AS [ValueNChar], '+''''+[ValueChar]+''''+' AS [ValueChar] UNION ALL'
  FROM [test].[SelectCharactersCode]
  WHERE [IsUpperCase]=0
    AND [IsLatin]=1;
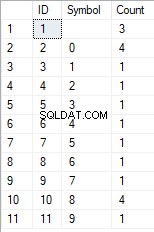
We krijgen het volgende resultaat:

Hetzelfde geldt voor de Russische karakters in kleine letters:
SELECT 'SELECT '+CAST([ValueInt] AS NVARCHAR(255))+' AS [ValueInt], '+''''+[ValueNChar]+''''+' AS [ValueNChar], '+COALESCE(''''+[ValueChar]+'''', 'NULL')+' AS [ValueChar] UNION ALL'
  FROM [test].[SelectCharactersCode]
  WHERE [IsUpperCase]=0
    AND [IsRus]=1;
We krijgen het volgende resultaat:

Hetzelfde geldt voor de karakters:
SELECT 'SELECT '+CAST([ValueInt] AS NVARCHAR(255))+' AS [ValueInt], '+''''+[ValueNChar]+''''+' AS [ValueNChar], '+''''+[ValueChar]+''''+' AS [ValueChar] UNION ALL'
  FROM [test].[SelectCharactersCode]
  WHERE [IsNumeral]=1;
Het resultaat is als volgt:

We hebben dus codes om de volgende gegevens afzonderlijk in te voeren:
- De Latijnse karakters in kleine letters.
- De Russische karakters in kleine letters.
- De cijfers.
Het werkt voor zowel het NCHAR- als het CHAR-type.
Op dezelfde manier kunnen we een invoegscript voorbereiden voor elke set tekens. Bovendien krijgt elke set zijn eigen tabulatiefunctie.
Om het simpel te houden, implementeren we de algemene tabelfunctie die de benodigde dataset voor de eerder geselecteerde gegevens op de volgende manier retourneert:
SELECT
	'SELECT ' + CAST([ValueInt] AS NVARCHAR(255)) + ' AS [ValueInt], '
	+ '''' + [ValueNChar] + '''' + ' AS [ValueNChar], '
	+ COALESCE('''' + [ValueChar] + '''', ‘NULL’) + ' AS [ValueChar], '
	+ CAST([IsNumeral] AS NCHAR(1)) + ' AS [IsNumeral], ' +
	+CAST([IsUpperCase] AS NCHAR(1)) + ' AS [IsUpperCase], ' +
	+CAST([IsLatin] AS NCHAR(1)) + ' AS [IsLatin], ' +
	+CAST([IsRus] AS NCHAR(1)) + ' AS [IsRus], ' +
	+CAST([IsExtra] AS NCHAR(1)) + ' AS [IsExtra]' +
	+' UNION ALL'
FROM [test].[SelectCharactersCode];
Het eindresultaat is als volgt:

Het klaar-script is verpakt in de tabulatiefunctie [test].[GetSelectCharacters].
Het is belangrijk om een extra UNION ALL te verwijderen aan het einde van het gegenereerde script, en in de [ValueInt]=39 moeten we ”’ veranderen in ””:
SELECT 39 AS [ValueInt], '''' AS [ValueNChar], '''' AS [ValueChar], 0 AS [IsNumeral], 0 AS [IsUpperCase], 0 AS [IsLatin], 0 AS [IsRus], 1 AS [IsExtra] UNION ALLDeze tabelfunctie retourneert de volgende set velden:
- Aantal – het regelnummer in de geretourneerde gegevensset;
- ValueInt – de numerieke waarde van het teken;
- ValueNChar – het teken van het NCHAR-type;
- ValueChar – het karakter van het CHAR-type;
- IsNumeral – het criterium dat het teken een cijfer is;
- IsUpperCase – het criterium dat bepaalt dat het teken in hoofdletters staat;
- IsLatijn – het criterium dat bepaalt dat het teken een Latijns teken is;
- IsRus – het criterium dat bepaalt dat het karakter een Russisch karakter is;
- IsExtra – het criterium dat bepaalt dat het karakter een extra karakter is.
Voor de invoer heb je de volgende parameters:
- @IsNumeral - als het de cijfers zou moeten retourneren;
- @IsUpperCase :
- 0 – het mag alleen de kleine letters retourneren voor letters;
- 1 – het mag alleen de hoofdletters retourneren;
- NULL – het moet in alle gevallen letters retourneren.
- @IsLatin – het moet de Latijnse karakters teruggeven
- @IsRus – het moet de Russische karakters teruggeven
- @IsExtra – het moet extra tekens teruggeven.
Alle vlaggen worden gebruikt volgens de logische OR. Als u bijvoorbeeld cijfers en Latijnse tekens in kleine letters wilt teruggeven, roept u de tabulatiefunctie op de volgende manier aan:
We krijgen het volgende resultaat:
declare
@IsNumeral BIT=1
   ,@IsUpperCase BIT=0
   ,@IsLatin BIT=1
   ,@IsRus BIT=0
   ,@IsExtra BIT=0;

SELECT *
FROM [test].[GetSelectCharacters](@IsNumeral, @IsUpperCase, @IsLatin, @IsRus, @IsExtra);
We krijgen het volgende resultaat:

We implementeren de functie [test].[GetRandString] die de regel zal vervangen door pseudowillekeurige tekens, waarbij de aanvankelijke lengte van de tekenreeks behouden blijft. Deze functie moet de mogelijkheid bieden om alleen die tekens te gebruiken die cijfers zijn. Het kan bijvoorbeeld handig zijn als u de serie en het nummer van de ID-kaart wijzigt.
Wanneer we de functie [test].[GetRandString] implementeren, krijgen we eerst de set tekens die nodig is om een pseudowillekeurige regel van de opgegeven lengte te genereren in de invoerparameter @Length. De rest van de parameters werken zoals hierboven beschreven.
Vervolgens plaatsen we de ontvangen set gegevens in de tabelvariabele @tbl . Deze tabel slaat de velden [ID] op – het volgnummer in de resulterende tabel met karakters, en [Waarde] – de presentatie van het karakter in het NCHAR-type.
Daarna genereert het in een cyclus een pseudowillekeurig getal in het bereik van 1 tot de kardinaliteit van de eerder ontvangen @tbl-tekens. We zetten dit nummer in de [ID] van de tabelvariabele @tbl voor zoeken. Wanneer de zoekopdracht de regel retourneert, nemen we het [Value]-teken en "lijmen" we het aan de resulterende regel @res.
Wanneer het werk van de cyclus eindigt, komt de ontvangen regel terug via de @res-variabele.
U kunt zowel de voor- als achternaam van de kandidaat op de volgende manier wijzigen:
UPDATE [dbo].[Employee]
SET [FirstName] = [test].[GetRandString](LEN([FirstName])),
        [LastName] = [test].[GetRandString](LEN([LastName]));
Daarom hebben we de implementatie van de functie en het gebruik ervan onderzocht voor de typen NCHAR en NVARCHAR. We kunnen hetzelfde eenvoudig doen voor de typen CHAR en VARCHAR.
Soms moeten we echter een regel genereren volgens de set tekens, niet de alfabetische tekens of cijfers. Op deze manier moeten we eerst de volgende multi-operatorfunctie gebruiken [test].[GetListCharacters].
De functie [test].[GetListCharacters] krijgt de twee volgende parameters voor de invoer:
- @str – de rij karakters zelf;
- @IsGroupUnique – het definieert of het unieke karakters in de regel moet groeperen.
Met de recursieve CTE wordt de invoerregel @str omgezet in de tabel met tekens - @ListCharacters. Die tabel bevat de volgende velden:
- ID – het volgnummer van de regel in de resulterende tabel met tekens;
- Karakter – de presentatie van het personage in NCHAR(1)
- Tellen – het aantal herhalingen van het teken in de regel (het is altijd 1 als de parameter @IsGroupUnique=0)
Laten we twee voorbeelden nemen van het gebruik van deze functie om zijn werk beter te begrijpen:
- Transformatie van de regel in de lijst met niet-unieke karakters:
SELECT *
FROM [test].[GetListCharacters]('123456888  789 0000', 0);
We krijgen het resultaat:

Dit voorbeeld laat zien dat de regel wordt omgezet in de lijst met tekens "zoals ze is", zonder deze te groeperen op basis van de uniciteit van de tekens (het veld [Aantal] bevat altijd 1).
- De transformatie van de regel in de lijst met unieke karakters
SELECT *
FROM [test].[GetListCharacters]('123456888  789 0000', 1);
Het resultaat is als volgt:
Dit voorbeeld laat zien dat de regel wordt omgezet in de lijst met tekens, gegroepeerd op hun uniekheid. Het veld [Aantal] toont het aantal bevindingen van elk teken in de invoerregel.
Op basis van de multi-operatorfunctie [test].[GetListCharacters] maken we een scalaire functie [test].[GetRandString2].
De definitie van de nieuwe scalaire functie toont zijn gelijkenis met de scalaire functie [test].[GetRandString]. Het enige verschil is dat het de [test].[GetListCharacters] multi-operatorfunctie gebruikt in plaats van de [test].[GetSelectCharacters] tabulatiefunctie.
Laten we hier twee voorbeelden bekijken van het geïmplementeerde gebruik van scalaire functies :
We genereren een pseudowillekeurige regel met een lengte van 12 tekens uit de invoerregel met tekens die niet zijn gegroepeerd op uniciteit:
SELECT [test].[GetRandString2](12, '123456789!!!!!!!!0!!!', DEFAULT);Het resultaat is:
64017!!5!!!7
Het sleutelwoord is DEFAULT. Het stelt dat de standaardwaarde de parameter instelt. Hier is het nul (0).
Of
We genereren een pseudowillekeurige regel met een lengte van 12 tekens op basis van de invoerregel met tekens, gegroepeerd op uniekheid:
SELECT [test].[GetRandString2](12, '123456789!!!!!!!!0!!!', 1);Het resultaat is:
35792!428273
Implementatie van het algemene script voor gegevensopschoning en de geheime gegevenswijzigingen
We hebben eenvoudige voorbeelden onderzocht voor elk type gewijzigde gegevens:
- De datum en tijd wijzigen;
- De numerieke waarde wijzigen;
- De bytevolgorde wijzigen;
- De gegevens van de karakters wijzigen.
Deze voorbeelden voldoen echter niet aan de criteria 2 en 3 voor de scripts voor het wijzigen van gegevens:
- Criterium 2 :de selectiviteit van waarden zal niet significant veranderen in de gewijzigde gegevens. U kunt NULL niet gebruiken voor het veld van de tabel. In plaats daarvan moet u ervoor zorgen dat dezelfde echte gegevenswaarden hetzelfde blijven in de gewijzigde gegevens. Als de echte gegevens bijvoorbeeld 12 keer de 103785-waarde bevatten in het veld van een tabel die onderhevig is aan wijzigingen, moeten de gewijzigde gegevens een andere (gewijzigde) waarde bevatten die 12 keer in hetzelfde veld van de tabel wordt gevonden.
- Criterium 3 :de lengte en grootte van waarden mogen niet significant worden gewijzigd in de gewijzigde gegevens. U vervangt bijvoorbeeld elk teken/byte door een pseudo-willekeurig teken/byte.
We moeten dus een script maken dat rekening houdt met de selectiviteit van de waarden in de velden van de tabel.
Laten we eens kijken naar onze database voor de wervingsservice. Zoals we zien, zijn persoonsgegevens alleen aanwezig in de kandidatentabel [dbo].[Medewerker].
Neem aan dat de tabel de volgende velden bevat:
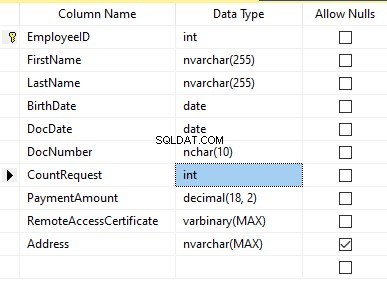
Beschrijvingen:
- Voornaam – naam, regel NVARCHAR(255)
- Achternaam – achternaam, regel NVARCHAR(255)
- Geboortedatum – geboortedatum, DATUM
- DocNumber – het ID-kaartnummer met twee cijfers aan het begin voor de paspoortreeks, en de volgende zeven cijfers zijn het documentnummer. Daartussen hebben we een koppelteken als de NCHAR(10)-regel.
- DocDate – de uitgiftedatum van de ID-kaart, DATUM
- CountRequest – het aantal verzoeken voor die kandidaat tijdens het zoeken naar cv, het gehele getal INT
- Betalingsbedrag – de ontvangen servicekosten voor de promotie van cv, het decimale getal (18,2)
- RemoteAccessCertificate – het RAS-certificaat, bytereeks VARBINARY
- Adres – het woonadres of het registratieadres, regel NVARCHAR(MAX)
Om de initiële selectiviteit te behouden, moeten we het volgende algoritme implementeren:
- Extract alle unieke waarden voor elk veld en bewaar de resultaten in tijdelijke tabellen of tabelvariabelen;
- Genereer een pseudowillekeurige waarde voor elke unieke waarde. Deze pseudowillekeurige waarde mag qua lengte en grootte niet significant verschillen van de oorspronkelijke waarde. Sla het resultaat op dezelfde plaats op waar we de resultaten van punt 1 hebben opgeslagen. Elke nieuw gegenereerde waarde moet een unieke gecorreleerde huidige waarde hebben.
- Vervang alle waarden in de tabel door nieuwe waarden vanaf punt 2.
In het begin depersonaliseren we de voor- en achternaam van kandidaten. We gaan ervan uit dat de achternaam en voornaam altijd aanwezig zijn en dat ze in elk veld maar liefst twee karakters lang zijn.
Eerst selecteren we unieke namen. Vervolgens genereert het een pseudowillekeurige regel voor elke naam. De lengte van de naam blijft hetzelfde; het eerste teken staat in hoofdletters en de andere tekens in kleine letters. We gebruiken de eerder gemaakte [test].[GetRandString] scalaire functie om een pseudowillekeurige regel van de specifieke lengte te genereren volgens de gedefinieerde karakterscriteria.
Vervolgens werken we de namen in de kandidatentabel bij op basis van hun unieke waarden. Hetzelfde geldt voor de achternamen.
We depersonaliseren het veld DocNumber. Het is het ID-kaart (paspoort) nummer. De eerste twee tekens staan voor de reeks van het document en de laatste zeven cijfers zijn het nummer van het document. Het koppelteken staat ertussen. Daarna voeren we de ontsmettingsoperatie uit.
We verzamelen de nummers van alle unieke documenten en genereren voor elk een pseudowillekeurige regel. Het formaat van de regel is 'XX-XXXXXXX', waarbij X het cijfer is in het bereik van 0 tot 9. Hier gebruiken we de eerder gemaakte scalaire functie [test].[GetRandString] om een pseudowillekeurige lijn van de opgegeven lengte te genereren volgens de parameters van de karakters.
Daarna wordt het veld [DocNumber] bijgewerkt in de kandidatentabel [dbo].[Werknemer].
We depersonaliseren het veld DocDate (de uitgiftedatum van de ID-kaart) en het veld BirthDate (de geboortedatum van de kandidaat).
Eerst selecteren we alle unieke paren gemaakt van "geboortedatum &datum van de ID-kaartuitgifte". For each such pair, we create a pseudorandom date for the date of birth. The pseudorandom date of the ID-card issue is made according to that “date of birth” – the date of the document’s issue must not be earlier than the date of birth.
After that, these data are updated in the respective fields of the candidates’ table [dbo].[Employee].
And, we update the remaining fields of the table.
The CountRequest value stands for the number of requests made for that candidate by companies during the resume search.
The PaymentAmount is the final amount of the resume promotion service fee paid. We calculate these numbers similarly to the previous fields.
Note that it generates a pseudorandom integer for the first case and a pseudorandom decimal for the second case. In both cases, the pseudorandom number generation occurs in the range of “two times less than original” to “two times more than original.” The selectivity of values in the fields is not changed too much.
After that, it writes the values into the fields of the candidates’ table [dbo].[Employee].
Further, we collect unique values of the RemoteAccessCertificate field for the remote access certificate. We generate a pseudorandom byte sequence for each such value. The length of the sequence must be the same as the original. Here, we use the previously created [test].[GetRandVarbinary] scalar function to generate the pseudorandom byte sequence of the specified length.
Then recording into the respective field [RemoteAccessCertificate] of the [dbo].[Employee] candidates’ table takes place.
The last step is the collection of the unique addresses from the [Address] field. For each value, we generate a pseudorandom line of the same length as the original. Note that if it was NULL originally, it must be NULL in the generated field. It allows you to keep NULL and don’t replace it with an empty line. It minimizes the selectivity values’ mismatch in this field between the production database and the altered data.
We use the previously created [test].[GetRandString] scalar function to generate the pseudorandom line of the specified length according to the characters’ parameters defined.
It then records the data into the respective [Address] field of the candidates’ table [dbo].[Employee].
This way, we get the full script for depersonalization and altering of the confidential data.
Finally, we get the database with altered personal and confidential data. The algorithms we used make it impossible to restore the original data from the altered data. Also, the values’ selectivity, length, and size aren’t changed significantly. So, the three criteria for the personal and secret data altering scripts are ensured.
We won’t review the criterion 4 separately here. Our database contains all the data subject to change in one candidates’ table [dbo].[Employee]. The data conformity is needed within this table only. Thus, criterion 4 is also here. However, we need to remember this criterion 4 claiming that all interrelations must remain the same in the altered data.
We often see other conditions for personal and confidential data altering algorithms, but we won’t review them here. Besides, the four criteria described above are always present. In many cases, it is enough to estimate the functionality of the algorithm suitable to use it.
Now, we need to make a backup of the created database, check it by restoring on another instance, and transfer that copy into the necessary environment for development and testing. For this, we examine the full database backup creation.
Full database backup creation
We can make a database backup with construction BACKUP DATABASE as in our example.
Make a compressed full backup of the database JobEmplDB_Test. The checksum calculation takes place in the file E:\Backup\JobEmplDB_Test.bak. Further, we check the backup created.
Then, we check the backup created by restoring the database for it. Let’s examine the database restoring.
Restoring the database
You can restore the database with the help of RESTORE DATABASE construction in the following way:
USE [master]
RESTORE DATABASE [JobEmplDB_Test]
FROM  DISK = N'E:\Backup\JobEmplDB_Test.bak' WITH  FILE = 1,
MOVE N'JobEmplDB' TO N'E:\DBData\JobEmplDB.mdf',
MOVE N'JobEmplDB_log' TO N'F:\DBLog\JobEmplDB_log.ldf',
NOUNLOAD,
REPLACE,
STATS = 5;
GO
We restore the JobEmplDB_Test database of the E:\Backup\JobEmplDB_Test.bak backup. The files will be overwritten, and the data file will be transferred into the file E:\DBData\JobEmplDB.mdf , while the transactions log file will be moved into F:\DBLog\JobEmplDB_log.ldf .
After we successfully check how the database is restored from the backup, we forward the backup to the development and testing environments. It will be restored again with the same method as described above.
We’ve examined the first approach to the data populating into the database for testing and development. This approach implies copying and altering the data from the production database. Now, we’ll examine the second approach – the synthetic data generation.
Synthetic data generation
The General algorithm for the synthetic data generation is following:
- Make a new empty database or clear a previously created database by purging all data.
- Create or renew a scheme in the newly created database – the same as that of the production databases.
- Copy of renew guidelines and regulations from the production database and transfer them into the new database.
- Generate synthetic data into the necessary tables of the new database.
- Make a backup of a new database.
- Deliver and restore the new backup in the necessary environment.
We already have the JobEmplDB_Test database to practice, and we have reviewed the means of creating a schema in the new database. Let’s focus on the tasks that are specific to this approach.
Clean up the database with the data purge
To clear the database off all its data, we need to do the following:
- Keep the definitions of all external keys.
- Disable all limitations and triggers.
- Delete all external keys.
- Clear the tables using the TRUNCATE construction.
- Restore all the external keys deleted in point 3.
- Enable all the limitations disabled in point 2.
You can save the definitions of all external keys with the following script:
1. The external keys’ definitions are saved in the tabulation variable @tbl_create_FK
2. You can disable the limitations and triggers with the following script:
EXEC sp_MSforeachtable "ALTER TABLE ? NOCHECK CONSTRAINT ALL";
EXEC sp_MSforeachtable "ALTER TABLE ? DISABLE TRIGGER ALL";
To enable the limitations and triggers, you can use the following script:
EXEC sp_MSforeachtable "ALTER TABLE ? WITH CHECK CHECK CONSTRAINT ALL";
EXEC sp_MSforeachtable "ALTER TABLE ? ENABLE TRIGGER ALL";
Here, we use the saved procedure sp_MSforeachtable that applies the construction to all the database’s tables.
3. To delete external keys, use the special script. Here, we receive the information about the external keys through the INFORMATION_SCHEMA.TABLE_CONSTRAINTS system presentation. We delete external keys through the cursor, one by one, using the formed dynamic script T-SQL, transferring the request into the system saved procedure sp_executesql .
4. To clear the tables with the TRUNCATE construction, use the dedicated script. The script works in the same way as above, but it receives the data for tables, and then it clears the tables one by one through the cursor, using the TRUNCATE construction.
5. Restoring the external keys is possible with the below script (earlier, we saved the external keys’ definitions in the tabulation variable @tbl_create_FK):
DECLARE @tsql NVARCHAR(4000);

DECLARE FK_Create CURSOR LOCAL FOR SELECT
	[Script]
FROM @tbl_create_FK;

OPEN FK_Create;

FETCH NEXT FROM FK_Create INTO @tsql;

WHILE (@@fetch_status = 0)
BEGIN
	EXEC sp_executesql @tsql = @tsql;
	FETCH NEXT FROM FK_Create INTO @tsql;
END

CLOSE FK_Create;
DEALLOCATE FK_Create;
The script works in the same way as the two other scripts we mentioned above. But it restores the external keys’ definitions through the cursor, one for each iteration.
A particular case of data purging in the database is the current script. To get this output, we need the below construction in the scripts:
EXEC sp_executesql @tsql = @tsql;Before this construction, or instead of it, we need to write the generated construction output. It is necessary to call it manually or via the dynamic T-SQL query. We do it via the system saved procedure sp_executesql.
Instead of the below code fragment in all cases:
WHILE (@@fetch_status = 0)
BEGIN
	EXEC sp_executesql @tsql = @tsql;
...

We write:

WHILE (@@fetch_status = 0)
BEGIN
	PRINT @tsql;

	EXEC sp_executesql @tsql = @tsql;
...
Or:
WHILE (@@fetch_status = 0)
BEGIN
	PRINT @tsql;
...
The first case implies both the output of constructions and their execution. The second case if for the output only – it is helpful for the scripts’ debugging.
Thus, we get the general database cleaning script.
Copy guidelines and references from the production database to the new one
Here you can use the T-SQL scripts. Our example database of the recruitment service includes 5 guidelines:
- [dbo].[Company] – companies
- [dbo].[Skill] – skills
- [dbo].[Position] – positions (occupation)
- [dbo].[Project] – projects
- [dbo].[ProjectSkill] – project and skills’ correlations
The “skills” table [dbo].[Skill] serves to show how to make a script for the data insertion from the production database into the test database.
We form the following script:
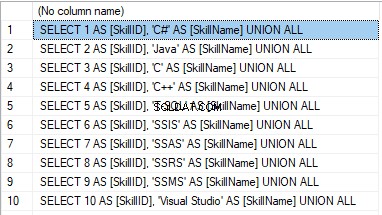
SELECT 'SELECT '+CAST([SkillID] AS NVARCHAR(255))+' AS [SkillID], '+''''+[SkillName]+''''+' AS [SkillName] UNION ALL'
  FROM [dbo].[Skill]
ORDER BY [SkillID];
We execute it in a copy of the production database that is usually available in read-only mode. It is a replica of the production database.
Het resultaat is:
Now, wrap the result up into the script for the data adding as here. We have a script for the skills’ guideline compilation. The scripts for other guidelines are made in the same way.
However, it is much easier to copy the guidelines’ data through the data export and import in SSMS. Or, you can use the data import and export wizard.
Generate synthetic data
We’ve determined the pseudorandom values’ generation for lines, numbers, and byte sequences. It took place when we examined the implementation of the data sanitization and the confidential data altering algorithms for approach 1. Those implemented functions and scripts are also used for the synthetic data generation.
The recruitment service database requires us to fill the synthetic data in two tables only:
- [dbo].[Employee] – candidates
- [dbo].[JobHistory] – a candidate’s work history (experience), the resume itself
We can fill the candidates’ table [dbo].[Employee] with synthetic data using this script.
At the beginning of the script, we set the following parameters:
- @count – the number of lines to be generated
- @LengthFirstName – the name’s length
- @LengthLastName – the last name’s length
- @StartBirthDate – the lower limit of the date for the date of birth
- @FinishBirthDate – the upper limit of the date for the date of birth
- @StartCountRequest – the lower limit for the field [CountRequest]
- @FinishCountRequest – the upper limit for the field [CountRequest]
- @StartPaymentAmount – the lower limit for the field [PaymentAmount]
- @FinishPaymentAmount – the upper limit for the field [PaymentAmount]
- @LengthRemoteAccessCertificate – the byte sequence’s length for the certificate
- @LengthAddress – the length for the field [Address]
- @count_get_unique_DocNumber – the number of attempts to generate the unique document’s number [DocNumber]
The script complies with the uniqueness of the [DocNumber] field’s value.
Now, let’s fill the [dbo].[JobHistory] table with synthetic data as follows.
The start date of work [StartDate] is later than the issuing date of the candidate’s document [DocDate]. The end date of work [FinishDate] is later than the start date of work [StartDate].
It is important to note that the current script is simplified, as it does not deal with parameters of the generated data selectivity configuration.
Make a full database backup
We can make a database backup with the construction BACKUP DATABASE, using our script.
We create a full compressed backup of the database JobEmplDB_Test. The checksum is calculated into the file E:\Backup\JobEmplDB_Test.bak. It also ensures further testing of the backup.
Let’s check the backup by restoring the database from it. We need to examine the database restoring then.
Restore the database
You can restore the database with the help of the RESTORE DATABASE construction, as shown below:
USE [master]
RESTORE DATABASE [JobEmplDB_Test]
FROM  DISK = N'E:\Backup\JobEmplDB_Test.bak' WITH  FILE = 1,
MOVE N'JobEmplDB' TO N'E:\DBData\JobEmplDB.mdf',
MOVE N'JobEmplDB_log' TO N'F:\DBLog\JobEmplDB_log.ldf',
NOUNLOAD,
REPLACE,
STATS = 5;
GO
We restore the database JobEmplDB_Test from the backup E:\Backup\JobEmplDB_Test.bak. The files are overwritten, and the data file is transferred to the file E:\DBData\JobEmplDB.mdf. The transaction log file is transferred to file F:\DBLog\JobEmplDB_log.ldf.
After checking the database restoring from the backup successfully, we transfer the backup to the necessary environments. It will be used for testing and development, and further deployment through the database restoring, as described above.
This way, we’ve examined the second approach to filling the database in with data for testing and development purposes. It is the synthetic data generation approach.
Data generation tools (for external resources)
When we have a job to fill in the database with data for testing and development purposes, it can be much faster and easier with the help of specialized tools. Let’s review the most popular and powerful data generation tools and explore their practical usage.
Full list of tools
DATPROF
IRI RowGen
Data Generator for SQL Server
Redgate SQL Data Generator
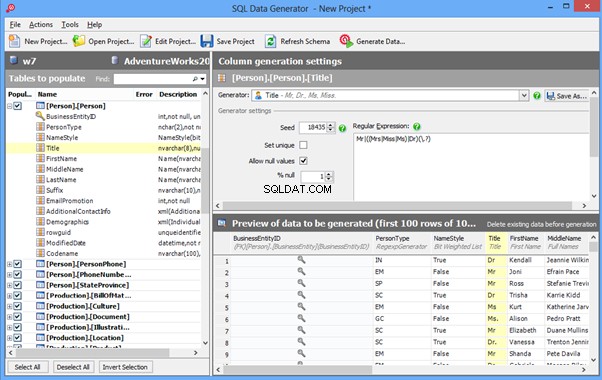
DTM Data Generator
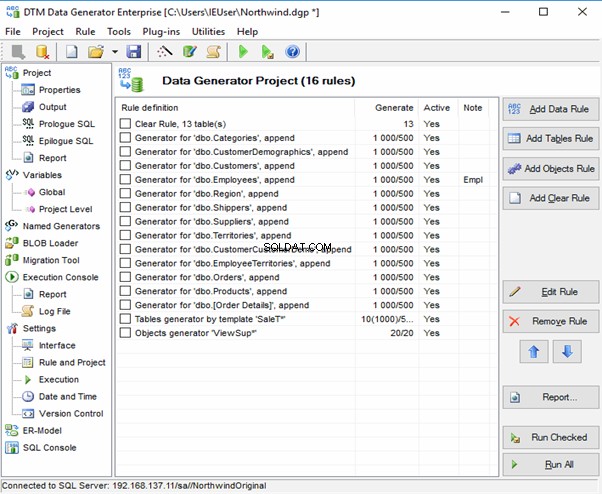
Datanamic Data Generator MultiDB
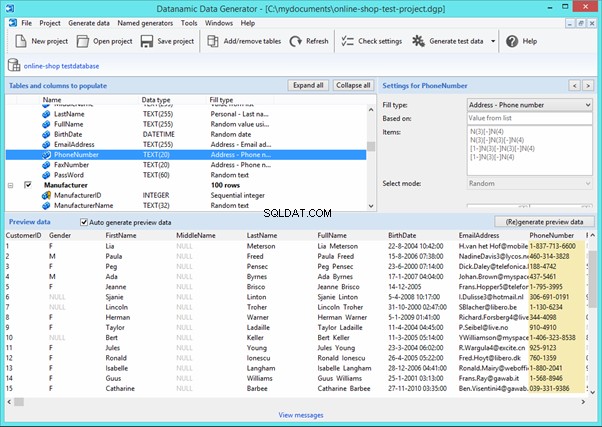
Now, let’s examine one of these tools more precisely.
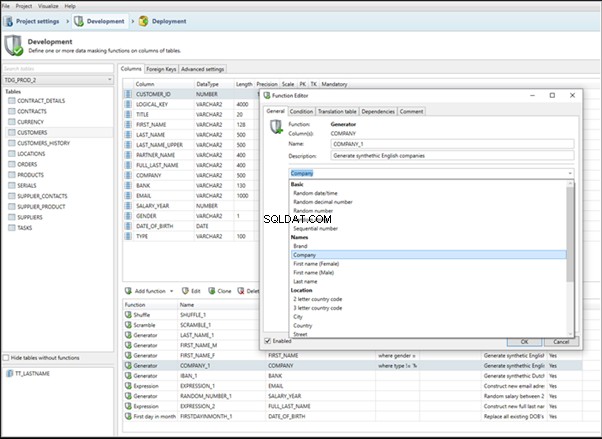
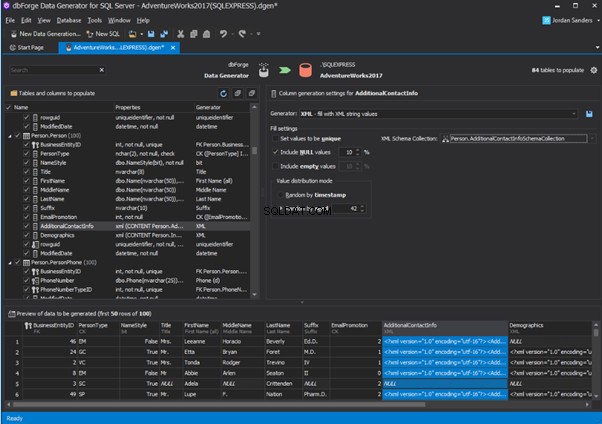
An overview of the employees’ generation by the Data Generator for SQL Server
The Data Generator for SQL Server utility is embedded in SSMS, and also it is a part of dbForge Studio. We reviewed this utility here. Let’s now examine how it works for synthetic data generation. As examples, we use the [dbo].[Employee] and the [dbo].[JobHistory] tables.
This generator can quickly generate first and last names of candidates for the [FirstName] and [LastName] fields respectively:
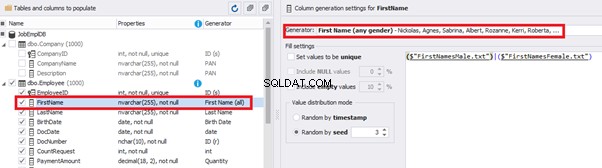
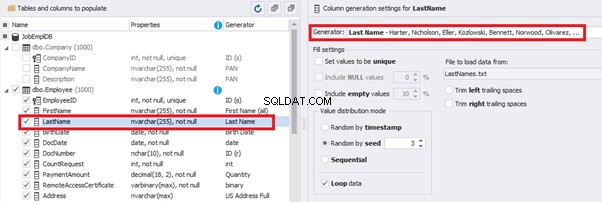
Note that FirstName requires choosing the “First Name” value in the “Generator” section. For LastName, you need to select the “Last Name” value from the “Generator” section.
It is important to note that the generator automatically determines which generation type it needs to apply to every field. The settings above were set by the generator itself, without manual correction.
You can configure distribution of values for the date of birth [BirthDate]:
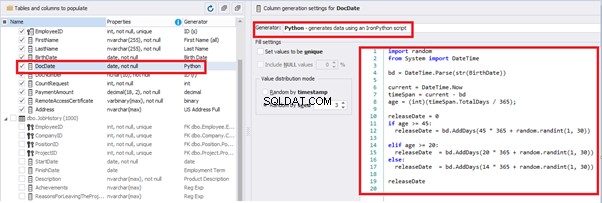
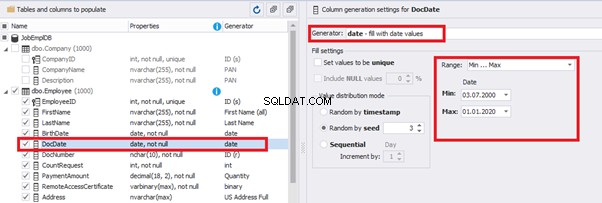
Set the distribution for the document’s date of issue [DocDate] through the Phyton generator using the below script:
import random
from System import DateTime
# receive the value from the Birthday field
bd = DateTime.Parse(str(BirthDate))
# receive the current date
current = DateTime.Now
# calculate the age in years
timeSpan = current - bd
age = (int)(timeSpan.TotalDays / 365);
# passport’s date of issue
releaseDate = 0
if age >= 45:
releaseDate = bd.AddDays(45 * 365 + random.randint(1, 30))
# randomize the issue during the month
elif age >= 20:
  releaseDate  = bd.AddDays(20 * 365 + random.randint(1, 30))
 # randomize the issue during the month
else:
  releaseDate  = bd.AddDays(14 * 365 + random.randint(1, 30))
# randomize the issue during the month
releaseDate
This way, the [DocDate] configuration will look as follows:
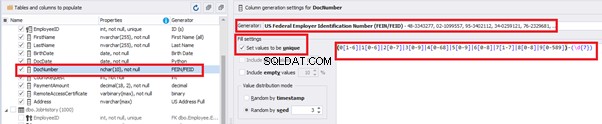
For the document’s number [DocNumber], we can select the necessary type of unique data generation, and edit the generated data format, if needed:
E.g., instead of the format
(0[1-6]|1[0-6]|2[0-7]|3[0-9]|4[0-68]|5[0-9]|6[0-8]|7[1-7]|8[0-8]|9[0-589])-(\d{7})We can set the following format:
(\d{2})-(\d{7})This format means that the line will be generated in format XX-XXXXXXX (X – is a digit in the range of 0 to 9).
We set up the generator for [CountRequest] and [PaymentAmount] fields in the same way, according to the generated data type:
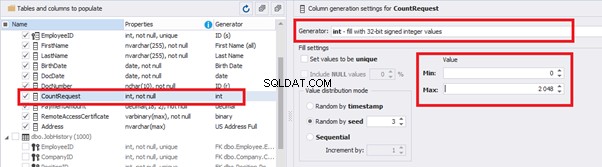
In the first case, we set the values’ range of 0 to 2048 for [CountRequest]. In the second case, it is the range of 0 to 100000 for [PaymentAmount].
We configure generation for [RemoteAccessCertificate] and [Address] fields in the same way:
In the first case, we limit the byte sequence [RemoteAccessCertificate] with the range of lengths of 16 to 32. In the second case, we select values for [Address] as real addresses. It makes the generated values looking like the real ones.
This way, we’ve configured the synthetic data generation settings for the candidates’ table [dbo].[Employee]. Let’s now set up the synthetic data generation for the [dbo].[JobHistory] table.
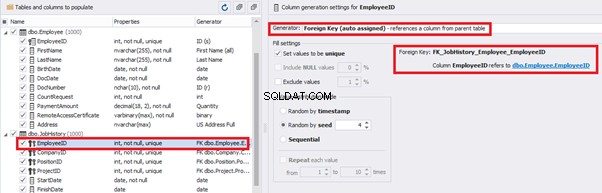
We set it to take the data for the [EmployeeID] field from the candidates’ table [dbo].[Employee] in the following way:
We select the generator’s type from the table or presentation. We then define the sample of MS SQL Server, the database, and the table to take the data from. We can also configure filters in the “WHERE filter” section, and select the [EmployeeID] field.
Here we suppose that we generate the “employees” first, and then we generate the data for the [dbo].[JobHistory] table, basing on the filled [dbo].[Employee] reference.
However, if we need to generate the data for both [dbo].[Employee] and [dbo].[JobHistory] at the same time, we need to select “Foreign Key (manually assigned) – references a column from the parent table,” referring to the [dbo].[Employee].[EmployeeID] column:
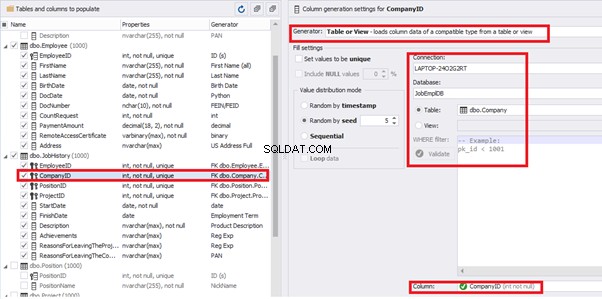
Similarly, we set up the data generation for the following fields.
[CompanyID] – from [dbo].[Company], the “companies” table:
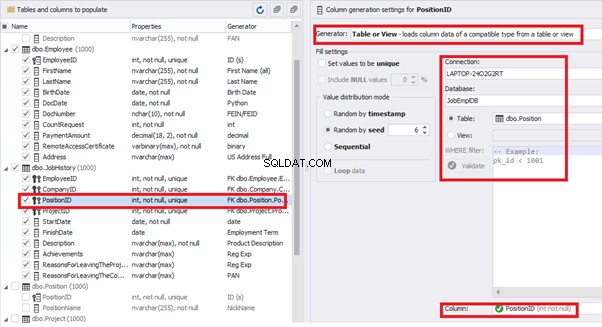
[PositionID] – from the table of positions [dbo].[Position]:
[ProjectID] – from the table of projects [dbo].[Project]:

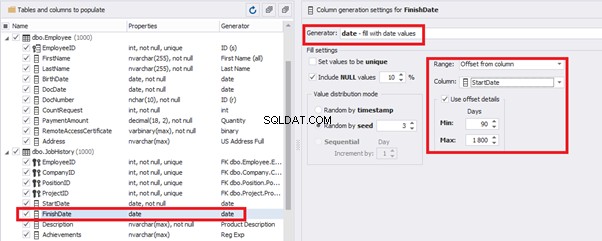
The tool cannot link the columns from different tables and shift them in some way. However, the generator can shift the date within one table – the “date” generator – fill with date values with Range – Offset from the column. Also, it can use data from a different table, but without any transformation (Table or View, SQL query, Foreign key generators).
That’s why we resolve the dates’ problem (BirthDate
E.g., we limit the BirthDate with the 40-50 years’ interval. Then, we restrict the DocDate with 20-40 years’ interval. The StartDate is, respectively, limited with 25-35 years’ interval, and we set up the FinishDate with the offset from StartDate.
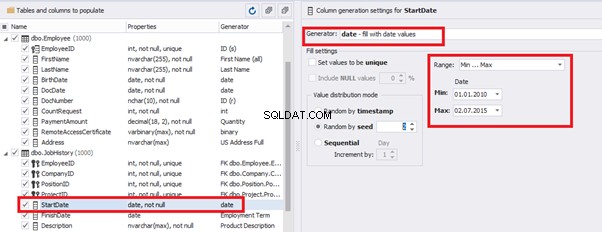
We set up the date of birth:
Set up the date of the document’s issue
Then, the StartDate will match the age from 35 to 45:
The simple offset generator sets FinishDate:
The result is, a person has worked for three months till the current date.
Also, to configure the date of the working end, we can use a small Python script:
This way, we receive the below configuration for the dates of work end [FinishDate] data generation:
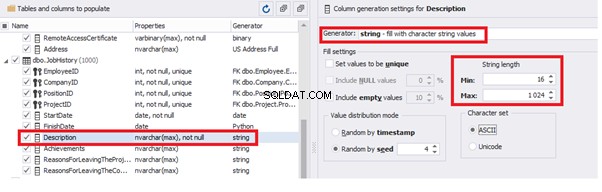
Similarly, we fill in the rest of fields. We set the generator type – string, and set the range for generated lines’ lengths:
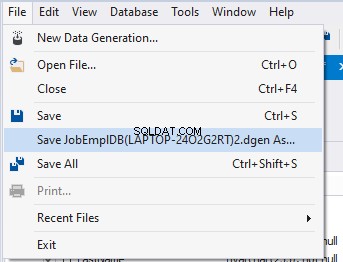
Also, you can save the data generation project as dgen-file consisting of:
We can save all these settings:it is enough to keep the project’s file and work with the database further, using that file:
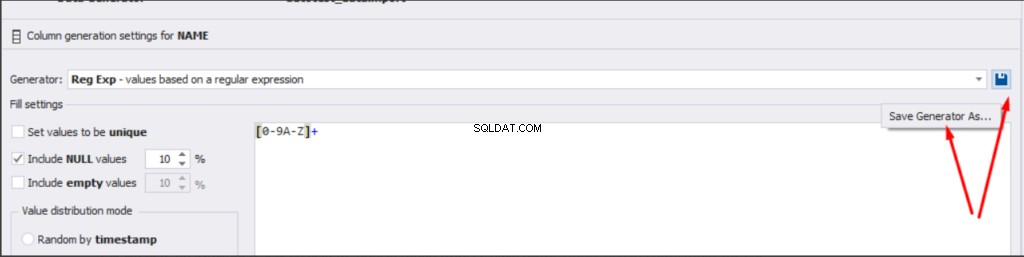
There is also the possibility to both save the new generators from scratch and save the custom settings in a new generator:
Thus, we’ve configured the synthetic data generation settings used for the jobs’ history table [dbo].[JobHistory].
We have examined two approaches to filling the data in the database for testing and development:
We’ve defied the objects for each approach and each script implementation. These objects are here. We’ve also provided scripts for changing the data from the production database and synthetic data generation. An example is the database of recruitment services. In the end, we’ve examined popular data generation tools and explored one of these tools in detail.
SQL SERVER – How to Disable and Enable All Constraint for Table and Database 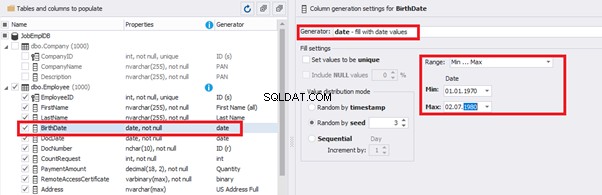
import random
from System import DateTime

bd = DateTime.Parse(str(StartDate))

releaseDate = bd.AddDays(random.randint(1, 30))

releaseDate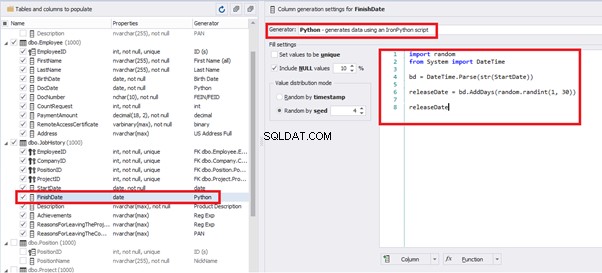
Conclusion
References
Microsoft TechNet Wiki
Top 10 Best Test Data Generation Tools In 2020
SQL Server Documentation